Pantry Organization Ideas that Actually Work
A messy pantry doesn’t just waste space, it quietly wastes time, money, and food.
The good news is you don’t need a full makeover to fix it. With the right pantry organization ideas, small changes can shift how your whole kitchen works.
Today, I’ll walk you through a clear way to reset your shelves, choose what actually helps, and keep things from slipping back into chaos. You’ll see how to match your setup to your daily habits, not some perfect picture online.
Why Pantry Clutter Builds Up
Nobody wakes up one morning and decides to make a mess of their pantry. It happens slowly, a bag at a time, until one day you open the door and can’t find the rice. Once you know how it builds, it’s a lot easier to stop.
- Grocery trips pile up fast: Fresh crackers get shoved in front of the half-eaten box from last week. After a few rounds, older items get buried, stale, and forgotten.
- Good intentions fall apart: You plan to stay organized, but busy days and one messy grocery run can throw everything off within a week.
- Random stacks make a visual mess: Half-open chip bags, loose granola bars, and random packets create clutter. A full pantry can still feel calm, but not when items compete for space.
- No zones means no focus: When pasta, cereal, and soup sit together, it becomes harder to find things. Clear zones help your brain locate items faster without searching.
Start Here: Empty and Reset Your Pantry First
Before you measure a single shelf or buy a bin, pull everything out. This step makes the rest actually work.
Take everything off the shelves and group it on the counter or table. You’ll see what you have, what’s expired, and what you forgot about.
- Toss expired food: Check dates and be honest about what you won’t use
- Set aside duplicates: Put extras in one spot so you stop overbuying
- Wipe everything down: Shelves, corners, and sticky spots
- Sort into rough groups: Snacks, baking, canned goods, breakfast
Starting with a clean slate makes every step after this easier and faster.
Step 1: Plan Your Pantry Before You Buy Anything

Oh, we’ve all done it. You get excited, run to the store, and come home with a stack of bins that don’t quite fit the shelves. I did the same thing on my first try and ended up returning half of them. Grab a tape measure and sit with your pantry for ten minutes before you spend a dime.
Measure Your Pantry Space
Pull out the tape measure and jot down three numbers for every shelf. You want the width from one wall to the other, the depth from front to back, and the height between shelves.
- Shelf width and depth
- Total height between shelves
- Odd corners, gaps, or deep spots
Don’t skip the funny little spots. That deep corner where things go to die, the short gap above the top shelf, the sliver near the door. Those are the places a narrow basket or small rack can really earn its keep.
Measure What You Use
Your pantry should fit how you actually cook and snack, not somebody else’s pretty photo online. Take a quick peek at what lands in your cart most weeks.
- What you buy most often, like cereal, pasta, snacks, and spices
- Bulk items versus everyday staples
- Items that need airtight storage versus loose ones
If you bake every Sunday, you’ll want more jars on hand. If the kids snack their way through the week, plan a snack bin they can reach without climbing the shelves.
Make a Simple Sketch
Write down the shelf measurements and block out where each group of food will live.
Baking stuff together, cans in one spot, snacks somewhere easy to grab.
Moving things around on paper is a lot easier than hauling heavy bins back and forth later. Keep that little sketch close by and change it as you go.
Step 2: Pick and Buy the Right Containers
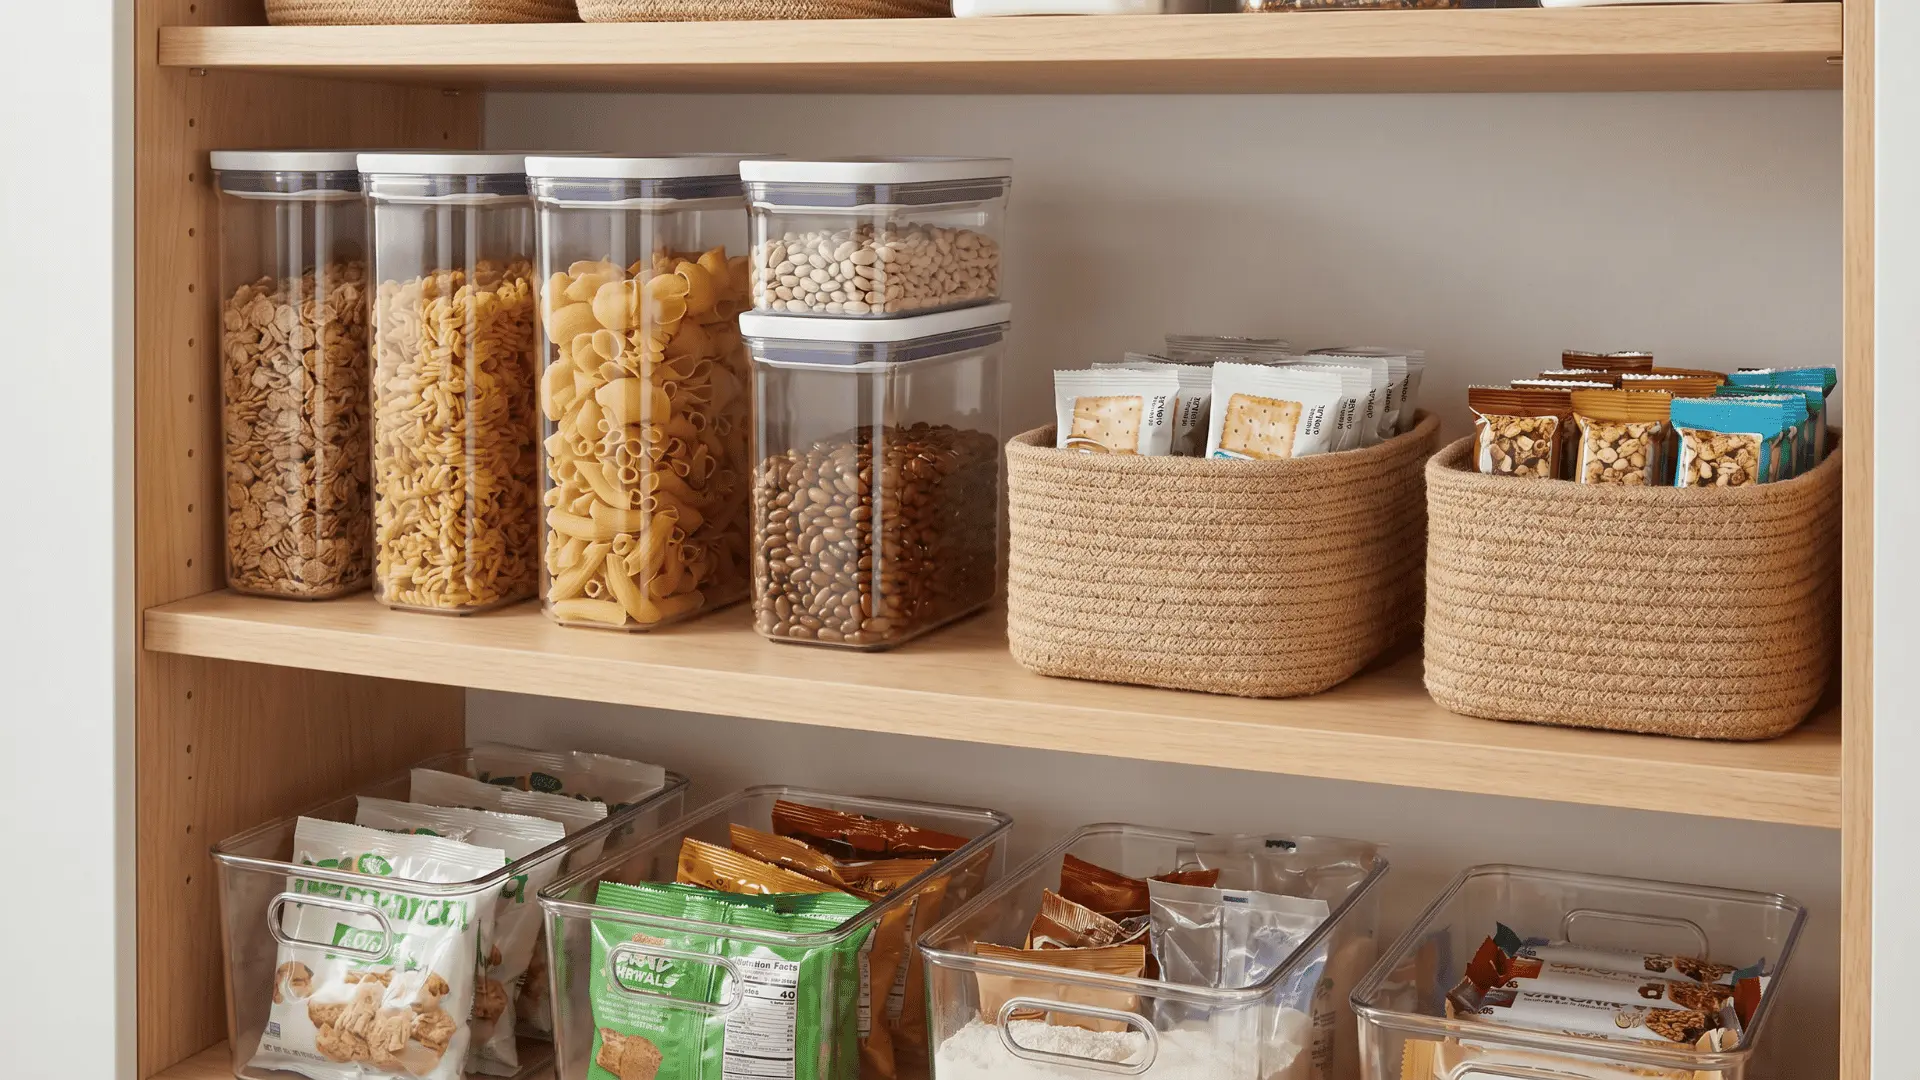
Those matching container sets look so pretty stacked on a shelf, but half of them end up in the back of a cabinet because they don’t fit anything you actually eat. You don’t need the whole set. You need the right pieces for your food and your space.
Container Types to Know
A little mix of styles works better than a matching lineup. Here’s a quick look at what does what.
| Container Type | Best For | Why It Works |
|---|---|---|
| Airtight Pop-Top Containers | Flour, sugar, cereal, pasta, rice | Keeps food fresh, clean look |
| Open Plastic Bins | Snack packets, small jars, seasoning mixes | Easy to pull out and put back |
| Jute Baskets | Bulk items, drinks, rarely used goods | Hides clutter, adds warmth |
One small shift that makes a big difference is using clear containers for everyday staples.
When you can see how much rice, flour, or cereal is left, you stop guessing at the store. It also cuts down on duplicate buys and food waste.
- Visibility: You know what’s running low without opening lids
- Consistency: Same-size containers stack better and waste less space
- Quick checks: One glance tells you what to restock
You don’t need everything in clear bins. Just start with the items you use every week.
Buy Only the Sizes You Need
Full container sets are a trap. Buy single pieces as you go, so you don’t end up with two huge ones you’ll never fill and none of the medium size you really wanted.
- Single pieces that fit your food and space
- Sales at Target, IKEA, and The Container Store
Keep an eye on the clearance aisle too. That’s where I’ve found some of my favorite pieces for half the price.
Repurpose Clear Containers You Already Have
Before you spend a dime, look around your kitchen. You probably have plenty of good containers doing nothing. A quick wash and a fresh label, and you’re set, for example:
- Takeout quart containers for grains and dry goods
- Washed-out sauce jars for spices and seeds
- Plastic Costco snack tubs for bulk packets
- Glass pasta jars for rice or lentils
Step 3: Arrange Shelves and Make the Most of Every Inch
Think about how you move around your kitchen each morning. The stuff you reach for without thinking should be front and center, and the stuff you barely touch can hide out up top.
Once it’s arranged this way, a few simple tricks help you fit even more without the shelves looking packed.
| Shelf Spot | What Goes There | Why It Works |
|---|---|---|
| Eye-Level Shelf | Cereal, coffee, pasta, and everyday snacks | Prime real estate for what you grab daily without looking |
| Waist-Level Shelf | Granola bars, fruit pouches, crackers, kids’ snacks | Little ones can help themselves without climbing |
| Lower Shelves | Big rice bags, cases of drinks, and family-size flour | Heavy stuff stays low, saves your back and your toes |
| Top Shelf | Backup sauces, holiday bakeware, that fancy platter from your aunt | Once-a-year items rest quietly up top |
| Floor | Oil bottles, cases of soda, paper goods | Giant items tucked in a bin or tray stay neat |
Think of this part as small upgrades that make your shelves work harder without adding bulk. Each one uses space that usually goes unused, so you can store more without making things feel crowded.
Make Every Inch Work (Smart Space Tricks for Any Pantry Size)
These quick tweaks help you use space better without making shelves feel packed. Focus on stacking smart, improving access, and cutting clutter.
- Go Vertical with Shelf Risers: Add a second level so items at the back stay visible. Great for cans and spice jars. Doubles shelf space.
- Use Under-Shelf Baskets: Hook them under shelves to use empty space. Works well for flat items like packets and pouches.
- Choose Narrow, Pull-Out Bins: Slim bins fit tight spots and slide out easily. Nothing gets lost in the back.
- Add Wheels to Heavy Bins: Roll out flour, rice, or pet food instead of lifting. Easier and safer.
- Use Hooks on Side Walls: Turn empty walls into storage for bags, aprons, or measuring cups.
- Keep a Grab-and-Go Basket: Use a mesh basket for onions, garlic, and potatoes. Keeps them visible and easy to grab.
- Use Turntables (Lazy Susans): Spin to reach oils, sauces, spreads, and small jars. No digging, better visibility, and perfect for deep or corner shelves.
- Limit Backstock: Keep one backup only. Stops shelves from getting crowded.
- Store Rarely Used Items Elsewhere: Move extras or occasional items out of the pantry.
- Keep It Simple: Fewer categories are easier to manage and maintain.
A small pantry works best when it holds only what you use every week.
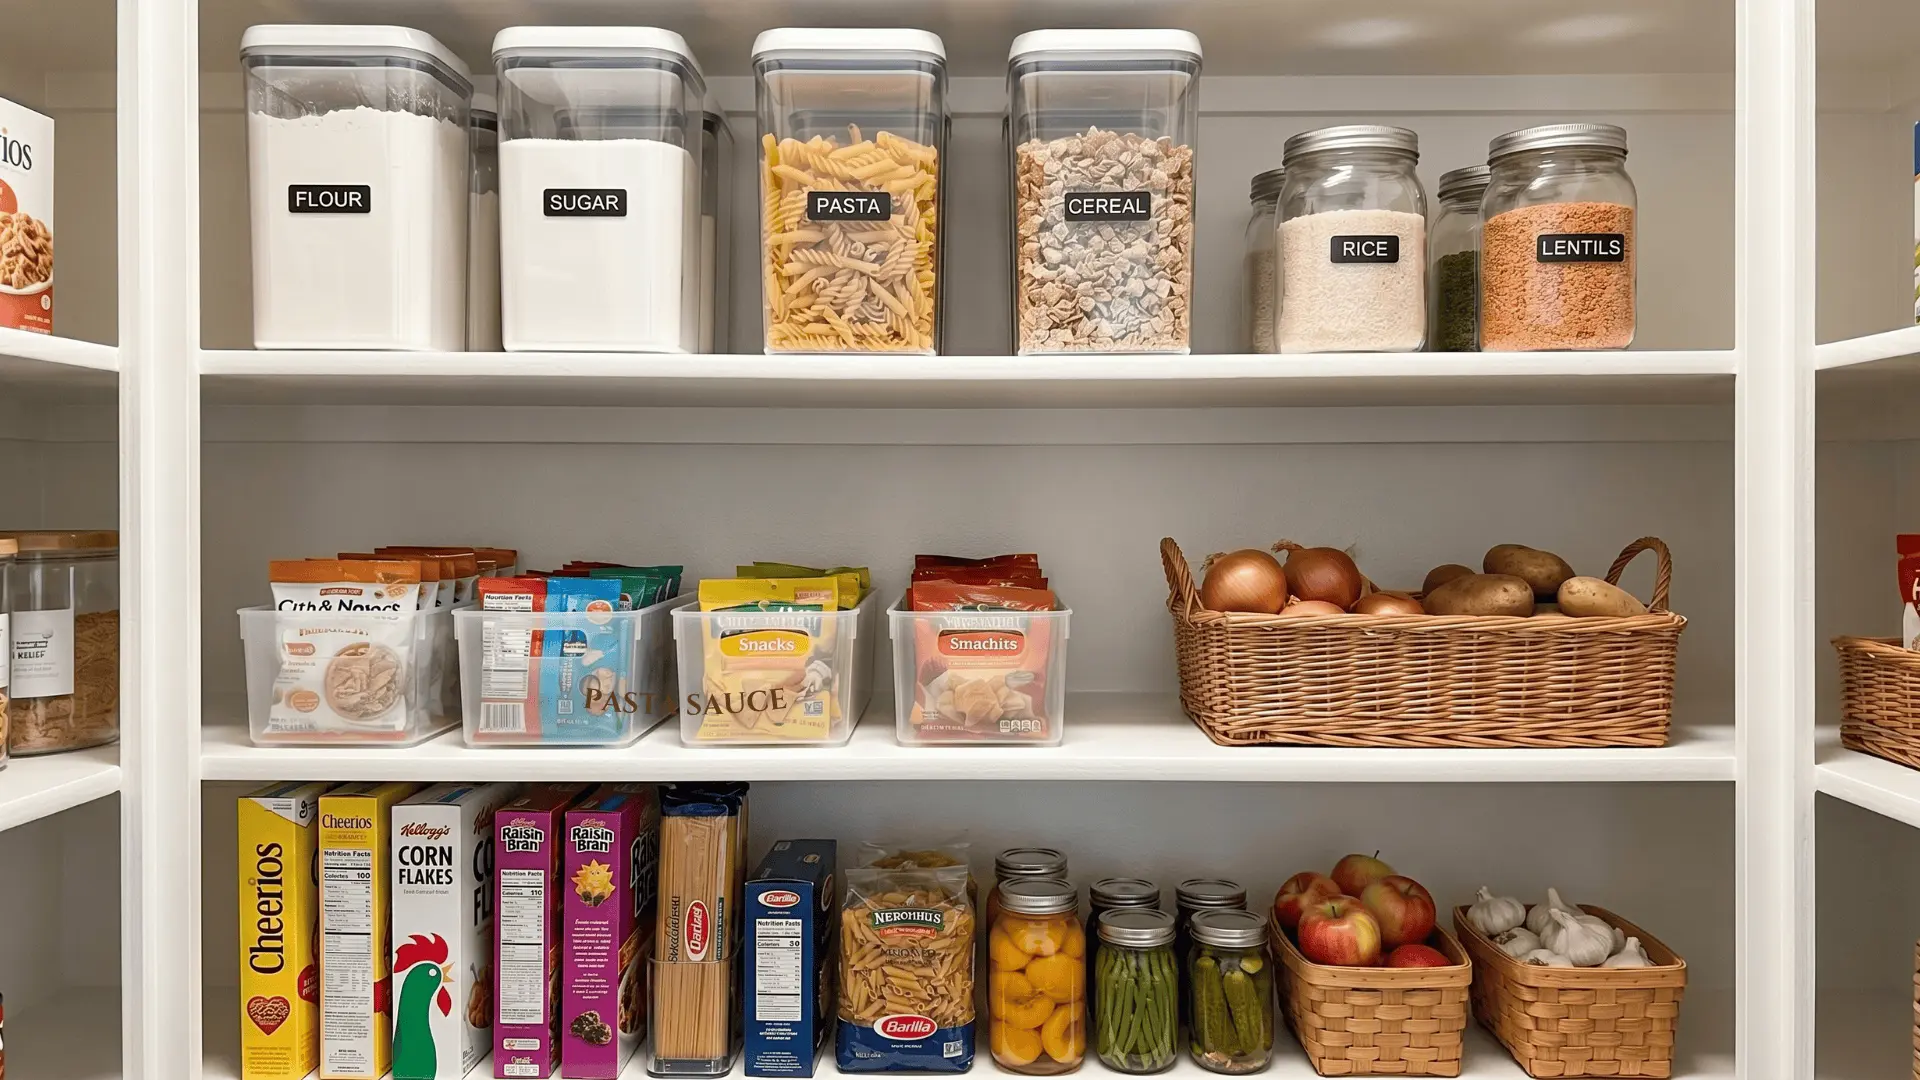
Step 4: Group Similar Items Together
Here’s the trick that finally stopped me from buying a fourth jar of peanut butter when I already had three. Group like with like, and your pantry practically runs itself.
| Zone | What Goes In |
|---|---|
| Pasta Corner | Spaghetti, penne, macaroni, lasagna sheets |
| Canned Goods | Beans, soups, tomatoes, tuna |
| Baking Zone | Flour, sugar, chocolate chips, baking powder |
| Breakfast Spot | Cereal, oats, pancake mix, honey |
| Snack Bin | Chips, crackers, granola bars, trail mix |
Grouping works best when you keep a simple rule in mind: one home per item.
Every item should live in the same spot every time you put it back. That’s what stops clutter from creeping back in.
- Return items right away: Don’t leave things on the counter “for later”
- Keep backups behind or below: So you use the older one first
- Avoid overflow zones: If a section is full, remove something before adding more
When everything has a fixed place, your pantry stays organized without much effort.
Step 5: Label Everything Clearly
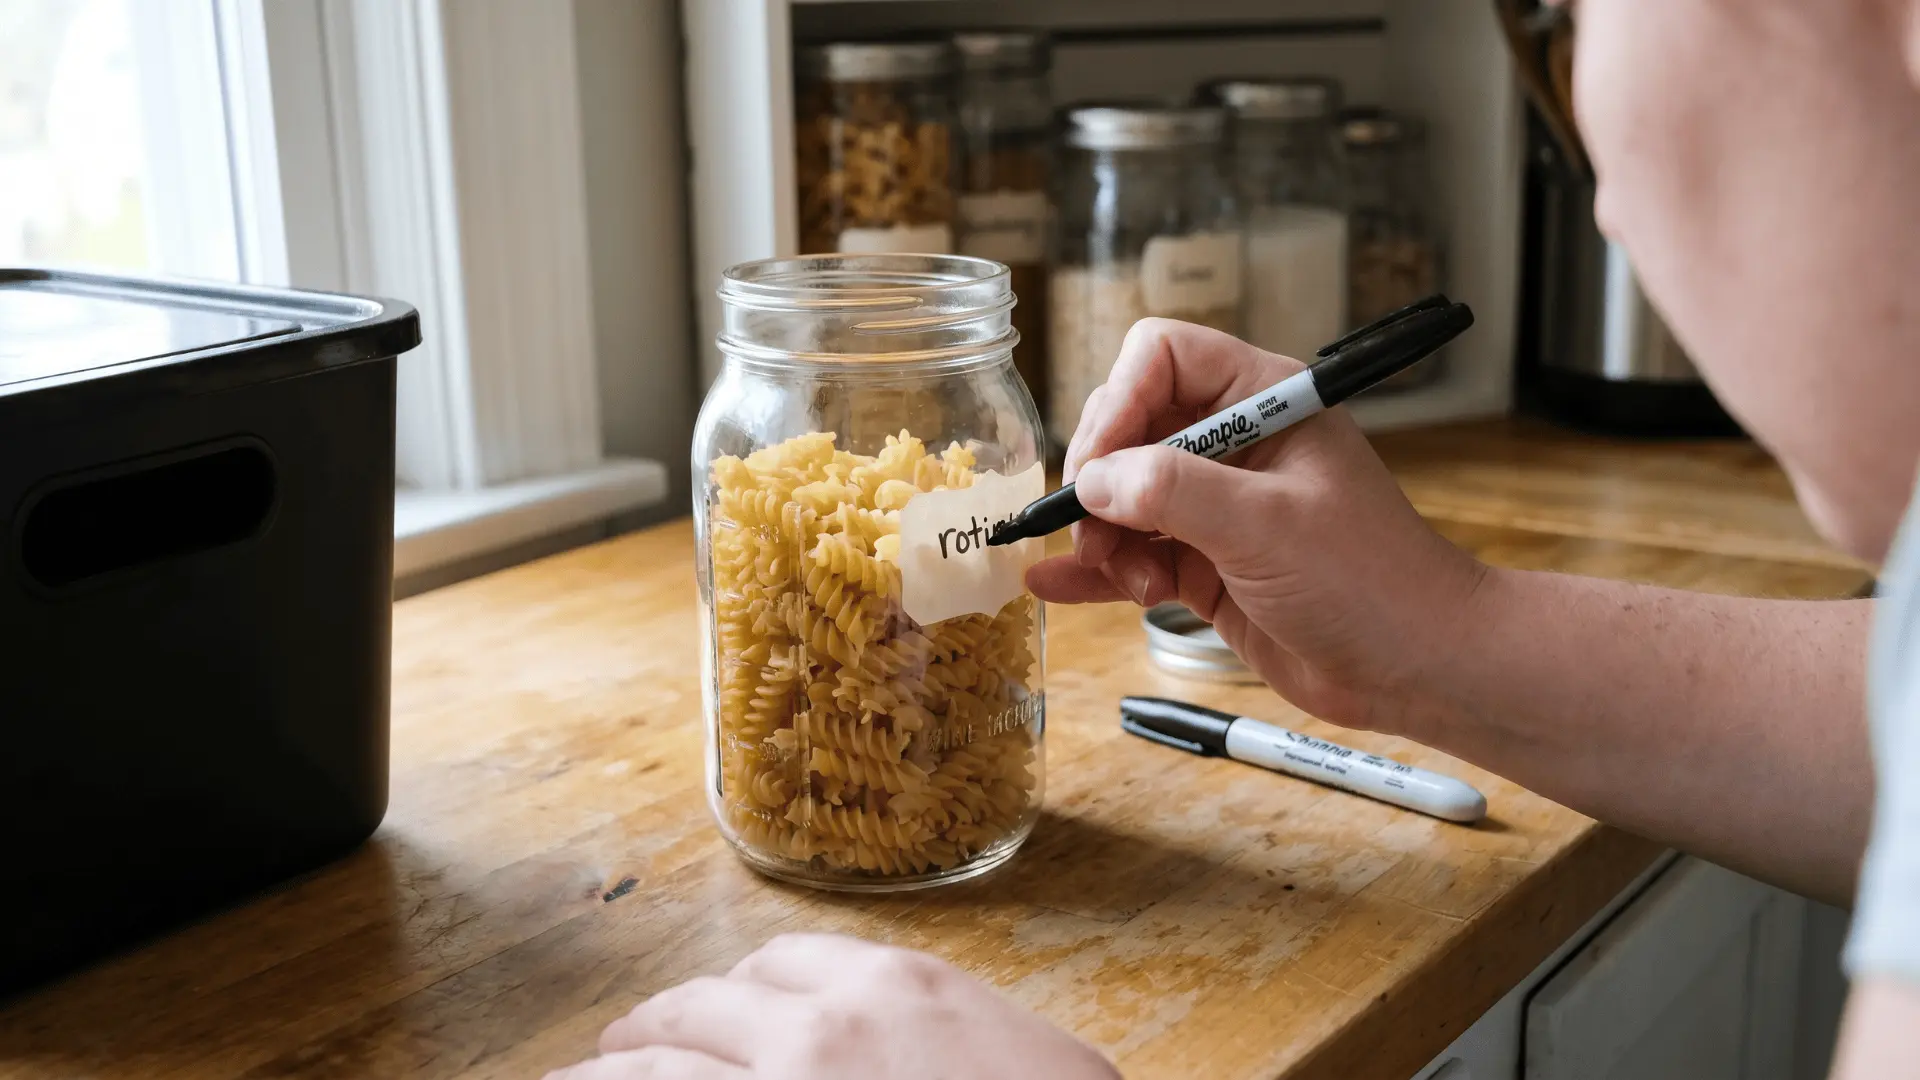
Labels are what keep this whole system from falling apart three weeks in. Without them, someone pours rice into the flour jar, and you’re making gritty pancakes on a Sunday morning. Ask me how I know.
Keep It Simple
You don’t need a fancy label maker or chalkboard stickers. A strip of Scotch tape and a Sharpie do the job.
This is all you need:
- Item name, so no one is guessing what’s in the jar
- Expiration date from the original package
- Date you opened it, especially for oils and flours
I stick mine on the front where I can see them without turning the jar. Plain, boring, and it works.
Sharpie Tricks that Actually Stick
Skip the fancy label maker and grab two Sharpies instead. A regular black one for clear glass jars, since the ink shows up against the rice or pasta inside.
A white oil-based one for dark bins, opaque containers, or chalkboard labels.
Both wipe clean with a little rubbing alcohol when you swap contents, so you never end up scraping off sticky labels.
Two pens, five bucks total, and your whole pantry stays readable.
Make Labels Everyone Can Read
Your labels have to work for the whole house, not just you. If your husband can’t tell the cumin from the cinnamon, you’re still the one running to the kitchen every five minutes.
Write big and clear. Skip the cursive. If grandma is babysitting or your kid is old enough to pack a lunch, they should be able to read the jar from an arm’s length away.
Step 6: Maintain Your Pantry System
All that work you just did? It stays pretty if you give it ten minutes a week. Let it slide, and within a month, you’re back to shoving cereal next to the beans. A short check every week and a real tidy once a month does the trick.
Track What You Have
One extra habit that keeps your pantry under control is knowing what you already have before you shop.
You don’t need an app or anything fancy. Just a quick check before grocery runs.
- Scan shelves before shopping: Take 60 seconds to look through each zone
- Keep a simple list: Write down low items as you notice them during the week
- Avoid buying duplicates: Especially for things you already have backups of
This one habit saves money and keeps clutter from building up again.
Weekly Pantry Check
Pick a quiet day that already fits your routine. Sunday afternoon works well right before making a grocery list.
- Put items back: Return anything sitting out to its proper spot
- Scan for mess: Check shelves for spills, crumbs, or loose packets
- Note low items: Keep track of what’s running out
- Update your list: Add low items to your grocery list
- Rotate stock: Move older items to the front so they get used first
Monthly Pantry Reset
Once a month, take a little more time to clean and reset. It helps avoid a bigger mess later.
- Check expiration dates: Go through every item carefully
- Toss unused food: Get rid of anything expired or stale
- Wipe surfaces: Clean shelves, bins, and containers
- Refresh labels: Fix anything faded or outdated
- Fix messy zones: Reset any section that’s slipping
- Adjust layout: Update zones if your routine has changed
Conclusion
Getting your pantry in order is less about perfection and more about control. Once you set up simple zones, use containers that fit your habits, and stay consistent with quick check-ins, things stop piling up again.
These pantry organization ideas work because they focus on what you actually use, not what looks good for a day. Over time, you’ll notice faster grocery trips, fewer duplicates, and less food going to waste.
Start small, stay steady, and build from there. Pick one shelf today, reset it properly, and see how quickly the rest begins to follow.
Frequently Asked Questions
What is the First Step to Organizing a Pantry?
Start by emptying everything out. Toss expired items, wipe the shelves clean, and sort what’s left into groups before anything goes back in.
How Do You Organize a Small Pantry?
Use vertical space. Add shelf risers, door hooks, and stackable bins. Keep only what you actually eat, and store backup stock somewhere else.
What Should Not Be Stored in A Pantry?
Skip anything that needs refrigeration, like eggs or soft cheese. Avoid cut produce, opened bags without clips, and items that trap moisture or heat.
Should You Decant Food Into Containers?
Decant staples you use often, like flour, rice, and cereal. Skip decanting things you finish in a week, since the extra step isn’t worth it.
How Often Should You Clean out Your Pantry?
Do a quick tidy every week and a deeper clean once a month. Check expiration dates and wipe down shelves during the monthly reset.