
How to Recane a Chair: Step-by-Step Guide for Beginners
Want to give new life to an old chair? Recaning is a great way to fix up worn-out seats.
This guide will walk you through how to recane a chair, even if you’ve never done it before.
I’ll cover everything that you need to get started, how to remove old caning, steps to weave new cane, and tips to make your project look great.
By the end, you’ll know how to recane a chair like a pro.
It might take some practice, but you’ll save money and learn a useful skill.
Ready to start your recaning project?
Let’s dive in and learn how to bring that old chair back to its former glory!
Understanding Chair Caning
What is Chair Caning?
Chair caning is a technique used to create or repair woven chair seats. It involves weaving strands of cane material in a specific pattern to form a sturdy and comfortable seating surface.
This method has been used for centuries and is still popular for fixing antique chairs or creating new ones with a classic look.
Different Types of Chair Cane
There are two main types of chair cane:
1. Hand-woven cane:
This method involves weaving individual strands of cane by hand.
Pros:
- Gives a more authentic, traditional look
- Allows for custom patterns
- Can be more long-lasting if done correctly
Cons:
- Takes more time and skill
- Can be more expensive
2. Pre-woven cane webbing:
This is a ready-made sheet of woven cane.
Pros:
- Faster and easier to install
- Good for beginners
- Often less expensive
Cons:
- May not look as authentic
- Limited pattern options
Hand-woven cane is often better for antique or high-value chairs, while pre-woven webbing works well for simpler or modern chairs.
Choosing the Right Method
When deciding which caning method to use, think about:
- Your skill level: If you’re new to caning, pre-woven webbing might be easier.
- The type of chair: Antique or valuable chairs often benefit from hand-woven cane.
- Time available: Hand-weaving takes longer than using pre-woven webbing.
- The look you want: Hand-woven cane offers a more traditional appearance.
By thinking about these factors, you can choose the caning method that’s best for your chair and your abilities.
Preparing the Chair for Recaning
Before you start recaning your chair, you need to properly prepare it. This section will guide you through removing the old cane and checking the chair for any issues that need fixing before you begin the recaning process.
Removing the Old Cane
To start, you need to figure out what type of cane your chair has:
- Hand-woven cane looks like a woven pattern of individual strands.
- Pre-woven cane appears as a single sheet with a uniform pattern.
Once you’ve identified the type, follow these steps to remove the old cane:
- Use pliers to pull out the old cane. Be gentle to avoid damaging the chair frame.
- For pre-woven cane, look for staples or glue holding it in place. Remove these carefully.
- Scrape off any leftover bits of cane using a putty knife or sandpaper.
- Clean the seat frame by wiping it down with a damp cloth.
- Sand down any rough spots in the frame to make it smooth for the new cane.
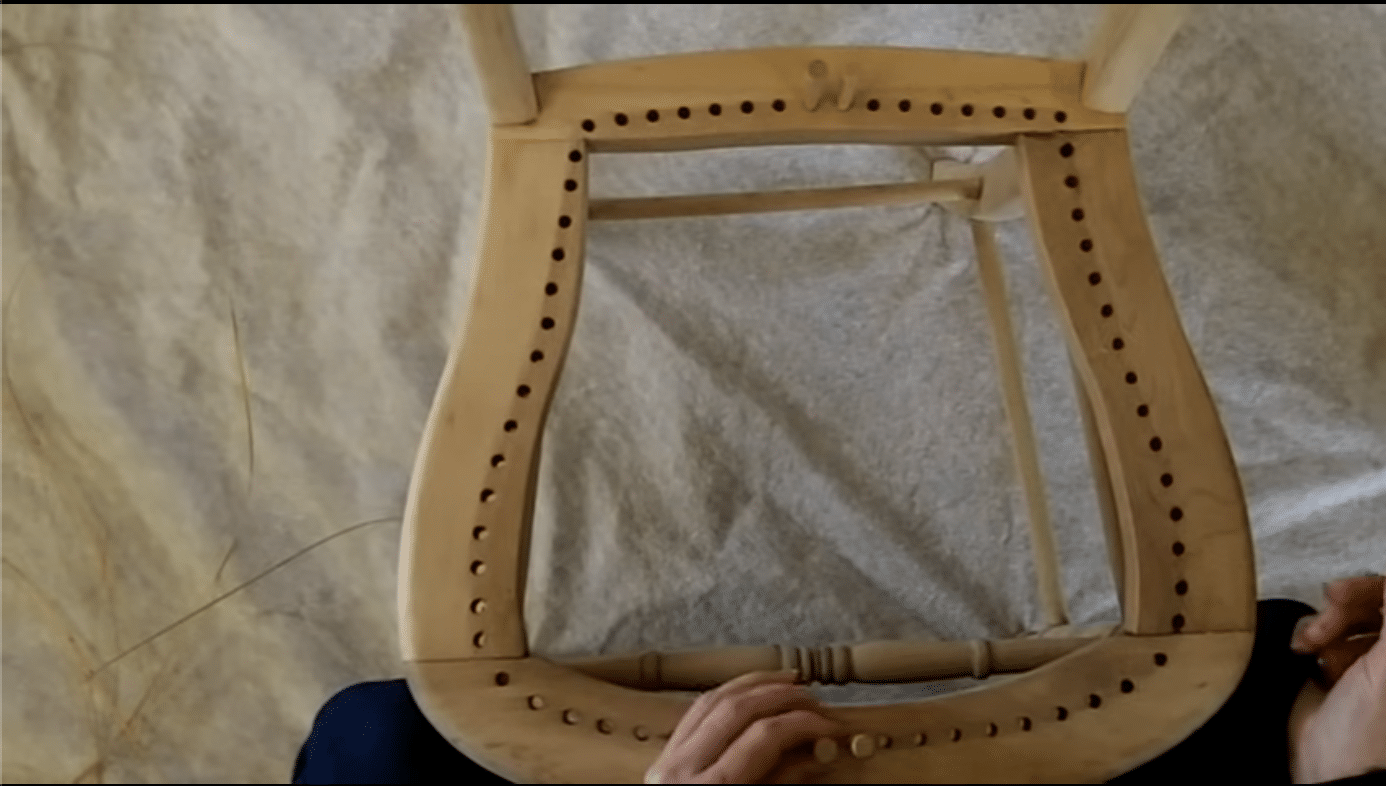
Inspecting the Seat Frame
After removing the old cane, it’s important to check the chair frame:
1. Look closely at the frame for any damage like:
- Splits in the wood
- Cracks
- Loose joints
2. If you find minor damage:
- Use wood glue to fix small splits or cracks.
- Tighten any loose screws or nails.
- For bigger issues, you might need to ask a professional for help.
3. Make sure the frame is sturdy before you start recaning.
By taking these steps to prepare your chair, you’ll have a better base for your new cane, which can help your recaning job last longer and look better.
Tools and Materials Needed
Before you start recaning your chair, you’ll need to gather the right tools and materials. The items you need will depend on whether you’re using the hand-weaving method or pre-woven cane webbing. Having everything ready before you begin will make your project go more smoothly.
For Hand-Weaving Method:
For hand-weaving, you’ll need:
- Cane strips
- Awl
- Pegs or wedges
- Caning needle
- Water basin
- Hammer
- Chair clamps
- Scissors or shears
- Measuring tape or rule
- Beeswax
For Pre-Woven Cane Webbing Method:
If you’re using pre-woven cane webbing, gather these items:
- Pre-woven cane webbing
- Wooden splin
- Spline chisel or knife
- Rubber mallet
- White glue or caning glue
- Measuring tape or rule
- Scissors
- Clamps
- Water basin
Step-By-Step Guide to Recane a Chair
Hand Weaving Method
Step 1: Soak the Cane

- Put 3-5 cane strands in room-temperature water.
- Don’t use hot or cold water. Hot water can make the cane’s tiny hairs stick up, while cold water might make it break.
- Soak until the cane is bendable, but not for too long. If left in water too long, the cane can turn an unattractive gray color.
Step 2: Prepare the Chair
- Use a sharp tool (awl) to find the middle holes on the front and back of the chair.
- Put the cane through the middle hole. Make sure the shiny side is facing up.
- Hold the cane in place with a peg. Leave about 3 inches of cane hanging under the seat.
Step 3: Weaving the First Set of Vertical Strands
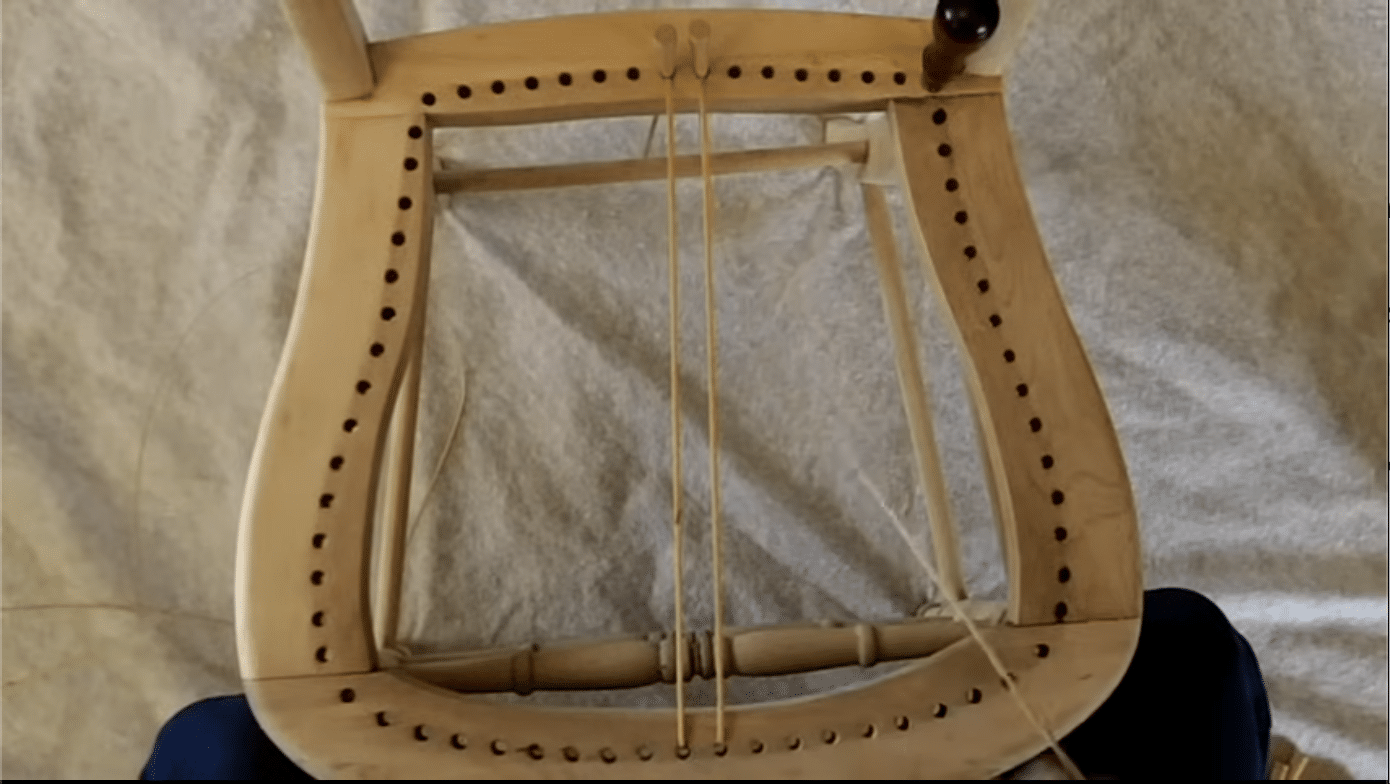
- Push the cane through the matching hole on the other side of the chair.
- Pull the cane so it’s snug but not too tight. It should lie flat on the bottom.
- Keep threading the cane through each hole, going back and forth between front and back.
- If the front and back have different numbers of holes, skip some side holes to keep the weave even.
Step 4: Weaving the Horizontal Strands
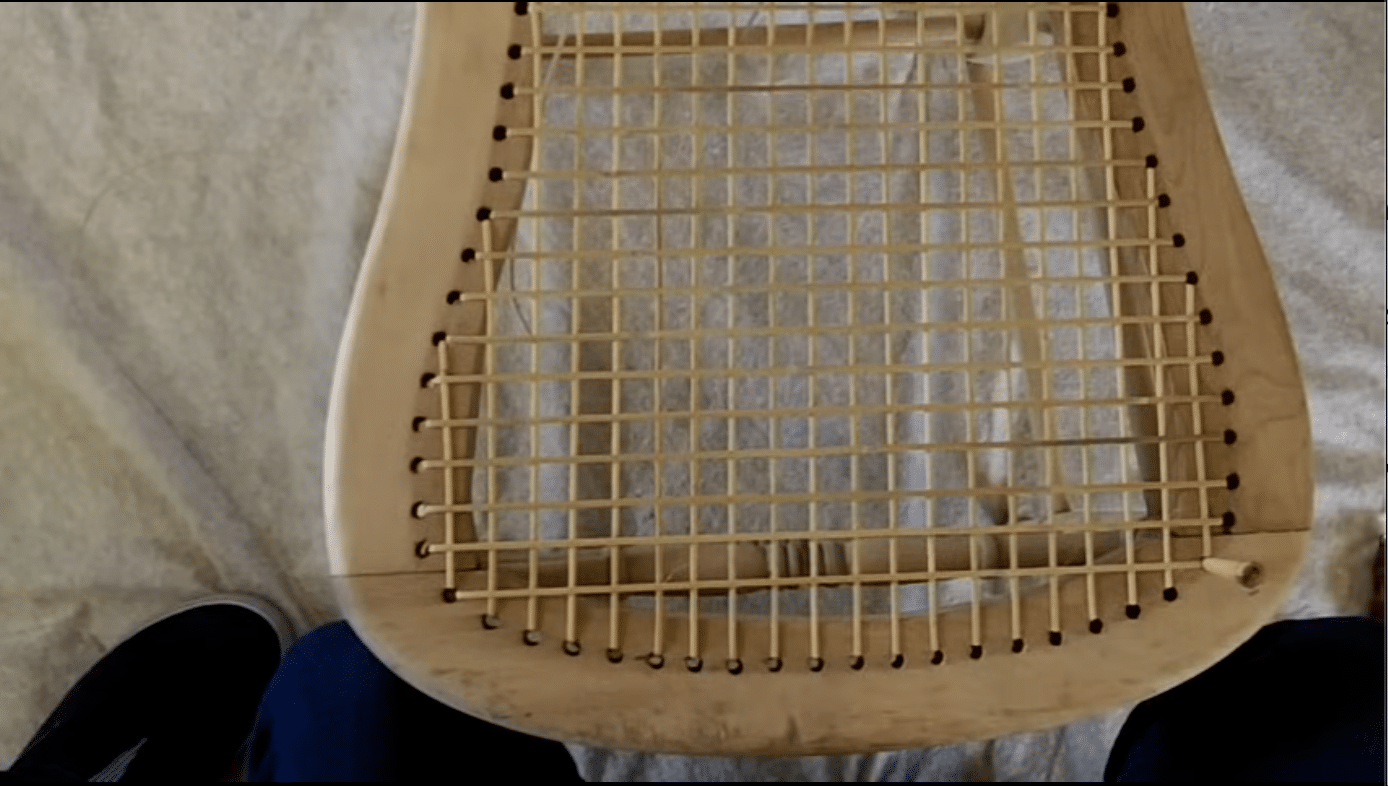
- Attach a new piece of cane in a side hole.
- Start weaving from side to side, like you did with the up-and-down strands.
- Keep the cane tight and flat, especially around curves.
- If needed, skip some side holes to avoid gaps in your weave.
Step 5: Second Layer of Vertical Strands
- Do the same as in Step 3, but weave slightly to the right of the first set of up-and-down strands.
- Make sure these new strands sit next to the first set, making the weave thicker.
Step 6: Weaving the First Diagonal Layer
- Begin weaving at an angle, starting from a corner.
- Go under the first up-and-down strand, then over the second. Keep this pattern across the seat.
- Keep the cane damp and even as you pull it through.
Step 7: Weaving the Second Diagonal Layer
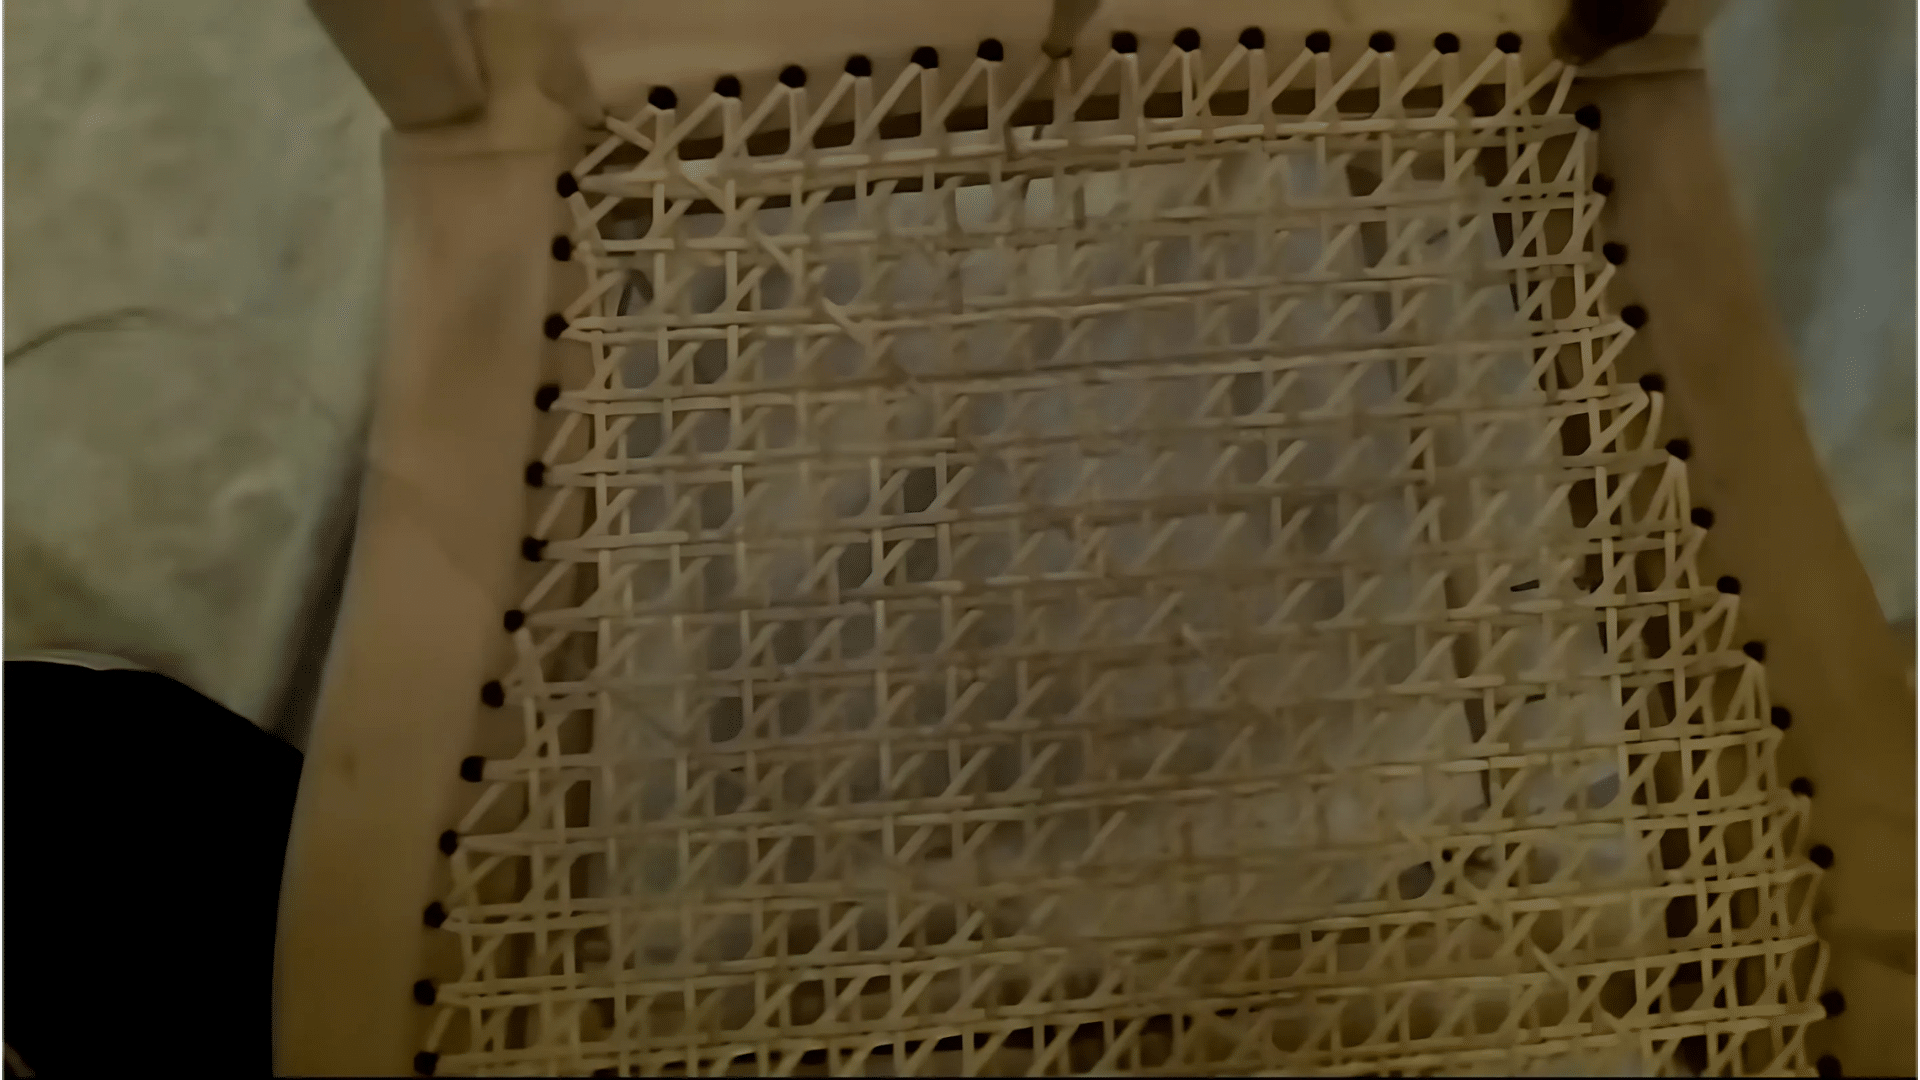
- Start the next angled weave going the other way to make X shapes on the seat.
- Switch between going under and over, keeping the pattern the same across the seat.
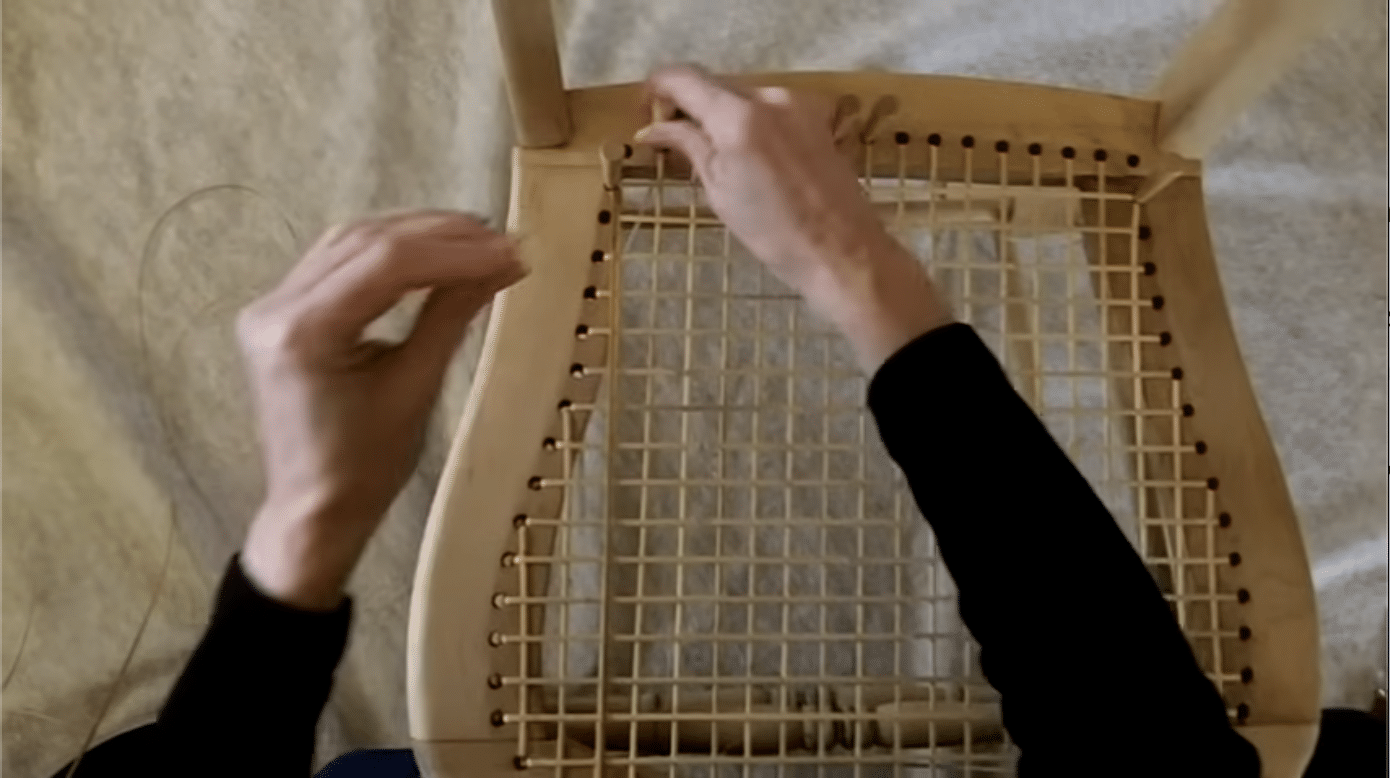
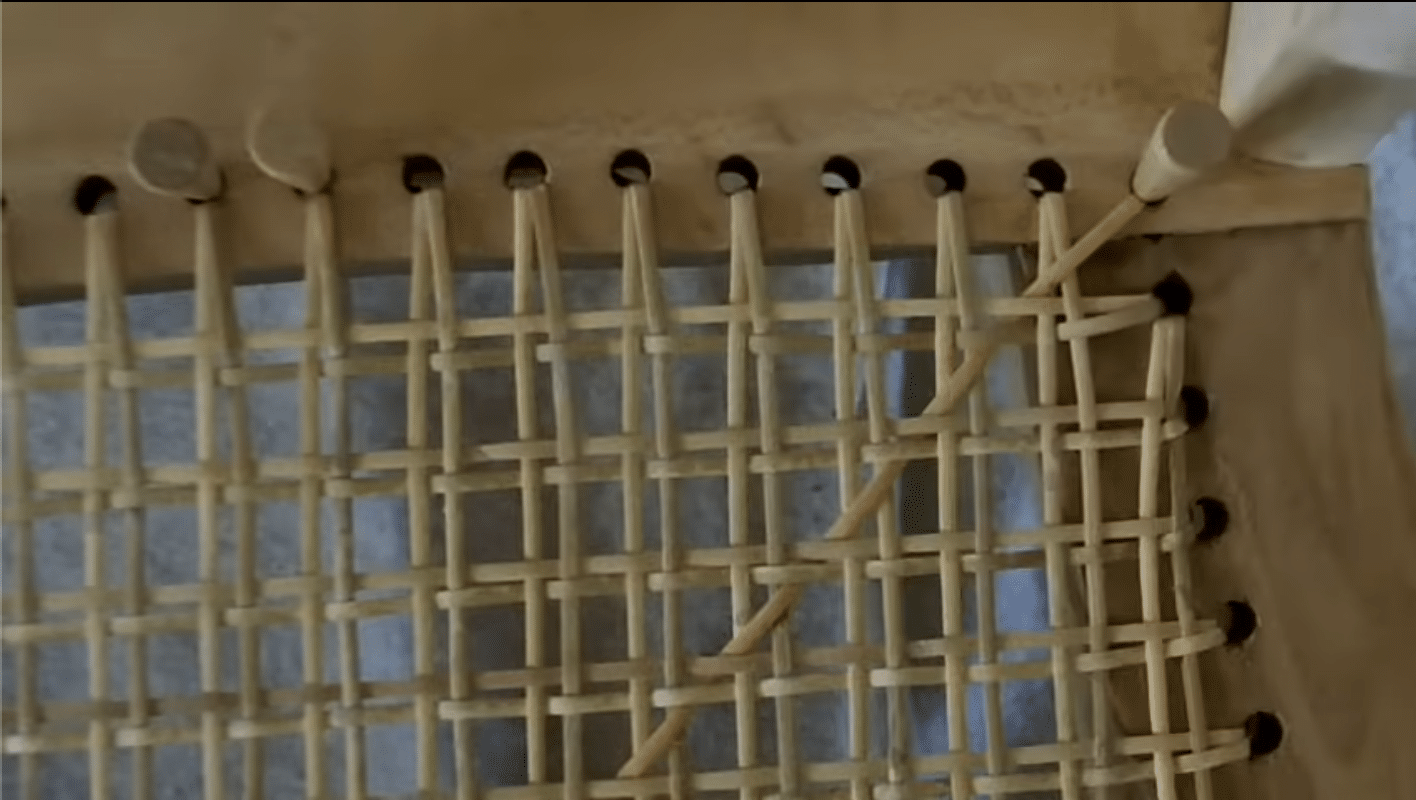
Step 8: Binding the Edges
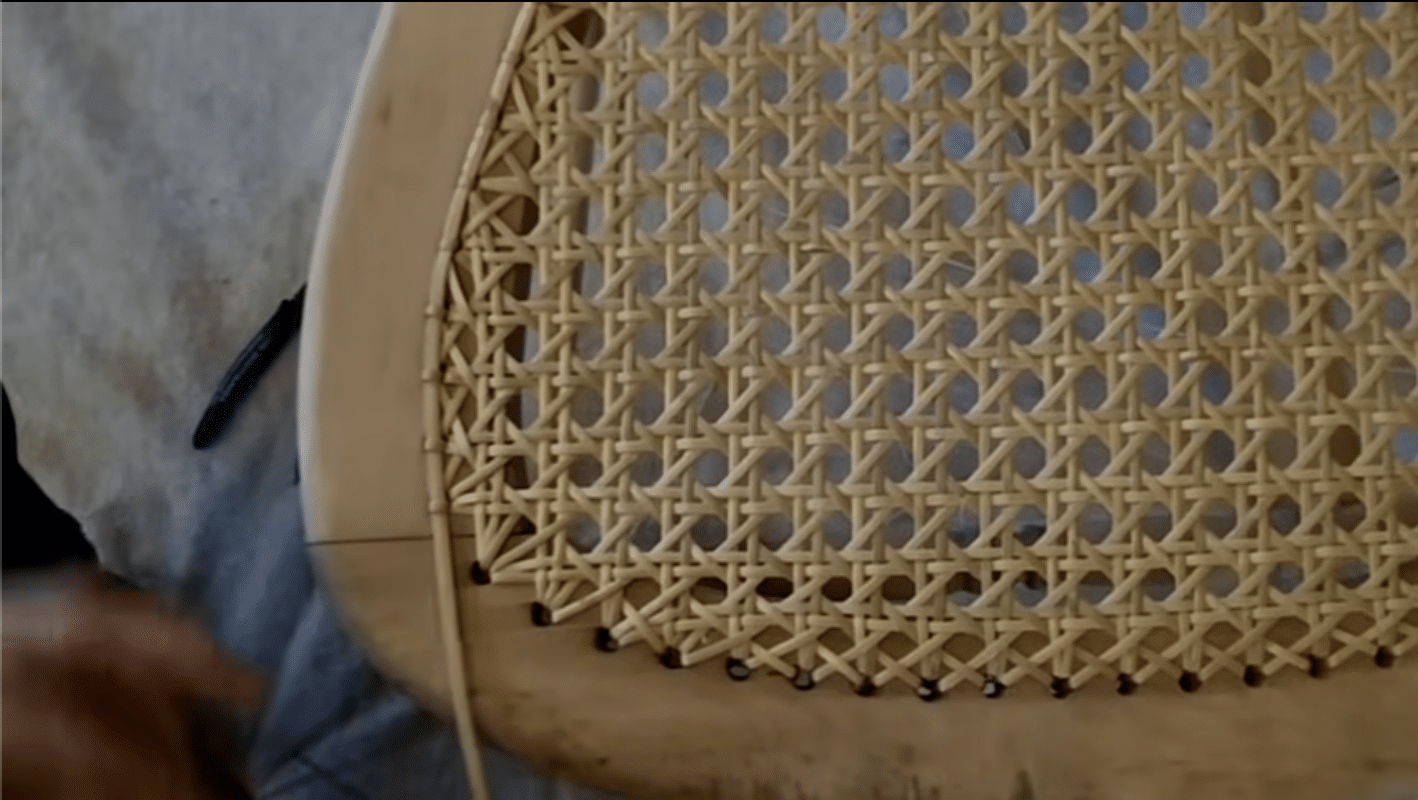
- Use 4mm narrow binding cane for the edges. Soak it first.
- Put the binding cane in the edge holes, making sure it’s tight.
- Loop the cane over the top and push it into the holes. Use your thumb to keep it flat.
- Do this all around the chair, even on curved parts.
Step 9: Finishing the Cane
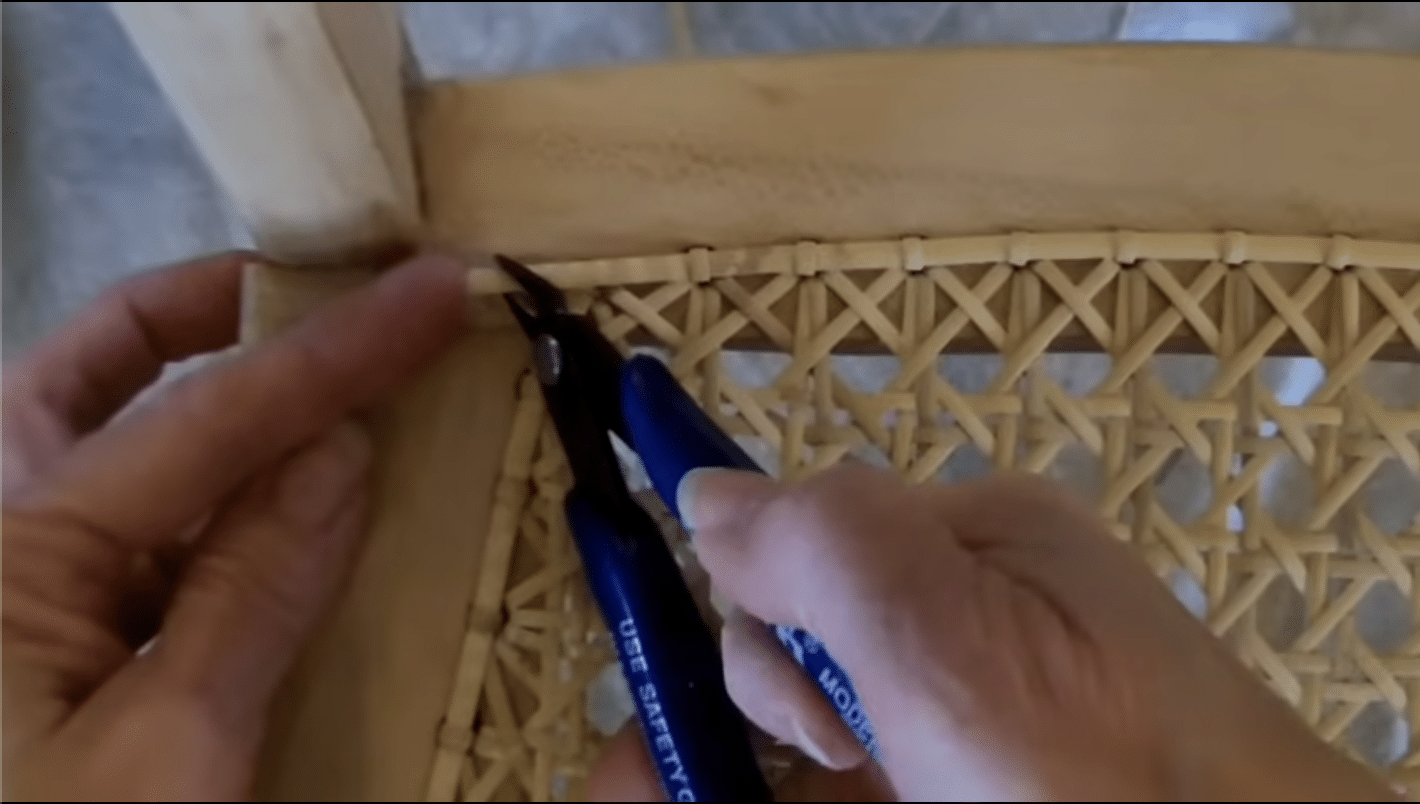
- Cut off extra cane with sharp cutters. Keep the ends pointing inside the seat.
- Make sure all the cane is tight and secure. Use pegs in corner holes to finish.
- Check for loose ends and tuck them in with your sharp tool.
- Lastly, trim any small hairs or rough edges with your cutters.
For more detailed information of this method, Click Here.
Pre-Woven Cane Webbing Method
Step 1. Soak the Cane:

- Fill a tub with room-temperature water.
- Submerge the pre-woven cane webbing fully in the water.
- Let it soak for about 30 minutes until it becomes soft and flexible.
- Don’t use hot water as it can harm the cane’s structure.
Step 2. Start from the Corner:
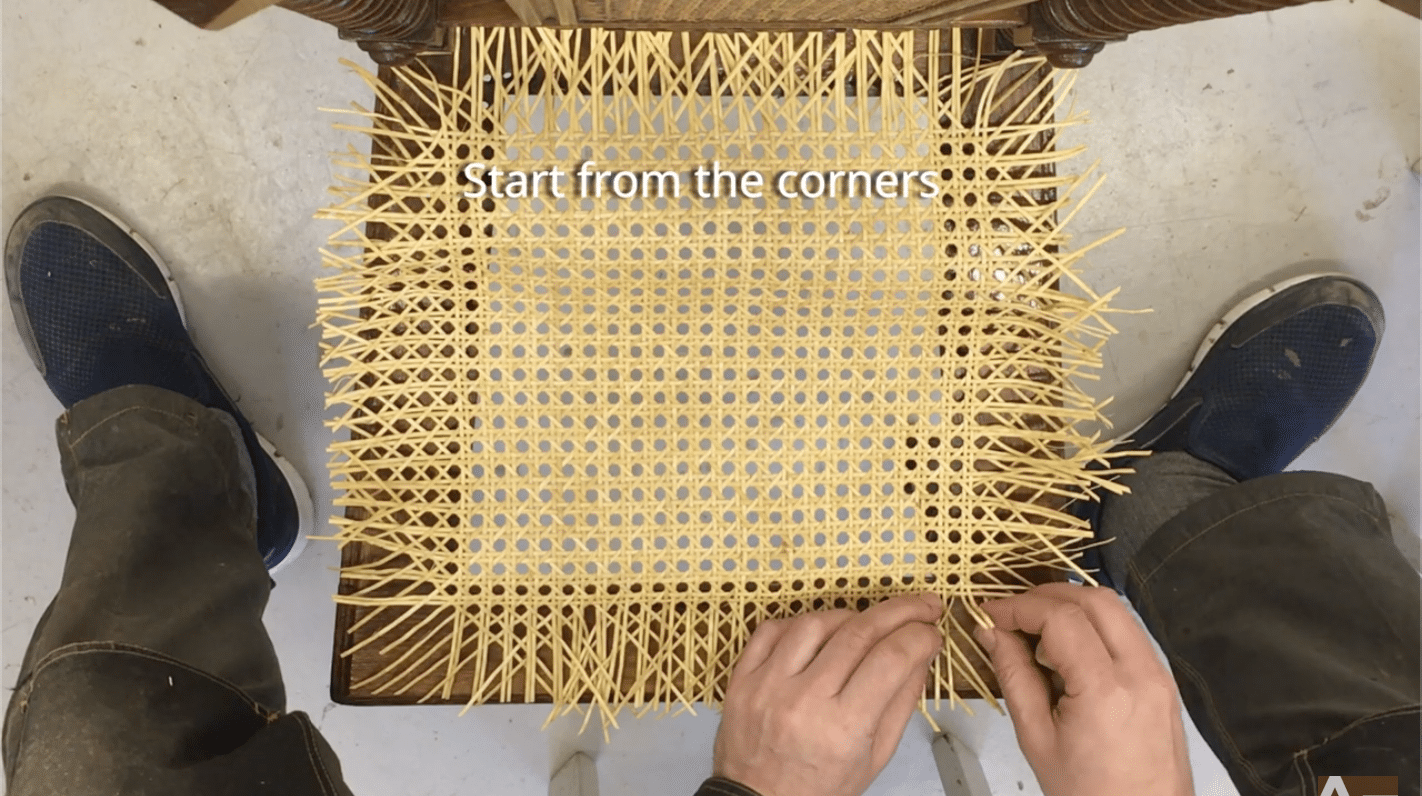
- Remove the wet cane from the water and let excess water drip off.
- Begin at one corner of the chair seat.
- Lay the cane over the seat, making sure it’s even with the frame edges.
- Use clamps to hold the cane in place temporarily.
Step 3. Covering Cane Lines:
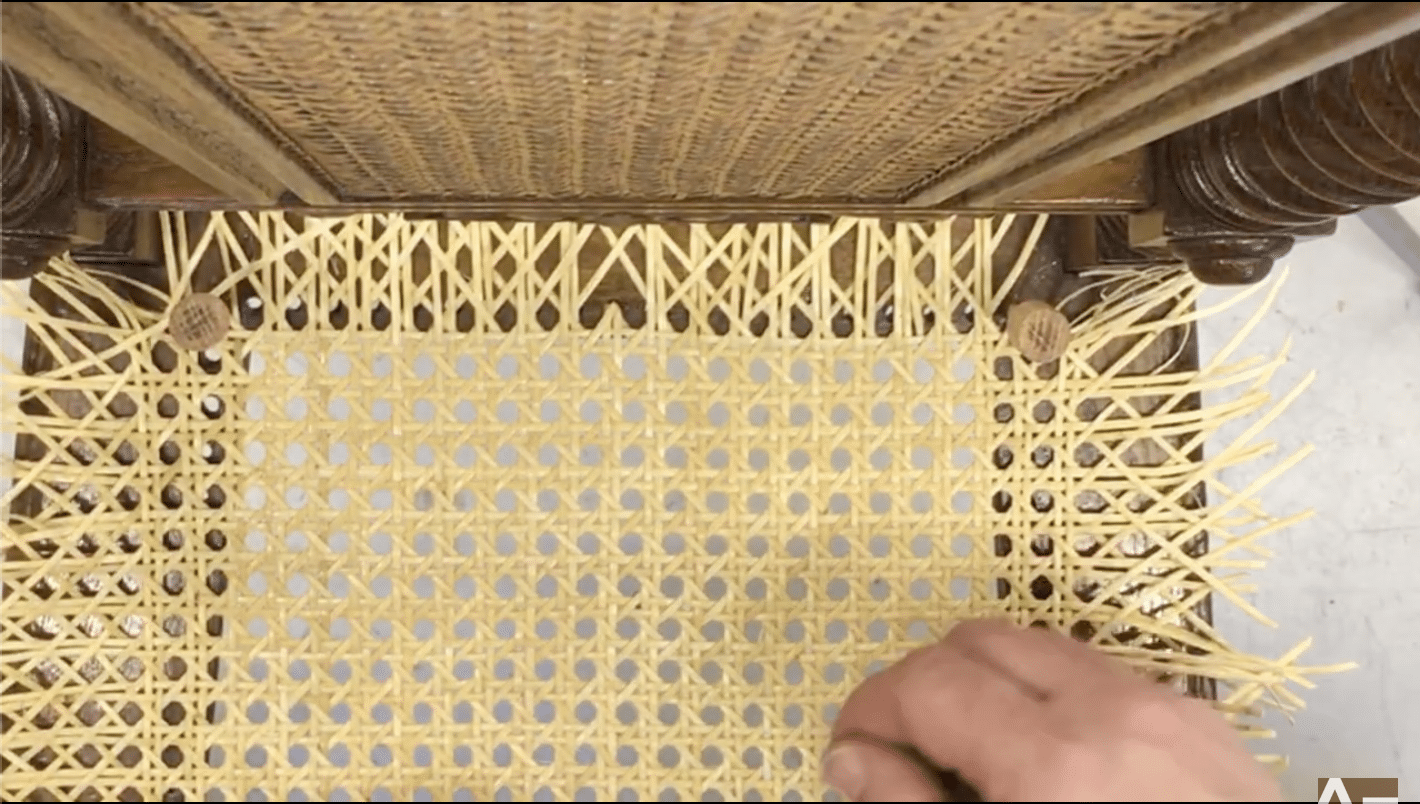
- Carefully stretch the cane across the seat.
- Make sure the cane lines are straight and parallel to the chair frame.
- Adjust as needed to keep the pattern even and neat.
- Use more clamps along the edges to keep the cane taut as you work.
Step 4. Complete the Last Corner:
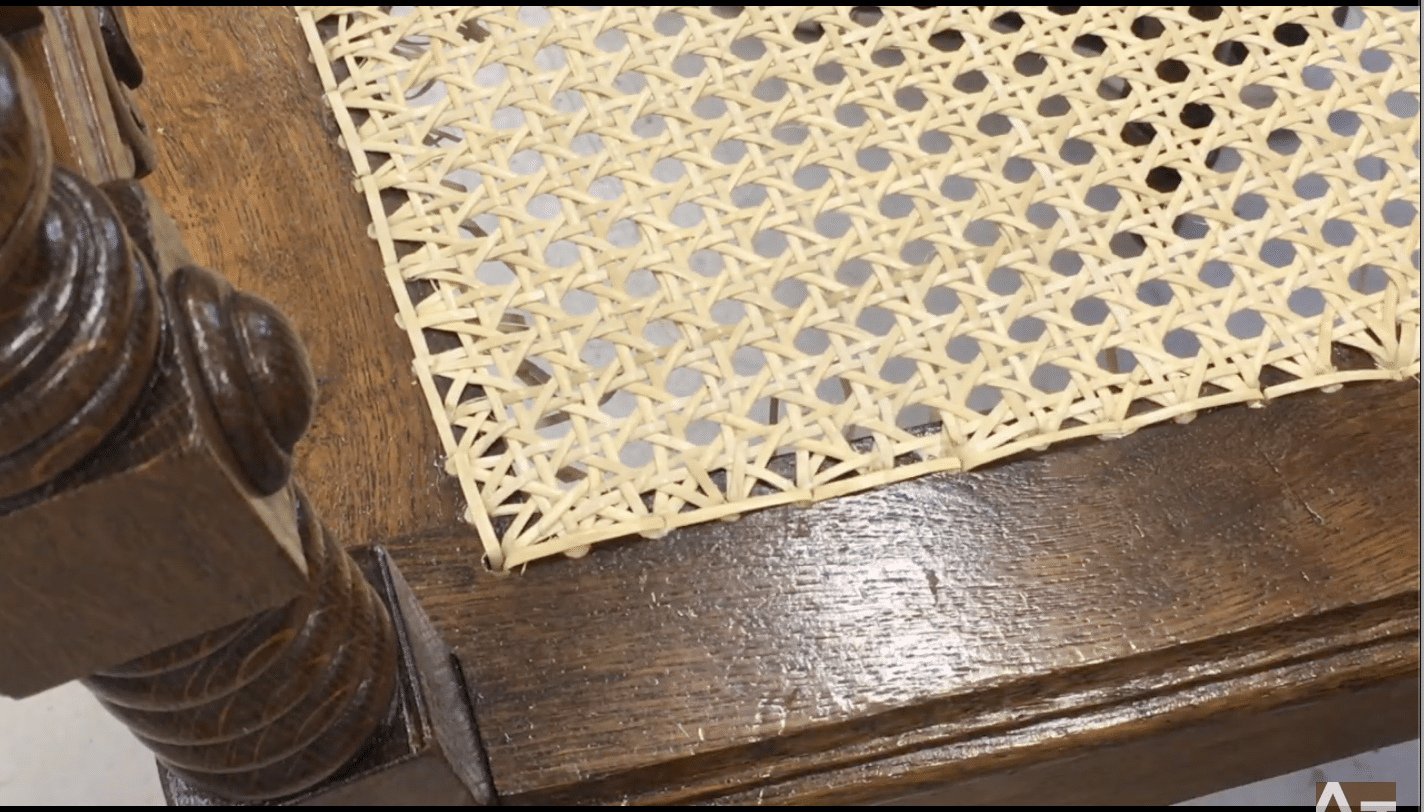
- When you reach the last corner, you may need to trim the cane slightly.
- Use sharp scissors to cut any excess, leaving just enough to tuck into the groove.
- Make sure all corners are tight and well-fitted.
- Double-check that the cane is evenly stretched across the entire seat.
Step 5. Finishing:
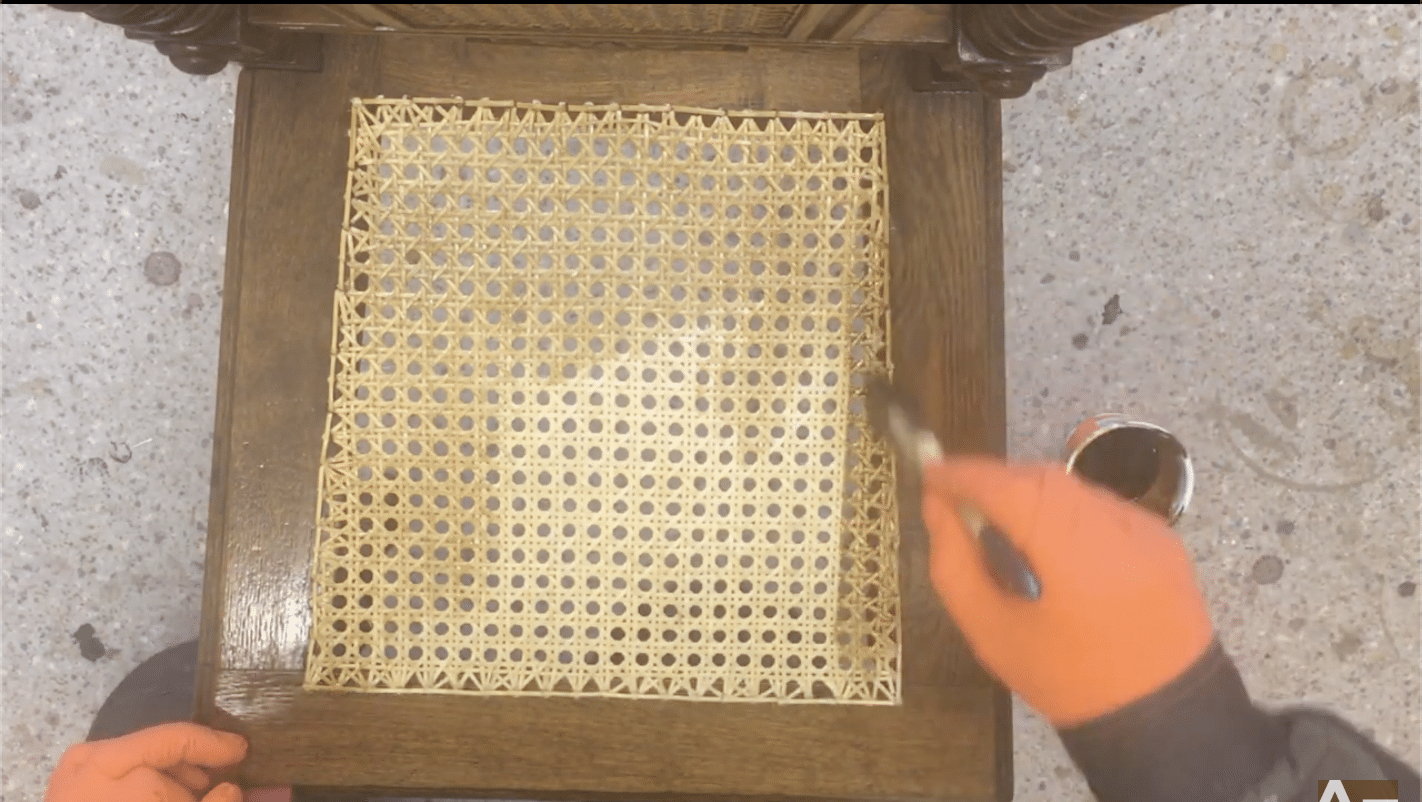
- Once the cane is dry (usually after 24 hours), prepare a mixture of shellac and dye.
- Mix equal parts shellac and dye (50/50 ratio).
- Apply this mixture to the cane using a brush.
- This seals the cane, protects it from wear, and gives it a nice color.
- Let it dry fully before using the chair.
For more detailed information of this method, Click Here.
Remember, working with pre-woven cane webbing is often easier and faster than hand-weaving, making it a good choice for beginners or for quick restorations.
Troubleshooting Common Issues
When recaning a chair, you might face some problems. This section covers the most common issues and how to fix them. I’ll tell you what to do if your cane breaks or splits, how to fix uneven weaving, and what to do if your cane webbing becomes loose after you’ve installed it.
Cane breaking or splitting: Causes and solutions.
Cane can break or split for several reasons:
- Cane is too dry: Always soak your cane before use. If it’s breaking, it might not be damp enough.
- Too much tension: Don’t pull the cane too tight as you weave.
- Old or poor quality cane: Use fresh, good quality cane for best results.
Solutions:
- If cane breaks during weaving, replace the broken piece with a new strand.
- Keep your cane damp as you work. Use a spray bottle to add moisture if needed.
- If splitting occurs, try using a slightly thicker cane for your project.
Uneven weaving: How to fix mid-process.
Uneven weaving can make your chair look messy. Here’s how to fix it:
- Stop weaving as soon as you notice the issue.
- Gently undo the uneven part of the weave.
- Re-weave the section, paying close attention to keeping strands parallel.
- Use a straight edge or ruler to check your lines as you go.
- Take your time – rushing often leads to mistakes.
If you’re halfway through and notice earlier rows are uneven:
- You may need to undo back to where the problem started.
- It’s worth the extra time to ensure a good final result.
Loose cane webbing: How to tighten it after installation.
Sometimes cane can loosen after you’ve finished your project. To tighten it:
- Lightly dampen the cane with a sponge. Don’t soak it completely.
- Let the moisture soak in for about 30 minutes.
- As it dries, the cane will tighten naturally.
- If it’s still loose, you can try re-soaking and stretching the cane slightly.
- For pre-woven cane, check if you can tighten the splines holding it in place.
Remember, prevention is better than cure:
- Make sure your initial weave is tight but not overly so.
- Allow your finished work to dry completely before use.
- Apply a sealant to help maintain the cane’s shape over time.
By addressing these common issues, you can ensure your recaned chair looks good and lasts for a long time.
How to Care for Your Newly Caned Chair?
After putting in the effort to recane your chair, you’ll want it to last. This section covers how to keep your caned chair in good shape. I’ll let you know the ways to clean and maintain the cane seat, and share tips to make your handiwork last longer.
Tips on maintaining and cleaning cane seats.
Keeping your cane seat clean and well-maintained helps it last:
1. Regular dusting:
- Use a soft brush or vacuum with a brush attachment.
- Dust weekly to prevent dirt buildup in the cane’s weave.
2. Cleaning:
- For light cleaning, use a damp cloth with mild soap.
- Don’t soak the cane – too much water can weaken it.
- For tougher dirt, use a soft brush with soapy water.
- Dry the cane quickly with a clean cloth or fan.
3. Avoid harsh cleaners:
- Don’t use strong chemicals or abrasive cleaners.
- These can damage the cane’s surface.
4. Check for loose strands:
- Look over your chair now and then for any loose bits.
- Fix small issues early to prevent bigger problems.
5. Mind the humidity:
- Cane works best in places that aren’t too dry.
- If your home is very dry, use a humidifier near the chair.
How to prolong the life of your recaned chair.
These steps can help your caned chair last longer:
1. Avoid direct sunlight:
- Too much sun can dry out and weaken cane.
- Keep the chair away from windows with strong sunlight.
2. Rotate the chair:
- If the chair is in a sunny spot, turn it often.
- This helps the cane wear evenly.
3. Use a chair pad:
- A thin cushion can protect the cane from wear.
- Make sure the pad lets air flow to the cane.
4. Mind the weight:
- Don’t put very heavy items on cane seats.
- Spread weight evenly when sitting.
5. Keep pets away:
- Cat claws and dog nails can damage cane.
- Train pets not to use the chair as a scratching post.
6. Regular oiling:
- Once a year, apply boiled linseed oil to the cane.
- This keeps it flexible and less likely to dry out.
7. Address issues promptly:
- If you notice any damage, fix it right away.
- Small repairs are easier and cheaper than full recaning.
By following these care tips, you can enjoy your newly caned chair for many years. Remember, a little care goes a long way in keeping your handiwork looking great.
Conclusion
Recaning a chair might seem tricky, but with patience and practice, you can bring new life to old furniture.
Whether you choose hand-weaving or pre-woven cane webbing, remember to keep your cane damp, maintain even tension, and take your time.
If you face issues like breaking cane or uneven weaving, these troubleshooting tips can help you get back on track.
Once you’ve finished, proper care will keep your newly caned chair looking great for years. Regular dusting, careful cleaning, and avoiding direct sunlight can make a big difference.
Ready to start your recaning project? Gather your materials, follow the step-by-step guide, and enjoy the satisfaction of restoring a beautiful piece of furniture.
With these skills, you can preserve family heirlooms or give thrift store finds a second chance.
Happy recaning!
Frequently Asked Question
How much does it cost to recane a chair yourself?
Recaning a chair yourself typically costs $20 to $50 for materials, depending on the chair size and cane quality. This is much cheaper than professional recaning services.
Is caning a chair difficult for beginners?
Caning can be challenging for beginners but is learnable with patience. Start with a simple pattern and pre-woven cane for easier projects. Practice improves skill quickly.
How long does it take to recane a chair seat?
For beginners, recaning a chair seat can take 8 to 12 hours. Experienced caners might finish in 4 to 6 hours. The time varies based on the pattern complexity and seat size.
Can I recane a chair with alternative materials like yarn or thread?
You can use alternative materials like yarn or thread, but they’re not as durable as traditional cane. These materials work better for decorative purposes or temporary fixes.
Where can I buy caning materials?
Caning materials are available at craft stores, woodworking shops, and online retailers. Specialty woodworking websites often have the best selection of caning supplies and tools.


