
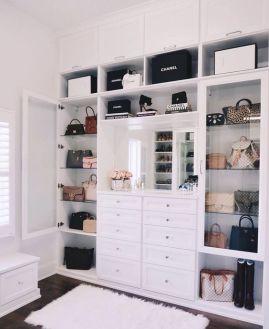
DIY Walk-in Closet: A Comprehensive Step-by-Step Guide
Have you ever dreamed of having your walk-in closet? You’re not alone. Many homeowners wish for this luxurious storage space.
But did you know you can create one yourself? Building a DIY walk-in closet is easier than you might think.
You don’t need to be a master carpenter to make it happen. With some basic tools and effort, you can design and build your perfect closet in just a few days.
Imagine having a custom space for all your clothes, shoes, and accessories. A place where everything has its spot and getting dressed is a breeze.
Ready to turn this dream into reality? Our step-by-step guide will help you create your DIY walk-in closet. Let’s get started on transforming your space and upgrading your storage!
Want a fancy walk-in closet but worried about the cost? Don’t worry! We’ll show you how to make one that’s both stylish and budget-friendly.
Starting the DIY Project
Are you ready to transform your space into a walk-in closet? Before you grab your tools, let’s set the stage for success.
This part is all about prep work – the not-so-glamorous but crucial steps that lay the foundation for your dream closet.
We’ll cover assessing your space, clearing the old, and preparing for the new. Remember, a good start sets you up for a great finish!
The Initial Steps
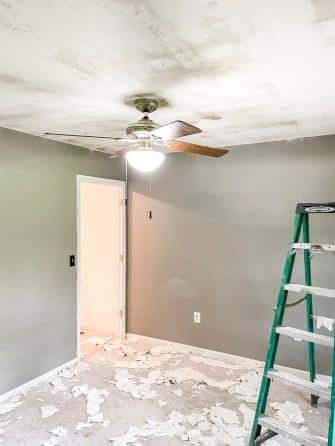
- Remove any old flooring or ceiling textures.
- Change the layout if needed. You might want to move walls or doors.
- Open up the space to connect it to your bathroom for easy access.
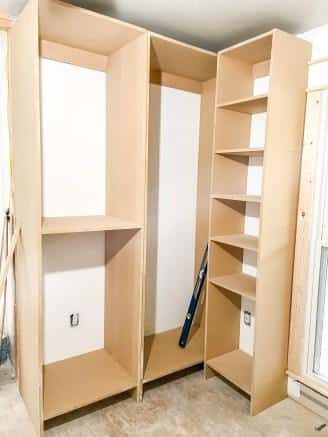
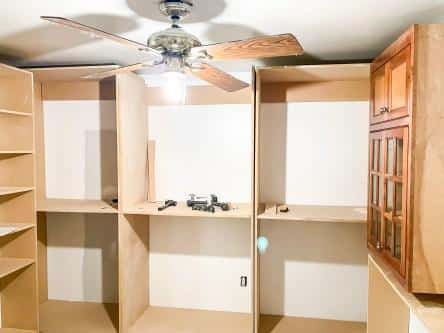
Building the Closet Structure
Now that your space is prepped, it’s time to bring your closet to life! This is where your vision starts taking shape.
We’ll walk you through creating the basic structure of your closet, from cutting boards to assembling units.
Don’t worry if you’re not a pro – we’ll break it down into simple steps. Get ready to see your closet come together before your eyes!
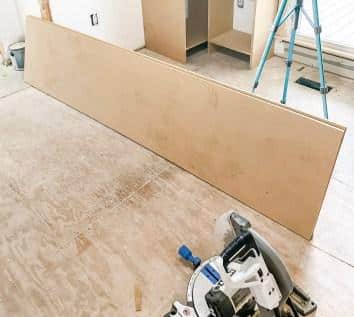
Materials You’ll Need
- Medium-density fiberboards (3/4 inch thick): Dense, flat panels made from wood fibers. Due to their smooth surface and stability, they are good for closet building.
- Brad nails (2 inches): Thin, small nails that join wood pieces. They leave tiny holes, making them ideal for closet construction.
- Level: A tool that checks if surfaces are straight. It helps ensure your closet shelves and units are even.
- Nail gun: A power tool that quickly drives nails into wood. It speeds up the building process and gives a neat finish.
- Square: An L-shaped tool used to check and mark right angles. It helps keep your closet corners perfectly straight.
- Circular saw or table saw: These are power tools for cutting wood. A circular saw is handheld, while a table saw is stationary. Both can cut MDF boards.
Step-by-Step Guide
1. Cut the MDF for the side pieces
- Height: Your ceiling height minus 4 inches
- Width: About 24 inches for hanging clothes
2. Cut Shelves
- Width: Same as side pieces
- Length: As long as you want each unit (we used 42 inches)
3. Join shelves to sides
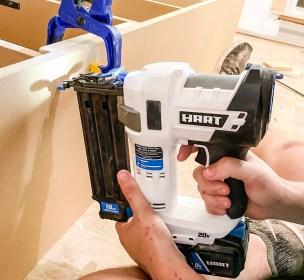
- Use 2-inch nails
- Nail from the outside of the long sides
- Check that shelves are square and level
Tip: Use spacers and clamps to keep shelf distances even
4. Create different sections
- Hanging areas for various clothing lengths
- Shoe shelves (14 inches deep works well)
- Drawer units for smaller items
5. Secure units to the wall
- Screw the top piece into wall studs for stability
Adding Special Features
Want to make your closet unique? Try these ideas.
- Install a glass cabinet for fancy items like perfumes or purses
- Add a half wall to separate your closet from the laundry area
- Create cubby shelves for extra storage
Finishing Touches
Your closet is taking shape, but there’s still work to do
To-Do List
- Add trim to units
- Build drawers
- Paint everything
- Install crown molding and baseboards
- Put in new flooring
- Hang a nice light
- Trim doorways
Remember, Rome wasn’t built in a day. Take your time and enjoy the process.
Soon, you’ll have a dream closet that didn’t cost a fortune!
Cost So Far: About $450 for MDF boards
Walk-in Closet Alternative

Built-in closets are a great alternative to walk-in closets if you want to maximize space. Although you can’t walk into a built-in closet, they are just as popular, if not more so, than walk-ins.
Built-in closets are efficient and don’t take up much space. However, walk-in closets can feel like wasted space and get disorganized over time.
On the other hand, maintaining a smaller built-in closet is much easier and more efficient. Small closets are also easier to keep tidy, unlike walk-ins, which can become messy over time.
Benefits of Built-in Closets
1. Space-efficient for small homes
2. Can hold a full wardrobe when well-organized
3. Reduce bedroom clutter
4. Promote a more minimalist lifestyle
5. Prevent hoarding unused items
Advantages Of Walk-in Closets
1. More affordable
2. It is simpler to install and upgrade
3. Keep items visible and easy to find
4. Many add-ons are available to boost storage
5. It can double as a dressing area with a mirror
Factors to Consider
1. Less storage space than walk-ins
2. Require some wall space for installation
3. It may not suit growing families or those planning to move
Is a Built-in Closet Right for You?
Choose a built-in if you have limited space or fewer items to store. They’re budget-friendly, low-maintenance, and compact.
However, be ready to tidy up and consider your long-term storage needs before deciding.
Summing It Up
Building a DIY walk-in closet is a rewarding project that can transform your space and storage options. This guide taught you how to plan, measure, and construct your custom closet.
Remember, the key to success lies in careful planning and precise execution. Your new walk-in closet will provide ample storage and add value to your home.
As you finish up, consider adding personal touches like a full-length mirror or stylish lighting to make your space shine.
Don’t forget to organize your items effectively once the construction is complete. With your new DIY walk-in closet, you’ll enjoy easy access to your belongings and a clutter-free living space.
We hope this guide has inspired you to take on this exciting home improvement project.


