Horizontal Deck Skirting Ideas and DIY Guide
I used to walk out onto my deck and feel like something was off. The space underneath looked messy, sometimes had gathered clutter, and didn’t match the rest of the yard. It felt like an unfinished part of the house.
That’s when I started looking into horizontal deck skirting. It turned out to be a simple fix that made a big difference.
In this guide, I’ll walk you through everything I learned, what horizontal skirting is, how it stacks up against other styles, and which materials are worth using.
I’ll also break down the steps to install it, along with tips to help you get the look right and keep it in good shape over time.
If you’re ready to give your deck a cleaner, more finished feel, this guide will help you get there.
What is Horizontal Deck Skirting?
Horizontal deck skirting covers the open space beneath your deck using boards installed side to side rather than up and down.
This layout gives your deck a clean, low-profile look instead of the more common vertical or lattice designs. It helps block debris, keeps animals out, and adds a smooth, polished finish to the area.
Many homeowners choose horizontal skirting to match the style of their siding or fencing. This design is also easier to blend with landscaping and often feels more current than older skirting types.
Overall, it’s a smart option if you want something simple, practical, and visually balanced without making your deck look too busy or closed-in.
Best Materials for Horizontal Deck Skirting
Choosing the right material affects how your skirting holds up over time. Some materials are easier to install, while others need less upkeep. Here are five solid options to consider for your project.
Pressure-Treated Wood
Pressure-treated wood is one of the most common choices for horizontal skirting. It’s affordable, easy to find, and designed to resist rot and bugs. Since it’s treated, it works well in soil and moisture.
However, it can be rough to the touch and may warp or crack if not sealed properly. To get a cleaner look, you’ll likely need to paint or stain it.
It’s a practical option, especially if you want to keep costs down while still protecting the space under your deck from pests and weather.
Cedar and Redwood
Cedar and redwood are strong natural woods that resist rot without chemical treatments. These options look good right out of the box, offering rich color and grain.
They’re also easier to cut and handle during installation. Both hold up well to outdoor weather, though redwood tends to cost more.
Staining can help them last longer, but even untreated, they age into a soft gray tone. If you want something that feels more natural and fits into a garden setting, cedar or redwood can be a great match.
Composite Deck Boards
Composite boards are made from a mix of wood fibers and plastic, which gives them excellent durability. They don’t warp, crack, or splinter easily, making them ideal for a long-lasting deck skirt.
They also come in various colors and textures, so you don’t need to paint or stain them. Installation is similar to real wood, though cutting may require special blades.
The main trade-off is the higher upfront price. Still, the low maintenance and clean finish make composite a great option if you want a modern, uniform look.
Cement Board or Hardie Planks
Cement board and Hardie planks are solid picks for areas with high moisture or heavy wear. These materials resist rot, insects, and fire, making them extremely tough.
They give your deck a strong, straight-lined finish that can be painted to match your home. Installation takes more time, and you’ll need special tools to cut through the board safely.
Despite the extra effort, they hold up for years with little maintenance. If you want a crisp, sturdy look that won’t shift or bend over time, this is a good bet.
Reclaimed Wood and Pallets
Reclaimed wood and pallet boards are great for a budget-friendly, eco-conscious skirting project. Each piece is different, giving your deck a unique, weathered look.
While they’re not as durable as other options, sealing and prepping the boards can help extend their life. You’ll need to sort and sand each piece before use, but the rustic finish can be worth the extra effort.
If you enjoy hands-on work and want a one-of-a-kind design, using reclaimed materials is a smart and innovative way to build your deck.
Step-by-Step Guide to Installing It Yourself
Installing horizontal deck skirting is a manageable project if you take it one step at a time. With basic tools and a weekend of work, you can create a neat, polished look under your deck. Follow these steps to get started.
1. Prep the Area and Frame

Start by clearing the ground below your deck. Remove weeds, rocks, and any debris that might block access or airflow. Once it’s clear, install a simple frame using treated 2x4s around the bottom of the deck.
This frame will support the horizontal boards. Make sure it’s level and securely fastened to the deck posts or base.
A strong frame is key to keeping the boards straight and secure over time. If your spans are long, you can also add blocking, which will help reduce sagging later.
2. Measure and Cut Boards

Take careful measurements from the ground up to the bottom of the deck and across each section. Because the ground may not be even, measure in several spots to avoid gaps.
Mark your boards and cut them to size using a circular saw or miter saw. Keep cuts straight and check for consistency, especially if you’re working with varying board lengths.
Stack cut boards by section to speed up installation. Taking your time here helps the next steps go more smoothly and reduces waste from incorrect cuts.
3. Attach Boards with Spacing

Start from the bottom and work your way up. Attach each board to the frame using exterior screws or hidden fasteners. Leave a small gap (around ¼ inch) between boards for drainage and airflow.
A spacer block makes this easier and keeps gaps uniform. As you go, check your lines with a level to avoid a slanted finish.
Consistent spacing improves airflow and gives the entire skirt a sharp, aligned look. Be sure to anchor boards firmly, especially at the ends.
4. Handle Posts and Obstacles

Not all areas will be flat or open. Measure and mark cutouts before you install the board in spots where deck posts or pipes get in the way.
Use a jigsaw or oscillating tool to make clean cuts around these obstacles. Take your time so the fit is snug but not overly tight.
Planning your layout ahead of time helps you avoid odd gaps and patchwork fixes. You can also notch boards if needed, which looks neater than using short filler pieces around tight areas.
5. Optional: Add a Hidden Door

If you want access to the space under your deck, add a simple hidden door. Choose one board section and attach it using hinges on one side. Use a magnetic latch or handle for easy opening.
Be sure the frame behind the door is sturdy so it can withstand regular use. A hidden door blends in with the rest of the skirting while giving you space for storage or access to pipes and cables.
You can even disguise it with a planter box or trim.
6. Paint or Stain for Finish

Once the boards are all in place, finish the look with paint or stain. Choose a product made for outdoor use, and apply it evenly across the entire skirt.
Staining helps highlight the wood grain, while painting offers a clean, solid color. Make sure to coat the edges and gaps between boards to protect them from moisture.
This step also gives your skirting a more polished and uniform appearance. With the right finish, your deck skirting will last longer and stay looking fresh throughout the seasons.
Modern and Rustic Horizontal Skirting Ideas
Horizontal deck skirting can fit many design styles, from clean and simple to cozy and natural. Here are six ideas that combine style with function to match your outdoor space.
Slatted Modern Look
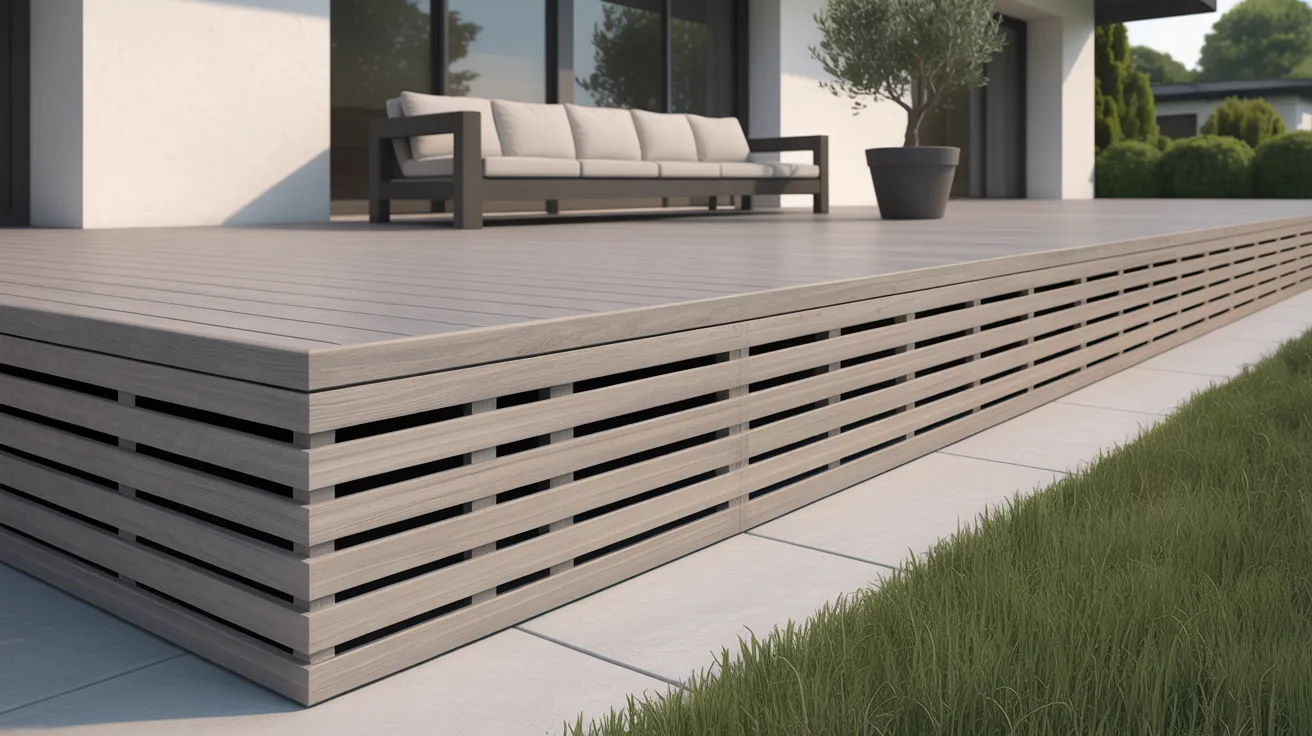
Use slim, evenly spaced horizontal boards to give your deck a light, airy feel. This design supports ventilation and pairs well with contemporary homes. It maintains a clean look without feeling heavy.
Make sure the gaps are narrow enough to keep out animals but wide enough for air to flow. Stick to one tone, like soft gray or natural wood, for a calm, simple finish.
It’s also a smart choice if you want to hide vents or small doors within the skirt. The consistent lines make everything blend in naturally.
Alternating Board Widths

Alternate between wide and narrow boards in your skirting layout for a rustic but bold effect. This breaks up the pattern just enough to catch the eye without feeling messy.
It’s a good fit for decks that already use mixed materials or colors. Stick to one wood type for a unified look, or mix tones for contrast.
The uneven pattern hides minor gaps or flaws, which makes it practical for older decks or rough ground. It’s stylish without feeling too formal.
Black Painted Boards

Painting your skirting black adds a bold, grounded feel to your deck. It works especially well with dark-stained decking, metal railings, or modern siding.
The black color hides dirt and makes the base of your deck disappear into the background. Choose flat or satin finishes for a clean, smooth surface.
This look is sharp and easy to maintain with occasional touch-ups. You can also pair black boards with wood trim or light-colored gravel for extra contrast along the deck’s edge.
Boards with Stone Base

Mixing horizontal boards with a stone base gives your skirting a strong, earthy look. Below the boards, use stacked stone, veneer panels, or even cement blocks.
The contrast in texture adds depth and works well in natural settings or near gardens. Keep the wood boards above the stone to avoid direct ground contact.
This setup is not just for looks; it also protects the boards from water and soil damage. It’s a smart option if your deck sits close to uneven or damp ground.
Horizontal Skirting with Lighting

Adding low-voltage lighting between skirting boards gives your deck a soft glow at night. You can install strip lights or small spotlights behind or below the slats.
This highlights the design without being too bright. It’s great for safety around steps and creates a cozy mood for evening use.
Use weatherproof fixtures and keep wires tucked behind the frame. This design works best with wider spacing between boards or slatted layouts that let light pass through easily.
Paired with Flower Beds

Combining horizontal skirting with raised flower beds adds charm and makes the transition from deck to yard more natural.
Build simple wood or stone boxes that sit against the skirt and fill them with low-maintenance plants or herbs. This will soften the straight lines of the boards and bring in color.
It’s also a good way to hide the base of your deck if it’s higher than usual. Keep plant choices simple and easy to care for, especially in full sun areas.
Horizontal vs Vertical Skirting: What to Know
Both horizontal and vertical skirting can nicely finish off a deck, but they differ in look, ease of work, and long-term care. Here’s a quick comparison.
|
Feature |
Horizontal Skirting |
Vertical Skirting |
|
Style |
Clean and modern |
Traditional and classic |
|
Ease of Installation |
Requires careful alignment |
Easier to line up and install |
|
Maintenance |
Fewer gaps, easier to clean surface |
More gaps, harder to reach between slats |
|
Ventilation |
Less airflow due to tight spacing |
Allows better airflow |
Horizontal skirting is ideal for a sharp finish and works well with modern homes. Vertical skirting, on the other hand, offers better ventilation and may be quicker to install for beginners.
Tips for Maintaining Horizontal Deck Skirting
Keeping your horizontal deck skirting in good shape helps it last longer and look better through the seasons. Regular care doesn’t take much time, but it can prevent bigger problems down the road.
Paying attention to moisture, pests, and surface wear ensures your skirting stays strong and clean. Here are some easy tips to help you care for it year-round:
- Clean it twice a year using a broom or soft brush to remove dirt and leaves.
- Check for loose boards or screws and tighten or replace them as needed.
- Reapply paint or stain every 2–3 years, especially in sunny or wet areas.
- Keep plants and soil at least a few inches away to reduce moisture buildup.
- Inspect for pests like ants or rodents, and seal gaps where needed.
- Make sure the ground slopes away from your deck to avoid standing water.
- Replace cracked or warped boards quickly to stop further damage.
Common Mistakes to Avoid
Even simple skirting projects can run into trouble if you skip key steps or rush the process. One of the most common mistakes is not allowing enough space between the boards.
Tight spacing can trap moisture and lead to warping or rot. Another issue is forgetting to slope the ground below the deck; this can cause water to collect and damage the wood over time.
Some people skip sealing or painting, which leaves boards exposed to the weather. Also, avoid attaching skirting directly to the deck without a frame.
This makes future repairs harder and weakens the structure. Taking the time to plan, prep, and install things properly will help your skirting last longer and look better.
Conclusion
Now that you’ve seen what horizontal deck skirting can do, you’re in a good place to start your own project. I’ve shared ideas on materials, layout, and how to put it all together, so you can plan with ease.
This small update not only changes how your deck looks — it also helps keep the space tidy and more usable.
If you’re setting up for a full weekend project or just adding a few touches, planning ahead makes things smoother. For more easy ways to work on your outdoor space, take a look at the other home and garden posts I’ve put together. There’s always something new to try!