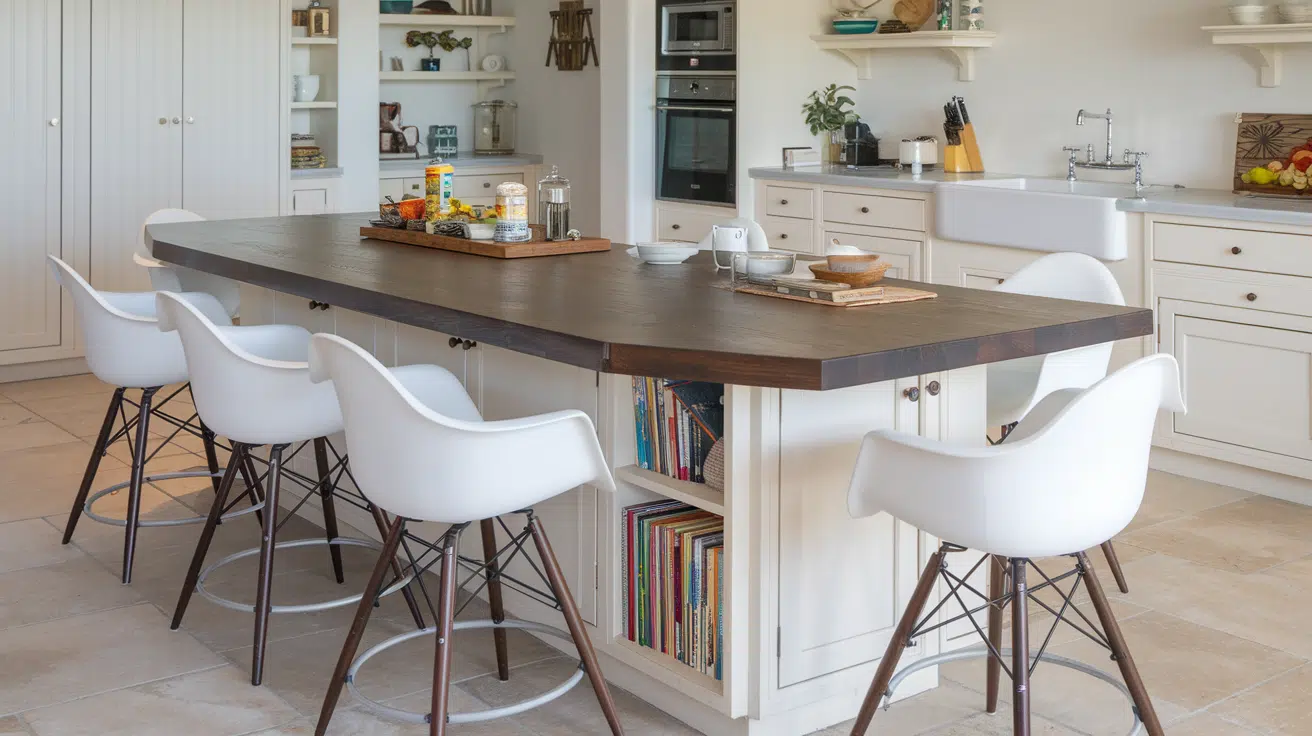
Kitchen Island Design Plans and Layouts for Every Space
Your kitchen is more than just where you cook, it’s a place where life happens. If you’ve been thinking about upgrading your space, a custom island might be just what you need.
No matter if you have a small kitchen or a roomy one, the right kitchen island design plans can help you add style, storage, and function.
In this blog, you’ll learn how to pick the right island for your space, smart layout ideas, and steps to create a kitchen island that really works. From measuring to choosing materials and finishing touches, we’ve got you covered.
Curious about how to make your island both useful and beautiful? Let’s get started.
Types of Kitchen Islands Based on Kitchen Size
Kitchen layouts come in all shapes and sizes. Understanding how to select and customize an island based on your specific space is crucial for creating a functional and appealing cooking area.
Small Kitchen Islands
In compact kitchens, every square inch counts. Small kitchen islands offer ingenious solutions that maximize limited space while providing additional workspace and storage.
Designers have developed clever configurations that integrate seamlessly into tight areas, creating multipurpose surfaces that serve as preparation zones, casual dining spots, and storage centers.
Clever layouts can include narrow islands with slim profiles, rolling islands that can be moved as needed, or peninsula-style extensions that create extra counter space without overwhelming the room.
Medium and Large Kitchen Islands
Spacious kitchens open up a world of possibilities for islands that go beyond basic functionality.
These larger islands can become the centerpiece of your cooking and gathering space, incorporating features that enhance both utility and style.
From built-in appliances and expansive countertops to integrated seating and multiple work zones, medium and large kitchen islands change cooking spaces into comprehensive culinary environments.
Popular Kitchen Island Design Plans
Kitchen islands have become central components in modern kitchens, offering additional workspace, storage, and a gathering spot for family and friends.
1. L-Shaped Islands

L-shaped islands create a natural flow in kitchens with open floor plans. These islands provide ample counter space for food preparation and can incorporate seating on one or both sides.
They offer a clear division between cooking and socializing areas and work well in medium to large kitchens.
The corner section of an L-shaped island can house a sink or cooktop, making efficient use of what might otherwise be dead space.
2. U-Shaped Islands

U-shaped islands maximize workspace and storage in large kitchens. This configuration creates a partial enclosure that keeps the cook at the center of action and allows for multiple work zones on a single island.
U-shaped designs provide extensive storage opportunities and can accommodate several people working simultaneously.
Adding seating to one side of a U-shaped island, creates a natural gathering point while maintaining plenty of work surface.
3. Galley-Style Islands

Galley-style islands feature a long, straight design that works well in narrow kitchens. These islands create a streamlined look and offer generous workspace along their length.
They can accommodate appliances while still providing prep space and often include seating along one side.
This layout creates an efficient workflow and matches well with contemporary kitchen designs.
4. Circular and Oval Islands

Breaking away from traditional rectangular shapes, circular and oval islands add visual interest to kitchens.
These unique shapes soften the look of kitchens with many straight lines and eliminate sharp corners in high-traffic areas.
They create a natural gathering spot for conversations and work well in kitchens with unusual dimensions or angles.
While they may offer less usable surface area, their distinctive appearance can make them worth considering for the ones seeking something different.
5. Two-Tier Islands

Two-tier islands feature different height surfaces, typically with a standard counter-height work surface and a higher bar-height section.
This arrangement separates food preparation areas from dining areas and hides kitchen mess from view when entertaining.
It provides comfortable seating at bar height and can incorporate different materials for each level. This layout is particularly useful for open-concept homes where the kitchen flows into living spaces.
6. Rolling Islands

For smaller kitchens or spaces that need flexibility, rolling islands offer mobility. These portable options can be moved as needed for different activities and stored away when not in use.
They often include locking wheels for stability when stationary and work well for occasional entertaining.
While smaller than permanent islands, rolling versions provide similar benefits with added versatility.
7. Islands with Appliances

Incorporating appliances into kitchen islands has become increasingly common. Options include sink-centered islands that move dishwashing away from walls, cooking islands with cooktops or ranges, islands with built-in refrigerator drawers, and microwave or warming drawer installations.
When planning an island with appliances, consider the necessary plumbing, ventilation, and electrical requirements early in the design process.
8. Waterfall Islands

Waterfall islands extend the countertop material down the sides to the floor, creating a continuous visual flow.
This design approach creates a striking focal point and shows off beautiful countertop materials. It gives a clean, modern appearance and protects cabinet ends from damage.
This style works particularly well with natural stone, quartz, or solid surface materials.
9. Multi-Level Islands

Multi-level islands go beyond the traditional two-tier approach to incorporate various heights for different functions.
These complex islands might include standard counter height for food preparation, lower sections for baking or pasta making, higher sections for casual dining, and cut-out sections to accommodate stools.
This approach creates a truly customized workspace that meets specific cooking needs.
10. Peninsula-Style Extensions

While not technically islands (as they connect to existing cabinetry on one end), peninsula layouts offer many of the same benefits.
Peninsula configurations work well in smaller kitchens where true islands won’t fit and create a partial room division without walls.
They offer additional counter and storage space and can include seating on the open sides. For kitchens where space is limited, peninsulas provide an excellent alternative to freestanding islands.
Steps to Create a Kitchen Island
Building a custom kitchen island adds functionality and personal style. This guide provides a clear path to crafting a practical and attractive addition to your kitchen.
1. Measure Your Kitchen Space

Precise measurement forms the core of a successful kitchen island project. Calculate the available area carefully, focusing on how people move through the space.
Aim for 36-48 inches of clearance around the island to ensure smooth traffic flow. Select dimensions that work harmoniously with your kitchen’s layout and overall design.
2. Design Your Island

Create a detailed sketch that captures your unique requirements and kitchen style. Determine the island’s primary purpose – whether for food preparation, dining, storage, or a combination.
Select design elements that complement your existing kitchen decor, considering practical aspects like storage options and potential seating areas.
3. Gather Tools and Materials

Preparation sets the foundation for a successful project. Collect essential tools, including a measuring tape, circular saw, drill, level, screwdriver, and sander.
Gather materials such as plywood or lumber for the base, a countertop material like butcher block or granite, screws, wood glue, paint or stain, and hardware like handles and brackets.
4. Construct the Base

Build a robust, stable base that supports the countertop and withstands daily use. Create storage compartments like shelves, drawers, or open spaces that match your specific storage needs.
Ensure the frame is completely level to prevent future stability issues and provide a solid foundation for your island.
5. Install Countertop

Carefully cut your chosen countertop material to precise measurements. Securely mount the countertop to the base using appropriate techniques.
Apply a protective finish or sealant to increase durability, especially for materials like wood that require additional protection.
6. Add Final Touches

Complete the project by installing hardware and painting or staining to match your kitchen decor. Add practical features like electrical outlets or lighting to increase functionality.
Pay attention to these final details to create a polished, professional-looking kitchen island that reflects your personal style and meets your cooking needs.
Key Features to Consider For Kitchen Islands
Kitchen islands are more than just additional counter space, so understand the critical design elements that can change an ordinary kitchen into a highly functional and attractive workspace.
Storage Solutions

Smart storage is the backbone of an effective kitchen island design. The innovative solutions maximizes every inch of available space while maintaining a clean, organized appearance.
Pull-out cabinets offer convenient access to frequently used items, while specialized storage like spice racks, knife blocks, and vertical storage for cutting boards can be integrated seamlessly.
This storage system accommodates your cooking style and keeps essential tools within easy reach, reducing clutter and improving overall kitchen efficiency.
Work Surfaces and Countertops

Selecting the right countertop material is a critical decision that impacts both the island’s functionality and its visual appeal.
Granite remains a popular choice for offering durability, heat resistance, and a classic style. Butcher block provides a warm, natural look and allows for direct food preparation.
Quartz offers a perfect balance of durability and low maintenance, with a wide range of color and pattern options. Each material has unique characteristics – some prioritize practicality, while others focus on visual impact.
Lighting and Power Sources

Effective lighting and power integration make the kitchen island a multifunctional centerpiece.
Pendant lights have become a popular design element, providing both task lighting and a decorative focal point. Consider adjustable lighting that can be dimmed for different times of day and activities.
The goal is to make your space functional, safe, and designed to improve your overall kitchen experience.
Maintenance Tips for Kitchen Islands
A custom kitchen island isn’t just an investment in style and function — it’s a centerpiece that needs care to stay beautiful and durable. Regular maintenance keeps it looking fresh and extends its lifespan.
- Wipe surfaces daily with a soft cloth and mild dish soap; avoid harsh chemicals that can damage stone, wood, or quartz.
- Use cutting boards and trivets to protect countertops from scratches, stains, and heat damage.
- Seal stone surfaces like granite or marble every 6–12 months to prevent staining and moisture absorption.
- Oil butcher block countertops monthly with food-safe mineral oil to maintain moisture resistance.
- Clean spills immediately to prevent permanent stains, especially on wood and porous materials.
- Tighten loose hardware such as knobs, handles, and screws periodically to keep your island sturdy.
- Inspect electrical and plumbing fixtures regularly if your island has built-in sinks, cooktops, or outlets, catching small issues early.
By following these simple maintenance steps, your kitchen island will continue to look beautiful and perform at its best for years to come.
Conclusion
Designing the right kitchen island can make your space more useful, stylish, and fun to be in.
Now that you know about different kitchen island design plans, how to build one, and how to keep it looking great, you’re ready to take the next step.
Think about your kitchen needs and start planning the island that fits your home best. Even small changes, like picking the right layout or materials, can make a big difference.
Remember, good maintenance will help your island stay beautiful for years.
If you found this guide helpful, check out our other blogs for more smart kitchen ideas and tips.
Frequently Asked Questions
What is the ideal size for a kitchen island?
The ideal size of a kitchen island is 2-4 feet wide and 4-6 feet long, allowing comfortable movement.
How long does it take to build a custom kitchen island?
Building a custom kitchen island typically takes 1-3 weekends, depending on complexity and skill level.