Installing a water storage tank for your well involves assessing your water needs and well capacity to choose the right tank size. You’ll then pick a tank material and location and gather the necessary tools.
After prepping the area (level ground for above-ground tanks or professional guidance for below-ground), carefully position the tank and connect it to your well pump with pipes and fittings, following safety precautions and consulting a professional if needed.
Imagine a world where access to clean water is a luxury. Unfortunately, that’s the reality for over 703 million people globally. For homeowners blessed with a private well, a well water storage tank becomes an essential tool for ensuring a consistent and reliable supply of clean water for their homes. (1)
Well water storage tanks act as reservoirs, storing well water and delivering it to your household plumbing system when needed. A properly installed tank not only guarantees a steady water flow rate but also protects your well pump from unnecessary cycling, extending its lifespan and saving you money on repairs down the line.
Ready to take control of your well water supply? This guide will walk you through everything you need to know about the best way to install a storage tank system. Continue reading to learn more.
Assess Your Well and Water Needs
An assessment is a crucial first step. Before selecting a tank, consider these two essential factors: your well’s capacity and your household’s water usage. Finding this sweet spot guarantees your tank isn’t perpetually refilling or running dry, keeping your water pressure consistent and your well pump healthy.
An assessment will also allow you to address any issues before commencing with the tank installation. For instance, if you find that your well’s capacity is low, you can optimize water production by using high-tech well water harvesting systems from reliable manufacturers like EPP Well Solutions.
Determining Your Well Capacity
Several methods can help you determine your well’s production capacity:
Well recovery rate
This refers to how quickly your well replenishes water after pumping. If you have well documentation, it might include the well’s recovery rate in gallons per minute (GPM). The ideal recovery rate differs depending on your location. If you’re from New Hampshire, the minimum water supply capacity for households is at least 600 GPM within two hours once per day. (2)
Static water level
This is the depth to the water table within your well when the pump isn’t producing water pressure. A drop in static water level could signal a limited water source. You can measure the static water level yourself using a weighted rope and tape measure. However, static water level alone doesn’t equal well capacity.
Pumping Test
Wondering how you can accurately determine your well’s capacity? A pump test is the answer. It involves pumping water at a constant rate for a set time. A qualified well driller then monitors the water level in the well. The data allows them to accurately assess your well’s yield. This test is just optional, though.
Calculating Your Household’s Water Usage
Equally important is understanding your household’s daily water usage. Check out some water consumption estimation methods below.
Review water bills
Do you have access to past water bills? Analyze your average daily water usage based on the billing period.
Online water use calculators
Several online resources offer water use calculators. Use them to estimate your daily water consumption.
Why is it important to know your well’s capacity and your household’s water usage? That’s because it’ll guide you towards the ideal water storage options. If your chosen storage tank is too large, it might constantly cycle on and off trying to refill from a well that can’t keep up. This can lead to inefficiencies and potentially shorten the lifespan of your well pump.
On the other hand, what happens if a storage tank is too small and you have high demand? It won’t be able to provide enough water between well pump cycles. This can lead to pressure fluctuations and potentially even running out of water during peak usage times.
The sweet spot lies in selecting water storage options that allow your well to comfortably replenish the storage tank during off-peak hours. This ensures a consistent water flow throughout your home without putting undue stress on your well system.
Choosing the Right Water Storage Tank
Let’s explore the world of water tanks next! Selecting the right tank hinges on two main aspects. First is the type of tank itself. Next are the features that best suit your needs. Here are your options and the factors to consider when making a choice:
Types of Water Storage Tanks
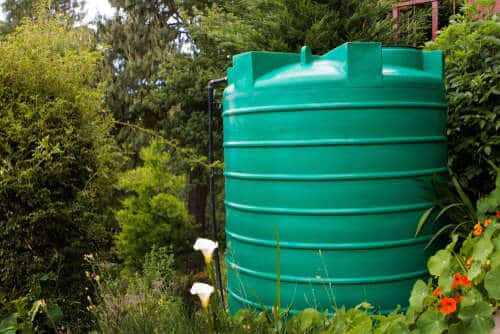
Polyethylene tanks
The global market for plastic water storage tanks is forecasted to reach USD$2.4 billion by 2030. One of the most popular plastic tanks are polyethylene ones, which are known for their affordability, durability, and lightweight design. They come in various sizes and are suitable for above-ground installations. (3)
Steel tanks
Built for strength and longevity, steel tanks are ideal for both above-ground and below-ground installations. They may require a protective coating to prevent corrosion.
Concrete tanks
These sturdy tanks offer excellent insulation and can be partially or fully buried. However, they are the heaviest option and require careful planning for placement.
Fiberglass tanks
Relatively lightweight and corrosion-resistant, fiberglass tanks are another option for above-ground installations. However, they may be more susceptible to cracking compared to steel tanks.
Factors to Consider when Selecting a Tank
Size
We’ve learned earlier that size is crucial. Your water tank should be large enough to accommodate your daily water needs without constantly refilling from your well.
Material
Consider factors like durability, corrosion resistance, and weather tolerance when choosing a material.
Location
Will your water tank be above-ground or buried? This will influence your material selection and may require additional considerations like frost protection for above-ground tanks in cold climates.
Budget
Water storage tanks come in a variety of price ranges. Determine your budget and choose a tank that offers the best value for your needs.
Features
Some tanks come with additional features like pressure gauges, level indicators, or clean-out ports. Consider which features would be beneficial for your setup.
Where to Purchase a Water Storage Tank
You can purchase storage tanks for your water system from various sources, including:
Well Drilling and Supply Companies
These companies often sell water storage tanks alongside well pumps and other water system equipment.
Plumbing supply stores
Many plumbing supply stores carry a selection of water storage tanks in various sizes and materials.
Online retailers
Several online retailers offer water storage tanks, allowing you to compare prices and features from the comfort of your home.
Select the perfect water storage tank based on the abovementioned factors to ensure a smooth-running well system for your home.
Preparing for Installation
Now that you’ve chosen your ideal water storage tank, it’s time to prepare for installation. Here are the essential steps:
Gathering the Necessary Tools and Materials
The specific tools you’ll need will depend on your chosen tank material and well system configuration. However, some general supplies might include:
Shovel (for above-ground tank placement)
Wrench set
Pex tubing or galvanized pipes (depending on your system)
Pipe cutters
Teflon tape
Safety glasses and gloves
It’s always a good idea to consult the tank’s installation manual. You can also talk to your chosen installer for a complete list of required tools and materials.
Clearing the Installation Area
You’ll need to prepare the designated area. Here’s what to consider:
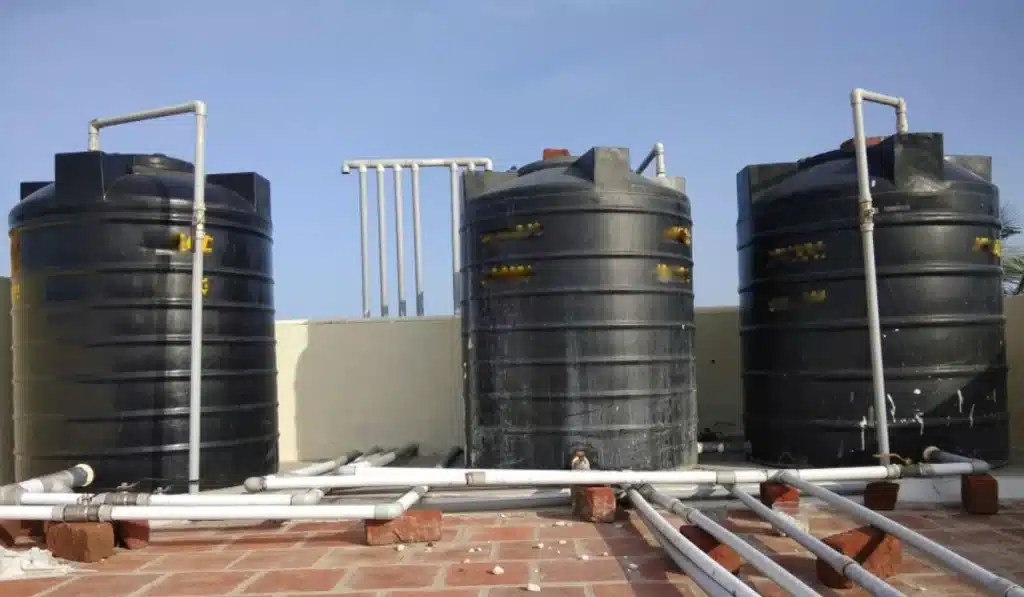
Above-ground installation
Choose a level, stable location with easy access for maintenance. Ensure there’s enough clearance around the tank for plumbing connections.
Below-ground installation
Cisterns require careful planning to ensure proper drainage and avoid frost lines in colder climates. Consult a professional for guidance on excavation depth and appropriate base material for the tank.
Making Adjustments to Your Well System (if Necessary)
In some cases, your well system might require minor adjustments to accommodate the new water storage tank. It could involve:
Installing a pressure relief valve on the tank to prevent over pressurization.
Adding a pressure gauge to monitor system pressure.
Connecting the tank to your well pump using the appropriate pipes and fittings.
Follow these preparation steps, and you’ll have your well system ready to welcome the new water storage tank.
Installing the Water Storage Tank
Okay, we’ve laid the groundwork. Now, it’s time for the exciting part: installing your water storage tank! The specifics may vary. But here’s a general overview of the process:
Positioning the Tank
Above-ground installation
Carefully maneuver the tank into the designated location you prepared earlier. Ensure it sits level and stable on a solid base.
Below-ground Installation
Following the guidance of a qualified professional, carefully lower the tank into the excavated area. Ensure proper alignment and use gravel or crushed stone to create a stable base around the tank.
Connecting the Tank to Your Well System
This crucial step involves connecting the tank to your well pump using pipes and fittings. Here’s a simplified breakdown:
Shut off the well pump
Safety first! Always turn off the well pump to reduce the system’s water pressure before making any plumbing connections.
Connect the Pipes
Following the manufacturer’s instructions and adhering to local plumbing codes, connect the tank to the well pump using the appropriate pipes and fittings. You might need to install a bypass valve to allow well water to flow directly to your home if the tank needs servicing.
Pressure relief valve
Don’t forget to install a pressure switch on the tank to safeguard against too much system pressure.
Final thoughts
There you have it. That’s how to install a water storage tank for your well. Remember that this guide is just a general overview. Consult a well service or plumbing professional if you’re uncomfortable with any aspect of the process. They can ensure the job is done right and safely.
Olivia Carter holds an MS in Systems Engineering from Stanford University and has been exploring the intricacies of advanced home systems for over a decade. Before this, Olivia worked with leading tech startups, developing innovative home solutions. She became a part of our editorial team in 2020, bringing a wealth of knowledge in home automation and AI. Previously, Olivia also led projects in home security technology. When not writing, she enjoys mountain biking and experimenting with home gadgetry.


 Above-ground installation


