Floating Frame DIY: Simple & Affordable
I love decorating my home with art, but buying frames can get expensive. That’s why I decided to make my own DIY floating frame.
It’s a simple, budget-friendly way to give any canvas a modern, polished look, and I get to customize the size and color to match my space.
In this guide, I’ll walk you through the easy steps to build a floating frame using basic tools.
You don’t need to be a woodworking expert—just a little time and patience will do the trick. The best part? It costs way less than store-bought frames.
If you have a favorite canvas that needs a stylish upgrade, this project is perfect for you. Let’s turn a plain canvas into a stunning wall art with a DIY floating frame!
What is a Floating Frame?
A floating frame is a type of frame that gives the illusion that the artwork is floating inside it.
Unlike traditional frames, it doesn’t cover the edges of the canvas, allowing the artwork to stand out more prominently.
Why DIY Floating Frame?

Buying pre-made floating frames can be expensive, and making your own allows you to customize the size, color, and material while saving money.
It’s also a fun and rewarding DIY project that adds a personal touch to your decor.
Why I Decided to Make My Frames
I love decorating my home with art, but I wanted a way to make my canvases look more polished without spending too much.
DIY floating frames gave me the perfect solution. They provide a professional look while allowing me to choose the style I want.
Materials You’ll Need
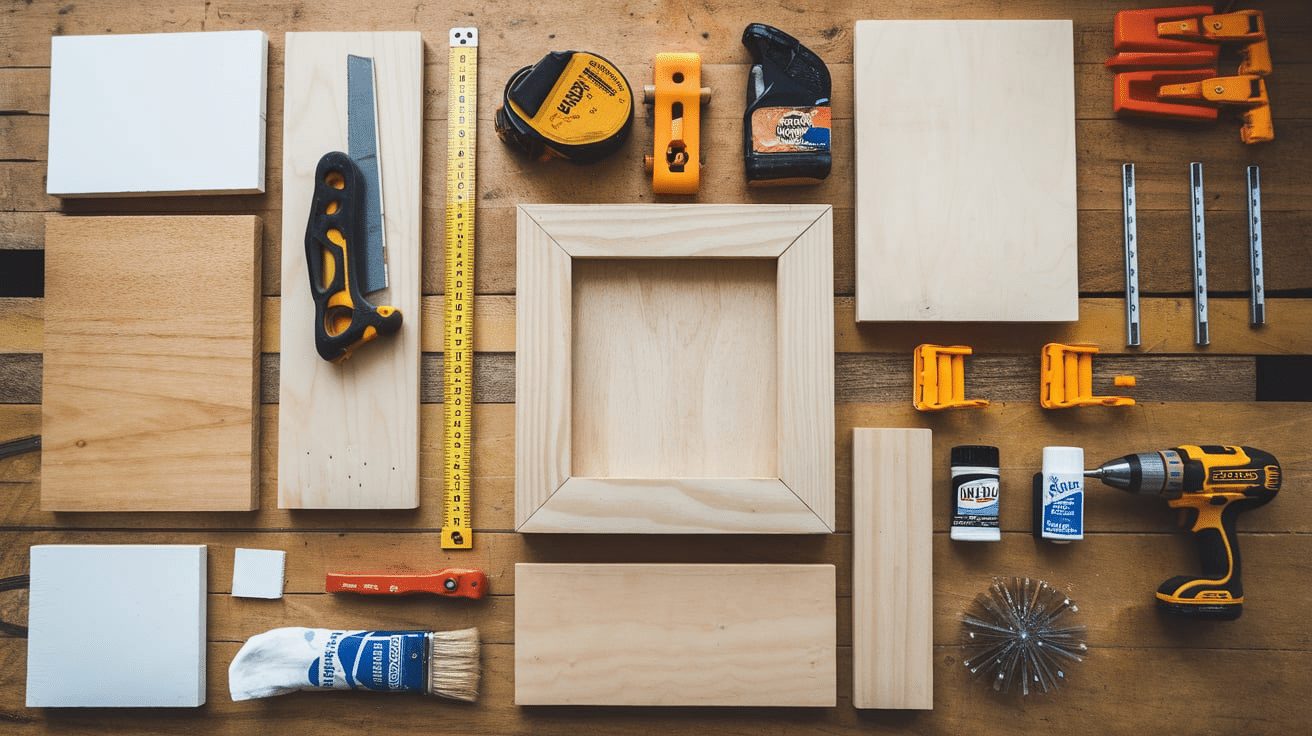
Before starting, gather these materials:
- Wooden boards (for the frame)
- Measuring tape
- Saw (hand saw or power saw)
- Sandpaper
- Wood glue
- Clamps
- Nails or screws
- Drill (if using screws)
- Wood stain or paint
- Paintbrush or cloth
- Clear sealant (optional)
- Hanging hardware (sawtooth hanger or wire)
The Step-By-Step Plan
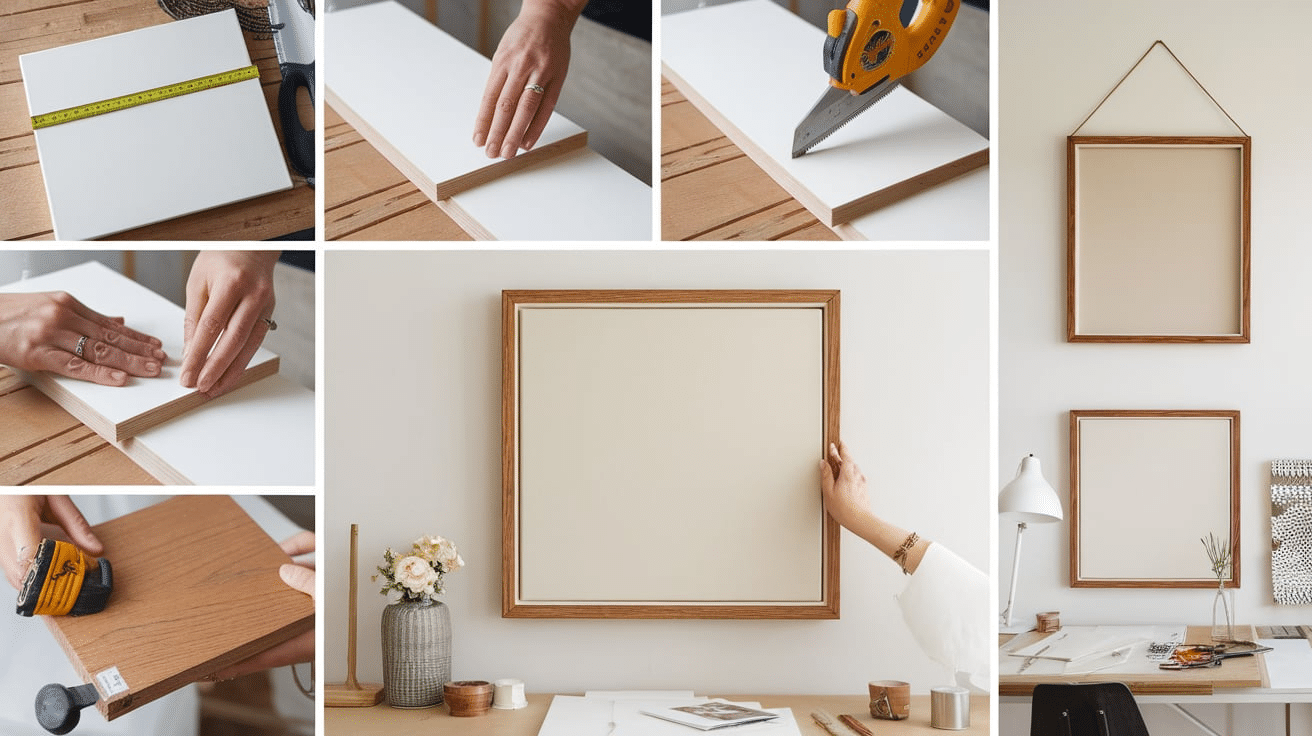
1. Measure Your Canvas
First, measure the length, width, and depth of your canvas.
The floating frame should be slightly larger than the canvas, leaving a small gap (about 1/8 to 1/4 inch) around all sides to create the “floating” effect.
2. Cut the Wood Pieces
Using your saw, cut four pieces of wood for the frame. You will need:
- Two longer pieces for the top and bottom
- Two shorter pieces for the sides
If you prefer a mitered corner look, cut the ends at a 45-degree angle. If you want a simple straight-edge frame, leave the ends at a 90-degree angle.
3. Sand and Smooth the Wood
Use sandpaper to smooth the edges and surfaces of your wood pieces. This helps prevent splinters and gives the frame a polished look.
4. Stain or Paint the Wood
Decide if you want a natural wood look or a painted finish.
If staining, use a brush or cloth to apply an even coat. Let it dry, and add a second coat if needed.
If painting, apply thin, even layers and let each dry before adding another. A clear sealant can be used for extra protection.
5. Assemble the Frame
Lay the wooden pieces on a flat surface and arrange them into a rectangle.
Apply wood glue along the edges where the pieces meet. Use clamps to hold them together while the glue dries.
If you want extra strength, reinforce the joints with nails or screws.
6. Let the Frame Dry
Once the frame is assembled, allow it to dry completely.
Wood glue usually takes a few hours to set, but leaving it overnight will ensure maximum strength.
If you use nails or screws, double-check that everything is secure before moving on to the next step.
7. Mount a Canvas into a Canvas Float Frame
Once the frame is dry, place your canvas inside.
The canvas should “float” within the frame with a small gap on all sides.
Secure the canvas by attaching small blocks of wood behind it, or use corner brackets inside the frame to hold it in place.
Please make sure the canvas is centered before fully securing it.
8. Add Hanging Hardware
Attach a sawtooth hanger or wire to the back of the frame.
Make sure it is centered so the frame hangs evenly on the wall.
If using wire, attach D-rings to both sides and connect them with sturdy picture-hanging wire.
9. Display Your Artwork
Find the perfect spot to hang your framed canvas.
A floating frame adds a professional, polished look to any piece of art. Step back and admire your work!
Benefits of a Floating Frame
- Enhances the appearance of canvas art
- It provides a modern, professional look
- Protects the edges of the canvas
- Fully customizable in terms of size, color, and material
- Budget-friendly compared to store-bought frames
Common Mistakes and How to Avoid Them
- Uneven measurements: Double-check dimensions before cutting wood.
- Not allowing enough drying time: Let the glue and paint dry fully before moving to the next step.
- Misalignment: Use a level to align your frame and canvas properly.
- Weak joints: Reinforce with nails or screws for added durability.
Tips for Success
- Choose wood that matches your home decor.
- Use a level to make sure your frame is straight.
- Experiment with different stains and paints to customize the look.
- If you don’t have a saw, most hardware stores can cut wood to size for you.
- Work in a well-ventilated area when using paint, stain, or glue.
Conclusion
Creating a DIY floating frame is a great way to enhance your canvas art without spending a lot of money.
It allows you to customize the frame to match your style and gives your artwork a professional touch. With just a few tools and materials, you can build a beautiful frame that makes your artwork stand out.
This project is also a great way to develop woodworking skills while adding a personal touch to your home decor.
You can experiment with different stains, paints, and frame sizes to achieve the perfect look for your space.
One of the best things about making your own floating frame is the satisfaction of completing a project with your own hands.
It’s rewarding to see your artwork displayed in a custom frame that you built yourself. Try this project and give your artwork the perfect finishing touch!
Frequently Asked Questions
What is a floating frame?
A floating frame is a type of frame that leaves a small gap around the canvas, making it look like it’s “floating” inside the frame.
How do I measure my canvas for a floating frame?
Measure the length, width, and depth of your canvas, then add a small gap (about 1/8 to 1/4 inch) for the floating effect.
How do I attach my canvas to the floating frame?
Use corner brackets or small wooden blocks behind the canvas to securely hold it.
Can I paint or stain my floating frame?
Yes, you can paint or stain the frame to match your decor and enhance the look of your artwork.
How long does it take to make a floating frame?
Depending on drying times for glue and paint, it can take a few hours to a day to complete.