DIY Shower and Remodel On a Budget
Remodeling a shower is a practical way to update a bathroom without spending a fortune.
Homeowners renovate their showers due to functional issues like leaks, mold, and poor drainage, while others want to refresh the style with modern fixtures and designs.
A well-planned DIY shower remodel can improve your bathroom’s appearance and functionality while keeping costs low.
This guide covers everything you need to know, from essential materials and step-by-step instructions to design ideas, maintenance tips, and cost breakdowns.
Following these guidelines allows you to modify your shower space efficiently and affordably.
Whether upgrading for comfort or resale value, a DIY remodel can be a smart investment.
Materials Needed for a DIY Shower Remodel
Demolition Tools:
- Hammer and prybar for removing old tile
- Gloves to protect your hands
- Safety glasses for eye protection
Waterproofing Materials:
- Cement board or tile backer board (like USG Fiberock)
- Waterproofing membrane (such as Mapei AquaDefense or Schluter Kerdi)
- Waterproof sealant for corners and edges
Tile Options:
- Wall tiles (subway tiles are budget-friendly)
- Accent tiles for design features
- Bullnose trim pieces for edges
- Tile spacers for even gaps
Installation Materials:
- Mortar/thin-set for setting tiles
- Grout for filling gaps between tiles
- Caulk for inside corners and where tile meets tub
- Silicone sealant for areas with direct water contact
Shower Components:
- Shower pan or materials for a tiled base
- Shower fixtures (head, handle, drain)
- Optional: materials for a bench seat or built-in shelf
Tools :
- Tile saw or snap cutter
- Trowels for applying mortar
- Grout float and sponge
- Level to ensure a straight installation
- Measuring tape and pencil
Stepwise Guide to DIY a Shower Remodel on a Budget
Planning and Measuring Your Space
Start by taking exact measurements of your shower area. Plan your tile layout before buying materials to avoid waste.
Consider the placement of fixtures, shelves, and any special features. This planning stage helps you create a budget and shopping list.
Demolition of Existing Shower
Put on safety gear and remove all existing tile and backer board down to the studs. Be careful not to damage plumbing or wiring behind walls.
Remove old fixtures and clear the space completely. This step can be messy, so cover nearby areas to protect them.
Framing for New Features
If you want to add a bench seat or shelf, now is the time to build the frame. Use 2x4s to create the structure.
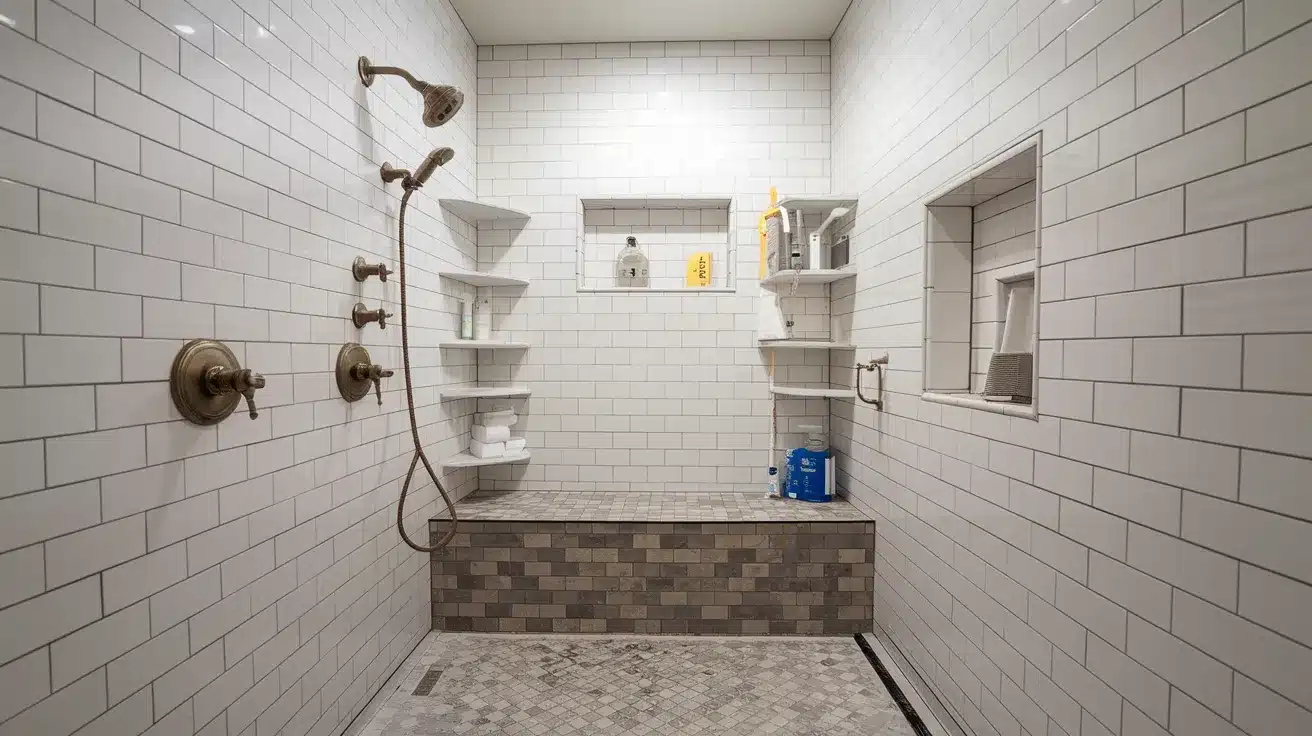
One DIYer framed a bench seat to fill extra space between the shower pan and back wall, plus added false walls to create a shelf for shampoo bottles.
Installing Shower Pan or Base
Set up your shower base according to manufacturer instructions. Make sure it’s properly leveled.
If your drain needs adjusting, this is the time to fix it. Prepare the area with a mud bed before placing the pan for shower pans.
Waterproofing the Walls
Install cement board or tile backer board on the walls.
Apply a waterproofing membrane like Mapei AquaDefense or Schluter Kerdi to prevent water damage. This step is critical for the long-term success of your shower.
Apply the waterproofing to all surfaces that will be tiled.
Tiling Process
Start with the first row of tiles, ensuring it’s perfectly level—work in small sections, applying mortar with a notched trowel.
Use tile spacers for even gaps. Cut tiles as needed using a tile saw or score-and-snap cutter. For best results, “back butter” tiles by applying mortar to the back of each piece.
Grouting and Sealing
After tiles are set (usually 24-48 hours), apply grout between them using a grout float—work in small sections, cleaning excess with a damp sponge before drying.
For inside corners, use waterproof sealant instead of grout. Once everything is dry, apply sealer to the tiles and grout to protect against moisture and stains.
By following these steps carefully, you can complete a shower remodel that looks professional without the professional price tag.
DIY Shower Base Options: Pan vs. Tile Floor
| Feature | Acrylic Shower Pan | Tile Shower Floor |
|---|---|---|
| Installation | Easier to install, great for DIYers | Requires more time and skill to install |
| Customization | Limited colors and sizes | Highly customizable with various tile options |
| Waterproofing | Built-in waterproofing | Requires proper waterproofing techniques |
| Maintenance | Easy to clean with minimal upkeep | Grout requires regular sealing and cleaning |
| Durability | Resistant to cracks but can scratch | It is more durable, but grout can wear over time |
| Aesthetic Appeal | Simple and functional | Can achieve a high-end, stylish look |
Innovative Shower Design Ideas for Every Bathroom
Mixed Tile Patterns and Colors
Create visual interest by combining different tile styles.
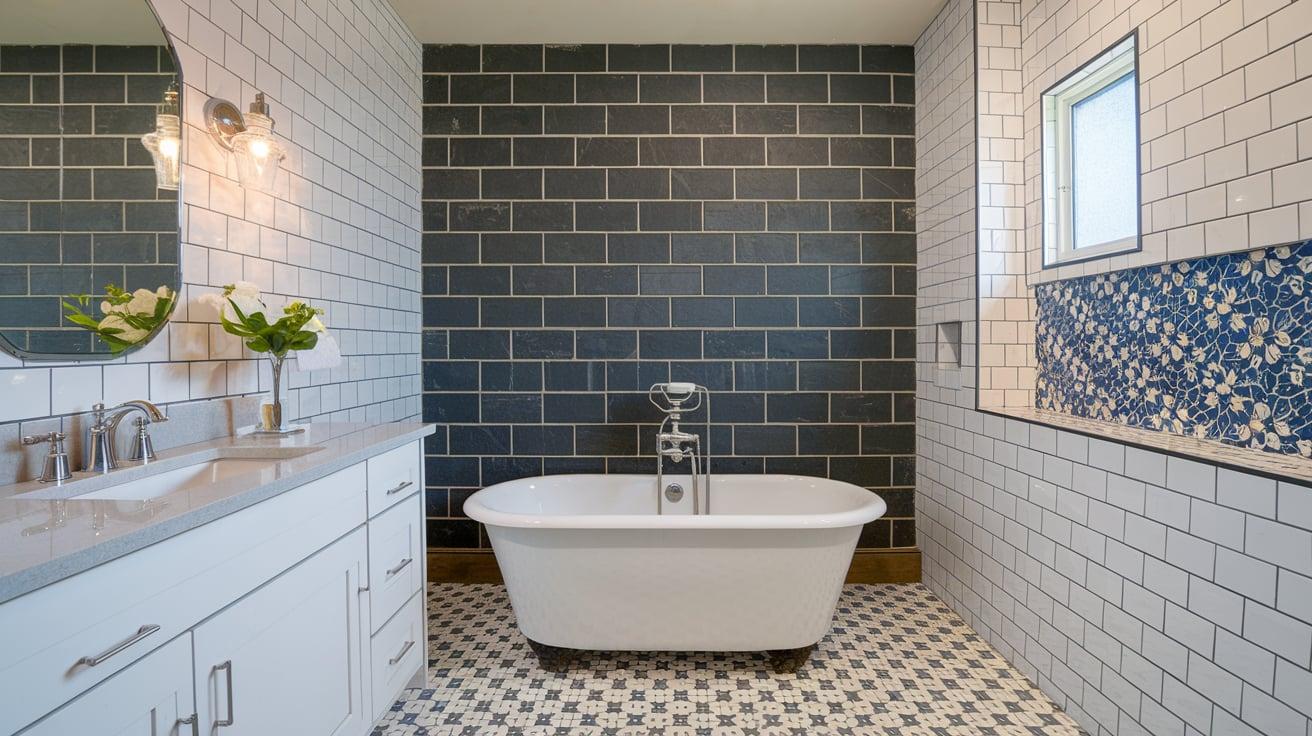
In one example from our sources, a homeowner used dark slate 4×12 tiles installed vertically on the back wall and white subway tiles laid horizontally on the side walls.
Another DIYer combined white subway tile with blue flower mosaic accent tiles to create a stunning focal point.
You can also mix tile sizes—using larger tiles for the main walls and smaller ones for accents saves time and money.
Built-in Niches and Shelves
Add practical storage without taking up floor space. One creative solution was building a full-length shelf into the shower wall to hold shampoo and soap bottles.
Custom shower niches can be built between wall studs and tiled to match your shower. These built-ins look great and keep bathroom products within easy reach.
Bench Seating Options

A bench seat adds both comfort and style to your shower.
You can build one by framing a section with 2x4s and covering it with cement board before tiling. Use larger tiles on the bench to minimize grout lines for a clean look.
One remodeler used matching 16×16 slate tiles cut to fit their bench seat, creating a sleek appearance.
Shower Curtain vs. Glass Door Considerations
Consider your budget and style preferences when choosing between a shower curtain and a glass door.
Shower curtains cost much less than glass doors and can be easily changed when you want a new look.
One DIY chose a charcoal-colored shower curtain to complement their grey and white tile combination.
For smaller bathrooms, curtains can also make the space feel larger than a door that swings open.
By incorporating these design ideas, you can create a shower that reflects your style while staying within your budget.
How to Maintain and Clean Your New Shower
Cleaning Recommendations for Different Surfaces
Use mild cleaners for tile and non-abrasive products for acrylic pans. Avoid acidic cleaners on natural stone tiles.
White subway tiles hide water spots better than dark tiles. Clean regularly with appropriate products to prevent buildup and staining.
Preventing Mold and Mildew
Run your bathroom fan during and after showers. Wipe walls with a squeegee after use. Use mold-resistant sealants in corner joints.
Keep shower curtains spread open to dry completely. Good airflow and reduced moisture are your best defenses.
When to Reseal Grout and Joints
Inspect sealed areas every 6-12 months. Reapply sealer when water stops beading on surfaces.
Apply penetrating sealer to both tiles and grout for maximum protection. Early maintenance prevents costly water damage to walls behind the tile.
Long-term Maintenance Tips
Check regularly for cracked tiles or missing caulk. Clean shower heads to prevent mineral buildup. Pay special attention to inside corners.
Shower pans require less maintenance than tiled floors, giving you peace of mind about potential leaks.
Mistakes to Avoid When Remodeling a Shower
Improper Waterproofing
Many DIYers rush past proper waterproofing. Always use quality products like Mapei AquaDefense or Schluter Kerdi on all shower walls.
Apply the waterproofing membrane completely and let it dry fully before tiling. Water damage from poor waterproofing can ruin walls and floors beneath your shower.
Poor Drainage Planning
One homeowner mentioned their old shower pooled water in the corner instead of flowing to the drain.
Ensure your shower floor has the correct slope toward the drain. When installing a pan, check it with a level before securing it.
Proper drainage prevents water damage and mold growth.
Tile Layout Mistakes
Start with a level first row as your foundation. Avoid tiny slivers of cut tile around fixtures.
Plan your layout before starting to create balanced, visually pleasing patterns. One DIYer recommended first dry-fitting tiles.
Skipping Important Steps
Don’t rush through crucial steps like letting mortar fully set before grouting. Always seal natural stone tiles before grouting to prevent staining.
Use proper sealant in corners instead of grout. Taking shortcuts might save time now but causes problems and expenses later.
Conclusion
While the process takes time and patience, the results are worth it. Your new shower can fix drainage issues, be easier to clean, and match your style perfectly.
Plan thoroughly, invest in proper waterproofing, take your time with the first row of tiles, and never skip the sealing step. Work in small sections, and don’t rush.
Ready to modify your bathroom?
With these tips and a weekend or two of work, you can create a beautiful new shower that looks professional without the professional price tag.
Frequently Asked Questions
How Long Does a DIY Shower Remodel Take?
It depends on the complexity, but most DIY projects take one to two weeks.
Can I Remodel My Shower Without Professional Help?
Yes, but ensure you have the right tools and knowledge for waterproofing and tiling.