How to Grow Microgreens Indoors Successfully
Microgreens are one of the fastest, cheapest crops you can grow at home. A tray of seeds costs only a few dollars and needs no yard or garden space. You can harvest a full crop in about a week.
This post covers how to grow microgreens the right way, from setup to harvest. You will learn the supplies you need and how to plant your trays.
You will also learn how to water, light, and avoid the common mistakes beginners make.
What Are Microgreens
Microgreens are young vegetable and herb seedlings, harvested one to three weeks after germination. They’re picked right after the first true leaves appear above the initial seed leaves.
Sprouts are grown in water and eaten whole, root and all. Microgreens are different. They grow in soil, or a soil-free medium, and only the stem and leaves get cut and eaten.
According to North Carolina State University’s Cooperative Extension, microgreens sit between sprouts and baby greens in size and maturity. They usually reach one to three inches tall before harvest.
Because they’re cut so young, they carry a stronger flavor and more nutrients by weight than the full-grown plant.
Why Grow Microgreens at Home
Growing your own microgreens brings more than fresh flavor to your plate. Here’s why so many home growers stick with this small crop long after the first tray.
- Higher nutrient density: Research from the University of Maryland found that some microgreens carry several times more nutrients than the mature vegetable, gram for gram.
- Lower cost: A packet of seeds costs a fraction of what store-bought microgreen containers sell for.
- No yard needed: A windowsill or countertop gives you enough space to grow a full tray.
- Fast harvest: Most varieties are ready to cut within one to three weeks of planting.
What You Need to Get Started
Before you plant a single seed, gather these basic supplies. None of it costs much, and you can reuse most items for future trays.
|
Supply |
Purpose |
|---|---|
|
Shallow tray with drainage holes |
Holds the growing medium and lets excess water drain out |
|
Growing medium |
Feeds and supports the roots, whether potting mix, seed-starting mix, or a soil-free mat |
|
Untreated microgreen seeds |
The seeds that will become your microgreens, ideally organic and untreated |
|
Spray bottle |
Waters seedlings gently without disturbing the soil surface |
|
Scissors |
Used to harvest at the soil line once greens are ready |
|
Grow light (optional) |
Supplements or replaces natural sunlight indoors |
|
Humidity dome or plastic wrap (optional) |
Traps moisture during the germination period |
How to Plant Microgreens Step by Step
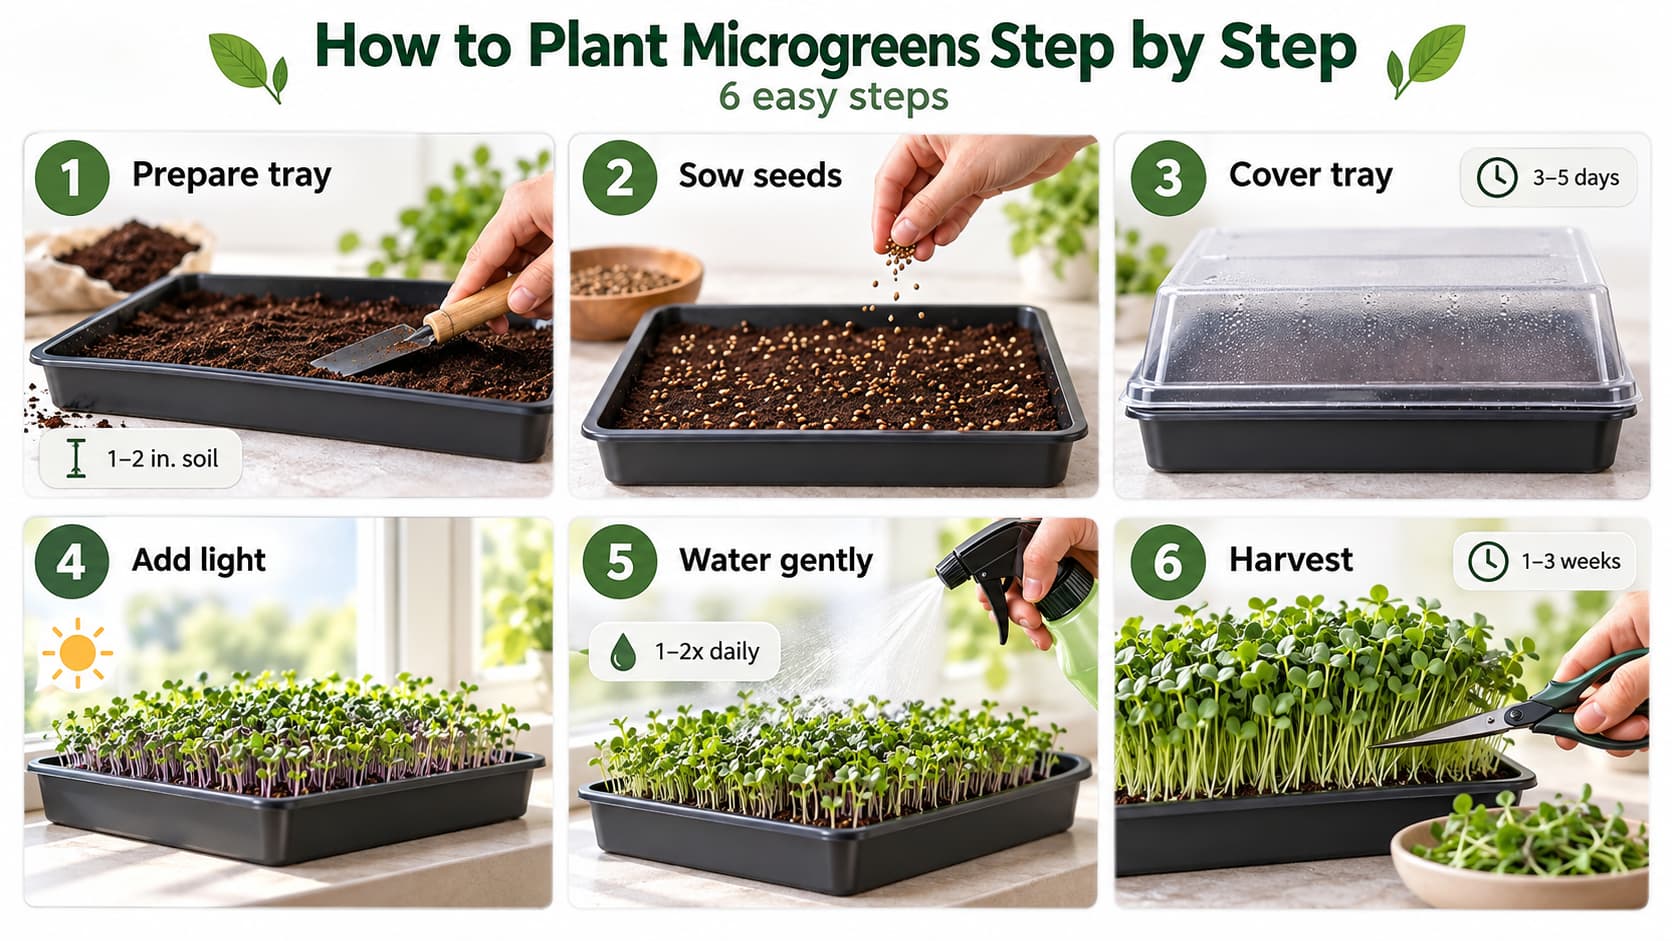
Planting microgreens follows the same basic routine no matter which seeds you choose. Follow these six steps and your first tray will be ready before you know it.
Step 1: Prepare Your Container
Fill your tray with one to two inches of moistened growing medium. Gently press it down with your hand or a flat piece of cardboard, keeping the surface level. Avoid packing the medium too tightly, since roots still need room to spread.
Step 2: Sow the seeds
Scatter your seeds evenly across the surface until most of the medium is covered. Press them lightly into place with your palm. Avoid clumping seeds together, since crowded patches often grow weak and thin, while bare spots waste tray space.
Step 3: Cover and Start the Blackout Period
Cover the tray with a humidity dome, plastic wrap, or a second tray turned upside down. Keep it in a warm spot away from direct light for three to five days. Check daily and mist if the surface feels dry.
Step 4: Uncover and Introduce Light
Once tiny sprouts start pushing up, remove the cover and move the tray to a sunny windowsill or under a grow light. This step signals the plant to start producing chlorophyll and turn green. Without enough light here, your microgreens will stay pale and weak.
Step 5: Water Consistently
Mist the soil once or twice a day, keeping it moist but never soggy. Check the surface with your finger before each watering, and skip a round if it still feels damp. Overwatering at this stage is one of the fastest ways to invite mold.
Step 6: Harvest at The Right Time
Most microgreens are ready one to three weeks after planting, once the first true leaves appear. Use clean scissors to snip just above the soil line, then rinse gently, and pat dry before using.
Watering Microgreens the Right Way
Watering seems simple, but it’s the step that trips up the most beginners. Get this part right and mold, rot, and dry patches become far less common.
- Bottom watering: Set your tray inside a slightly larger tray filled with water and let the soil soak it up from below.
- Top misting: Use a spray bottle instead of a watering can so you never disturb the seeds or soil surface.
- Watering frequency: Water once or twice daily, adjusting based on how quickly your tray dries out.
- Signs of overwatering: Watch for a sour smell, white fuzzy patches, or standing water at the bottom of the tray.
- Signs of underwatering: Wilting, curling leaves, or soil pulling away from the tray edges mean it’s time to water.
Light Requirements for Microgreens
Light is what turns pale, leggy sprouts into flavorful, green microgreens. Here’s what different light sources offer and how to use each one.
|
Light Source |
Recommended Use |
|---|---|
|
South-facing window |
At least 4 hours of direct sunlight daily; the best natural option |
|
LED grow light |
12 to 16 hours daily, ideal when natural light is limited |
|
East or west-facing window |
Works, but may need a grow light to fill the gaps |
|
No natural light available |
Rely fully on a grow light set on a timer |
Growing Microgreens Without Soil
You don’t need soil to grow microgreens successfully. Hydroponic growing mats made from coconut coir, hemp, or jute work as a mess-free alternative.
They hold moisture and give roots something to grip onto. These mats don’t carry natural nutrients the way soil does.
Add a diluted liquid fertilizer once seedlings sprout. Soil-free growing is easier to clean up and works well for smaller seeds like broccoli or arugula. Larger seeds such as peas and sunflowers still benefit from a thin layer of soil. It helps anchor their heavier stems as they grow.
Easiest Microgreens for Beginners
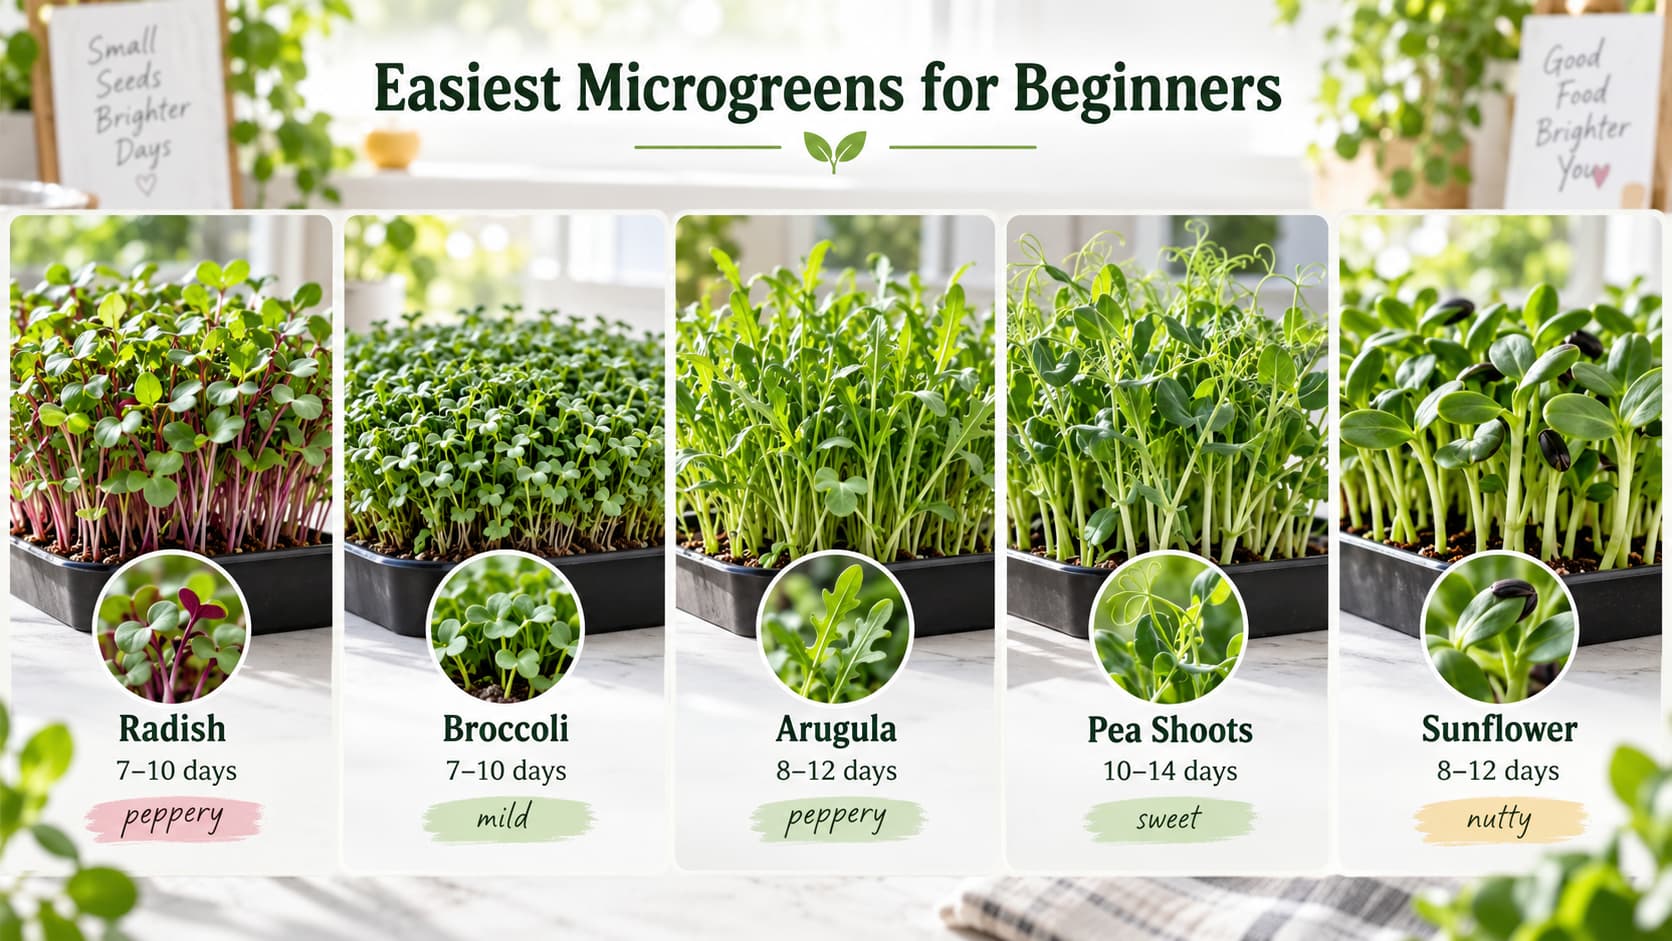
Not every seed grows at the same pace or with the same level of difficulty. These varieties are the most forgiving choices if you’re just starting out.
1. Radish
Radish microgreens sprout fast, usually ready within seven to ten days. They have a spicy, peppery bite that works well on sandwiches and salads. Seeds don’t need soaking before planting, making them easy for a first tray. Because they grow quickly, radish is a good confidence builder for new growers.
2. Broccoli
Broccoli microgreens take about eight to twelve days to reach harvest size and carry a mild flavor.
A study published through Penn State and the National Institutes of Health found broccoli microgreens deliver measurable amounts of sulforaphane. This compound has been linked to several health benefits. Broccoli is also forgiving of minor watering mistakes, which makes it a solid pick for beginners.
3. Arugula
Arugula is ready in about seven to ten days and brings a peppery, slightly nutty flavor. Seeds are small, so scatter them thinly to avoid overcrowding. It grows fast enough that you can correct mistakes quickly on your next tray. This is a good pick if you want a strong flavor without a long wait.
4. Pea shoots
Pea shoots take a bit longer, usually ten to fourteen days. Soak the seeds for six to eight hours before planting. Their flavor is sweet and mild, closer to fresh snap peas than a leafy green. Because the seeds are large, they’re easy for beginners with limited dexterity to handle. Pea shoots also tend to stand taller, which makes harvest simple with scissors.
5. Sunflower
Sunflower microgreens need ten to fourteen days and, like peas, benefit from soaking beforehand. They have a nutty, slightly crunchy texture that holds up well in salads and wraps. Their thicker stems make them one of the more satisfying varieties to harvest. Give them extra space in the tray since their stems grow wider than smaller seeds.
Common Mistakes When Growing Microgreens
A few small errors account for most failed trays. Knowing them ahead of time can save you a wasted batch of seeds.
|
Mistake |
Fix |
|---|---|
|
Overwatering |
Water once or twice daily and check the soil before adding more |
|
Sowing seeds too thick or thin |
Scatter seeds evenly across the surface, not in clumps or bare patches |
|
Skipping the blackout period |
Cover trays for three to five days to encourage even germination |
|
Reusing old soil |
Start each new tray with fresh growing medium to avoid disease |
|
Not enough light after sprouting |
Move trays to a bright window or grow light as soon as sprouts appear |
Harvesting and Storing Microgreens
Once your microgreens reach harvest size, a few small habits make a real difference in flavor and shelf life. Here’s what to do after you make the cut.
- When to harvest: Cut once the first true leaves appear, usually one to three inches tall.
- How to cut: Use clean scissors and snip just above the soil line.
- Rinsing: Rinse gently under cool water right before eating, not right after harvest.
- Drying: Pat dry with a paper towel or spin lightly in a salad spinner.
- Storage: Keep in a sealed container in the refrigerator and use within about a week.
- Regrowth: Most varieties will not regrow after cutting, so start a new tray if you want more.
Are Microgreens Safe to Eat?
Microgreens are generally safe to eat raw when grown and handled with basic care. They still carry some of the same risks as sprouts. Both grow in warm, moist conditions that let bacteria grow fast. The CDC has repeatedly warned that raw sprouts are a known source of foodborne illness linked to Salmonella, E. coli, and Listeria.
It advises children, older adults, pregnant women, and people with weakened immune systems to take extra care around raw sprouts. Microgreens are typically grown with more airflow and light exposure than sprouts, which lowers the risk. That said, they don’t eliminate the risk.
At home, you can lower your risk further by using clean containers and sanitizing trays between batches. Avoid reused soil, and refrigerate your harvest right away.
Conclusion
Growing microgreens at home is one of the simplest ways to add fresh, nutrient-rich greens to meals.
It takes no garden and very little time. Once you understand the basics of soil, water, light, and timing, trays grow themselves.
Start with an easy variety like radish or broccoli, watch how it responds to your setup, then adjust from there. Within a week or two, you’ll have a windowsill full of fresh greens. Snip, rinse, and add them to your plate.
Frequently Asked Questions
Do microgreens regrow after cutting them?
Usually, no. Most microgreens do not regrow after harvesting, although pea shoots may sometimes produce a second crop.
When should you not eat microgreens?
Do not eat microgreens that look moldy, slimy, spoiled, or smell sour. People at higher risk of foodborne illness should take extra care with raw microgreens.
What is the healthiest microgreen to eat?
Broccoli microgreens are a nutrient-rich option and are especially known for containing sulforaphane. Eating different varieties provides a broader range of nutrients.
Is it okay to eat microgreens every day?
Yes, most healthy adults can eat microgreens daily as part of a varied diet.
Do microgreens need to be washed before eating?
Yes. Rinse microgreens gently under cool running water before eating and dry them thoroughly.
What are the downsides of microgreens?
Microgreens have a short shelf life, require regular care while growing, and can carry foodborne bacteria if grown or handled improperly.