21 Beadboard Bathroom Ideas and Installation Tips
A bathroom can feel complete with just a few thoughtful changes, but knowing which upgrade makes the biggest difference is not always easy.
I often find that simple wall treatments create a bigger visual impact than expensive renovations, and beadboard in bathroom spaces continues to be a favorite.
If you’re wondering how to install beadboard with the right materials and layout, this blog covers everything you need to know: beadboard design ideas, installation steps, and maintenance advice before you begin.
Is Beadboard In a Bathroom a Good Choice?
Yes, Beadboard has earned its place in bathroom design for good reason. It adds texture, protects lower walls, and works with many decorating styles.
Beyond its classic good looks, the grooved panels add depth and dimension to flat walls while acting as a buffer against everyday splashes near sinks, tubs, and showers.
It’s a forgiving material that hides minor wall imperfections and pairs easily with almost any color palette or fixture style, from farmhouse to modern coastal.
It isn’t maintenance-free, though. Lower-quality materials can warp in humid environments, and unsealed seams can trap moisture over time.
But the right material choice and careful installation avoid most of these drawbacks.
Bathroom Beadboard Ideas for Every Space
Beadboard works in both classic and modern bathrooms when paired with the right finishes. These ideas can help you picture what fits your own space.
1. Traditional White Beadboard with Neutral Walls
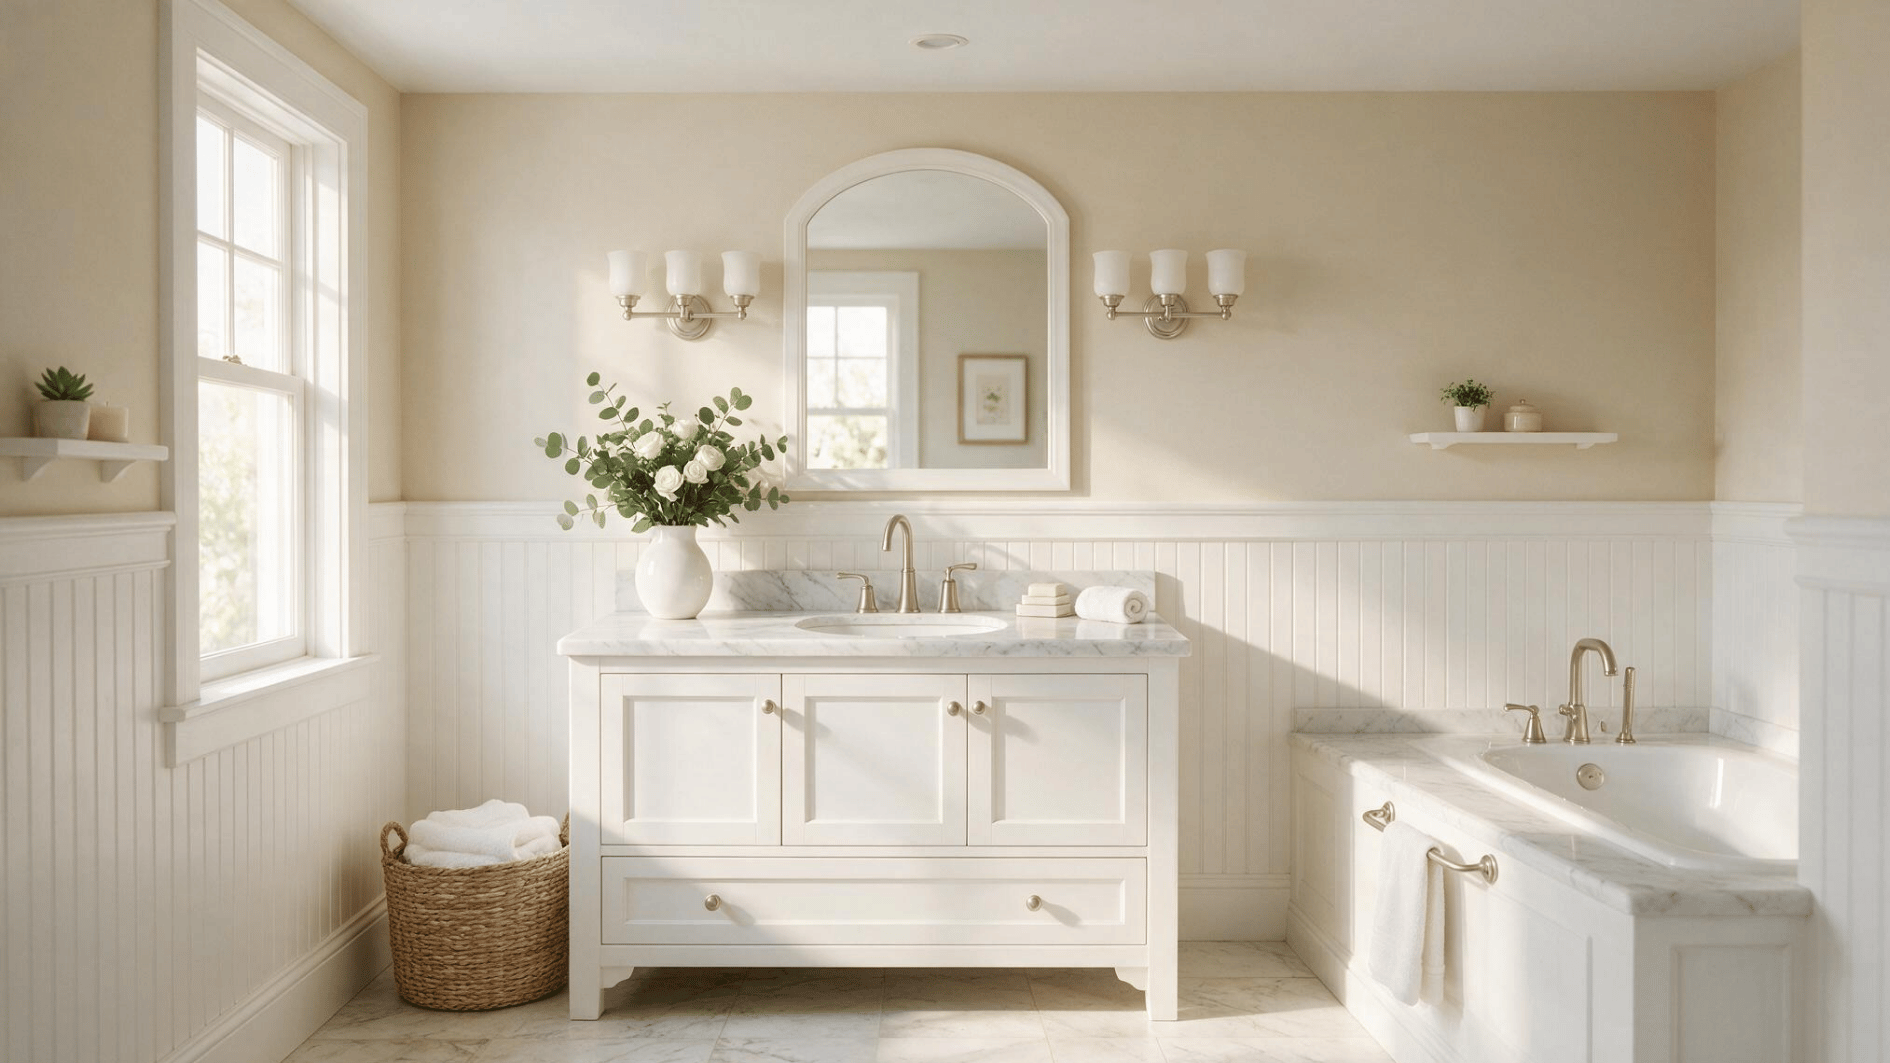
This timeless combinationkeeps bathrooms bright while adding subtle texture. Crisp white beadboard against soft neutral tones on the upper wall creates a clean, airy look that suits nearly any style.
Key Points:
- Pairs wellwith almost any flooring or fixture finish
- Especially good fit for smaller bathrooms, since light tones help the space feel more open
- Tends to age well and rarely feels dated over time
2. Modern Painted Beadboard in Soft Colors

Muted greens, blues, and warm grays create a fresh appearance without overwhelming the room. Painting beadboard in a contemporary hue keeps the classic paneling silhouette while updating the overall feel.
Key points:
- Calming spa-like tones or warmer, cozier shades both work well
- Paint color can completely change the mood of the room
- Easy to refresh later, since repainting is far less involved than replacing panels
3. Half-Wall Beadboard with Wallpaper Above

Mixing textures creates visual interest while keeping installation manageable. A half-wall of beadboard topped with a chair rail and patterned wallpaper above adds personality without covering the entire wall.
This layered approach to wall treatments appears often in French country bathroom ideas, where mixing textures is a core part of the style rather than an afterthought
Key points:
- Works especially well in powder rooms for a bold design statement
- Beadboard protects the lower wall while wallpaper handles the visual interest above
- Practical for rental bathrooms, since wallpaper can be swapped out later
4. Full-Height Beadboard for Cottage Bathrooms

Extending beadboard higher up the wall creates a cozy, finished appearance. Floor-to-ceiling paneling suits cottage, coastal, and farmhouse-style bathrooms particularly well.
Full-height paneling also fits naturally into modern farmhouse bathroom decor, where the emphasis on natural materials and layered texture makes it a practical and fitting choice.
Key points:
- Adds character to smaller bathrooms with a sense of intentional design
- Offers more moisture protection thanks to the added wall coverage
- Especially useful in bathrooms with limited ventilation
5. Beadboard Accent Wall Behind the Vanity

A single feature wall adds depth without remodeling the entire room. Installing beadboard behind just the vanity or mirror is a lower-cost way to introduce texture and interest.
Key points:
- Creates a natural focal point without competing with the rest of the space
- Lower-cost than a full-room installation
- Good option for testing the look before committing elsewhere in the bathroom
6. Beadboard Ceiling for a Unique Twist

Bringing beadboard overhead instead of on the walls adds unexpected texture and a cozy, cottage-like feel. A painted beadboard ceiling works especially well in bathrooms with plain walls.
Key points:
- Gives the eye somewhere interesting to land without changing the room’s footprint
- Particularly good for sloped or vaulted ceilings
- Highlights architectural details rather than hiding them
7. Dark Color Beadboard

Dark, dramatic tones on beadboard create a striking contrast against white fixtures, brass hardware, or light countertops. This bolder approach suits bathrooms aiming for a moodier, more sophisticated feel.
- Works particularly well in smaller powder rooms
- A strong statement that doesn’t overwhelm compact spaces
- Pairs well with warm lighting and metallic accents to keep the look inviting
8. Beadboard Wainscoting Around the Tub

Wrapping beadboard around the base of a freestanding or built-in tub adds a tailored, furniture-like quality to the space. It also offers a practical layer of protection against water splashes.
Key points:
- Smart choice for bathrooms where the tub is the visual centerpiece
- Adds a furniture-like, built-in feel to the tub area
- Moisture-resistant material is especially important here due to frequent water contact
9. Beadboard Paired with Beadboard Cabinetry

Matching wall paneling with beadboard-style cabinet doors creates a cohesive, custom-built look throughout the room. This pairing is popular in cottage and traditional-style bathrooms.
Key points:
- Unified material palette makes the space feel more intentional
- Simple way to elevate stock cabinetry
- Helps the vanity feel like a built-in feature rather than a separate piece
10. Beadboard with Contrasting Trim Color

Painting the trim, cap molding, or chair rail in a shade that contrasts with the beadboard itself adds a subtle architectural accent. Even a small contrast helps define the lines of the wall.
Key points:
- White trim against pale gray panels is a classic, easy combination
- Gives the design a more custom, finished appearance
- One of the easiest ways to add visual interest without a new color or material
11. Horizontal Beadboard

Running panels horizontally instead of vertically gives the classic beadboard look a more relaxed, beach-house feel. It’s a simple way to reference coastal style without adding literal nautical decor.
Key points:
- Pairs well with light woods, woven textures, and soft blues
- Widens the visual feel of a narrow bathroom
- Works nicely with shiplap-style trim for added texture
12. Beadboard in Soft Pastels Bathroom

Pale pink, mint, or buttery yellow beadboard brings a nostalgic, retro charm to a bathroom. This works especially well in older homes or spaces designed around a vintage theme.
Key points:
- Pairs beautifully with black-and-white tile or checkerboard flooring
- Softens the room without feeling overly bold
- Easy to update seasonally with new textiles and accessories
13. Beadboard on a Sloped Ceiling Nook

Following the angle of a sloped ceiling or dormer with beadboard turns an awkward architectural feature into a design highlight. It adds warmth to spaces that might otherwise feel like leftover square footage.
Key points:
- Great for attic bathrooms or upstairs powder rooms
- Draws attention to unique architectural lines instead of hiding them
- Works well paired with a skylight or small window
14. Two-Tone Beadboard Wall

Splitting a beadboard wall into two colors, stacked or side-by-side, creates a custom, tailored appearance. This is an easy way to add subtle contrast without a full pattern or wallpaper.
Key points:
- Works well with a horizontal color break at chair-rail height
- Lets you tie in two colors from elsewhere in the bathroom
- Simple to repaint if you want to update the palette later
15. Beadboard Wrapped Around a Window

Extending beadboard around a window frame instead of stopping at the edges creates a built-in, custom-millwork look. It’s a small detail that makes a big difference in perceived quality.
Key points:
- Frames natural light in a way that feels intentional
- Pairs well with simple roman shades or café curtains
- Adds a tailored, high-end feel without major renovation
16. Beadboard Behind Open Shelving

Installing beadboard as a backdrop for open shelves adds texture behind displayed towels, baskets, or décor. It keeps functional storage from looking flat or plain.
Once the beadboard backdrop is in place, stylish bathroom shelf decorations can help with deciding what to display and how to arrange it so the whole wall feels cohesive.
Key points:
- Great for bathrooms without much cabinet space
- Makes everyday items feel more like intentional styling
- Works well painted in a shade that contrasts with the shelves
17. Beadboard with Beaded Inset Cabinet Doors

Extending the beadboard groove pattern into inset cabinet doors ties the whole room together in one cohesive material story. It’s a detail typically found in higher-end custom builds.
Key points:
- Creates a seamless look between walls and cabinetry
- Popular in Shaker-style and cottage-style bathrooms
- Best planned early, since custom cabinet doors take extra lead time
18. Beadboard Framed Mirror

Adding a simple beadboard frame around a mirror echoes the wall treatment in a smaller, more affordable detail. It’s an easy way to tie a mirror into the rest of the room’s design.
Key points:
- Inexpensive upgrade compared to a full wall installation
- Great for renters who can’t alter the walls directly
- Works well with a thin painted trim to match the wall color
19. A Board-and-Batten Lower Half

Combining wall with board-and-batten paneling adds subtle textural variety. This works well when a bathroom has multiple distinct zones, like a separate toilet area.
Key points:
- Keeps a cohesive color palette even while mixing textures
- Helps visually separate functional zones in larger bathrooms
- Works especially well in a unified white or neutral paint scheme
20. Beadboard with a Painted Stripe Accent

Adding a single painted stripe along the top edge of beadboard, just below the cap molding, creates a subtle custom detail. It’s a small, low-effort way to add a designer touch.
Key points:
- Works well in a color that echoes the vanity or hardware
- Doesn’t require repainting the entire wall
- Easy to update or remove if you change the room’s palette later
21. Beadboard with Built-In Storage Niches

Framing recessed storage niches with beadboard trim turns a practical feature into a designed one. This works well above the toilet or beside the vanity where extra storage is often needed.
Key points:
- Keeps everyday items like towels and toiletries organized and visible
- Adds architectural detail to walls that would otherwise be plain
- A good way to combine function with the overall paneled look of the room
How to Install Beadboard in Your Bathroom
Installing beadboard becomes much easier when each stage is completed in the proper order, starting with a little planning before any cutting or fastening begins.
Getting the material, layout, and prep right upfront saves time and prevents costly rework later.
Materials Needed
Everything listed below covers the full installation – from wall prep and panel fixing through to the finishing trim and paint.
- PVC, vinyl, MDF, or real wood beadboard panels
- Cap molding, baseboards, and corner trim
- Construction adhesive and/or finish nails
- Caulk (paintable, moisture-resistant)
- Satin or semi-gloss paint suited for bathrooms
- Measuring tape, level, and pencil for marking
- Saw or panel cutter for sizing pieces
- Cleaning supplies (degreaser, cloths)
- Sandpaper or filler for wall repairs
Step 1: Choose Material, Height, Paint, and Trim
The material decision shapes everything that follows. PVC and vinyl handle bathroom humidity without special treatment, while MDF and real wood need sealing before installation.
Height affects how the finished wall reads – chair rail sits around 32 to 36 inches, while full-height panels suit taller ceilings.
Locking in paint finish and trim style before buying anything prevents mismatched purchases later.
Step 2: Measure, Mark, and Prepare the Walls
Accurate measurements taken before cutting prevent wasted panels and uneven gaps around outlets, corners, and fixtures. Mark horizontal reference lines with a level, since walls that appear straight often aren’t.
Getting the layout right also depends on how the bathroom itself is arranged, and designing an ideal bathroom layout from the start makes wall treatment decisions like this much easier to plan accurately.
Surface preparation matters just as much – panels applied over dusty, greasy, or patchy walls won’t bond evenly and are more likely to lift or shift over time.
Step 3: Cut and Dry-Fit the Panels
Cutting panels to size before installation is straightforward, but dry-fitting each piece first is the step that prevents costly mistakes.
Place every panel against the wall without adhesive to check fit, alignment, and how pieces meet at corners and edges. Adjustments made at this stage take seconds – the same corrections made after panels are fixed take significantly longer.
Step 4: Secure the Beadboard Panels
Construction adhesive works well for most panel materials, while finish nails add extra holding strength on heavier wood panels.
Apply adhesive in an even, consistent pattern rather than in one central blob to avoid gaps behind the panel face.
Checking level every few panels catches drift early – a small angle error at the start compounds noticeably by the time the last panel goes up.
Step 5: Install Trim, Caulk, and Paint
Cap molding along the top edge and baseboards at the bottom to cover raw panel edges and give the installation a finished, built-in appearance.
Caulking every seam where panels meet walls, fixtures, or the ceiling keeps moisture from working its way behind the surface over time.
A final coat of bathroom-rated satin or semi-gloss paint ties everything together and protects the surface from daily humidity.
Bathroom Beadboard Maintainance and Care
Bathroom beadboard needs regular cleaning and moisture checks to remain in good condition.
The table below covers simple care steps and signs that may require attention.
| Maintenance Task | What to Do | Signs to Check |
|---|---|---|
|
Simple cleaning |
Wipe with mild soap and dry. | Soap residue, dust, water spots, or grime |
|
Moisture inspection |
Check wet areas for damage. | Soft spots, swelling, stains, or peeling paint |
| Paint touch-ups | Cover chips and worn areas. | Scratches, faded patches, or exposed material |
| Full repainting | Repaint with moisture-resistant products. | Uneven color, stains, or widespread peeling |
|
Caulk maintenance |
Replace cracked or loose caulk. | Gaps, mildew, or water behind the panels |
Conclusion
If you’ve been wondering if beadboard in bathroom spaces is worth adding, the right design and installation approach can make a noticeable difference without requiring a complete remodel.
From choosing materials to learning how to install beadboard, every step contributes to a more polished and practical bathroom.
I always recommend planning your layout carefully before purchasing materials so the finished project looks intentional and lasts longer.
Now that you have ideas, planning tips, and installation knowledge, your next step is to measure your bathroom walls and create a simple layout before starting the project.
Frequently Asked Questions
Can Beadboard Be Installed Over Existing Tile?
Only if the tile surface is flat, secure, and suitable for proper panel attachment, since loose or uneven tile can affect adhesion.
Does Beadboard Increase Home Value?
It can improve visual appeal and buyer interest, especially in well-maintained, properly sealed bathrooms.
Can I Use Peel-And-Stick Beadboard Panels?
Yes, but they work best in low-moisture bathrooms with smooth, clean walls for a lasting bond.
Can Beadboard Be Removed without Damaging Drywall?
Minor drywall repairs are usually needed after removing attached panels, especially where adhesive or nails were used.