Transform Your Windows: Step-by-Step Tutorial on Pleating Curtains
Many homeowners struggle with plain, lifeless window treatments that fail to enhance their living spaces.
Flat curtains often look dull and do little to improve a room’s atmosphere. But there’s a simple solution that can change everything.
Pleated curtains can add depth, style, and a touch of luxury to any window.
This guide will walk you through the process of creating beautiful pleated curtains step by step.
You’ll learn how to measure, mark, and fold your curtains correctly, choose the right materials, and use basic tools to achieve professional-looking results.
By the end, you’ll have the skills to transform your windows and give your home a fresh, polished look.
What are Curtain Pleats?
Curtain pleats are folds in the fabric that are sewn or attached to create a structured, neat appearance.
These folds serve both practical and decorative purposes in curtain design.
They help distribute the fabric evenly across the curtain rod, allowing for smooth opening and closing.
Pleats also add depth and interest to your window treatments, making them look more polished and well-made.
Types of Curtain Pleats
Pinch Pleat
Pinch pleats are a classic style where fabric is pinched together at the top and sewn to create small, fan-like folds.
This type of pleat gives curtains a formal, tailored look that works well in living rooms and dining areas.
Pinch pleats can be single, double, or triple, depending on how many times the fabric is folded.
Pencil Pleat
Pencil pleats are thin, closely spaced folds that look like a row of pencils standing up.
This style is versatile and easy to make, making it a good choice for beginners.
Pencil pleats work well with lighter fabrics and can suit both casual and semi-formal spaces.
Box Pleat
Box pleats create a series of flat, rectangular folds that give curtains a structured, geometric look.
This style works well in modern or traditional settings and is often used in offices or formal living areas.
Box pleats add fullness to curtains without being too fussy.
Goblet Pleat
Goblet pleats are named for their shape, which looks like a wine glass or goblet.
The top of the pleat is pinched, while the bottom flares out.
This elegant style is often used in formal settings and works best with heavier fabrics.
Goblet pleats can add a touch of luxury to your window treatments.
Difference between pinch pleat and pencil pleat curtains:
| Feature | Pinch Pleat | Pencil Pleat |
|---|---|---|
| Appearance | Defined, structured folds | Tighter, softer pleats resembling a line of pencils |
| Formality | Often used in formal settings | More casual, suits various spaces |
| Installation | Requires hooks, hung on rings or rods | Uses curtain hooks, hung on tracks or poles |
| Fabric Usage | Uses more fabric for fuller folds | Less fabric required |
| Style | Traditional, elegant look | Versatile, adaptable look |
| Ideal Setting | Formal living/dining rooms | Bedrooms, casual living areas |
| Adjustability | Fixed pleats, less adjustable | Easily adjustable |
| Difficulty | More complex to make and hang | Simpler to create and install |
Why Curtain Pleats?
Curtain pleats are useful for many reasons.
- They make curtains look fuller and more put-together.
- Pleats help curtains open and close smoothly and evenly.
- They also let you control how much light and privacy you want.
- Pleated curtains can make a room feel more cozy or grand, depending on the style you choose.
- Overall, pleats turn simple fabric into stylish, useful window coverings.
Step-by-Step Tutorial on Pleating Curtains
For No-Sew Method
Materials and Tools You’ll Need
- Curtains or fabric panels
- Pleater tape
- Pleat hooks
- Iron-on adhesive (e.g., hem tape)
- Iron
- Toothpick or small tool for opening pleater tape slits
Step-by-Step Instructions
1. Prepare the Curtain Panels
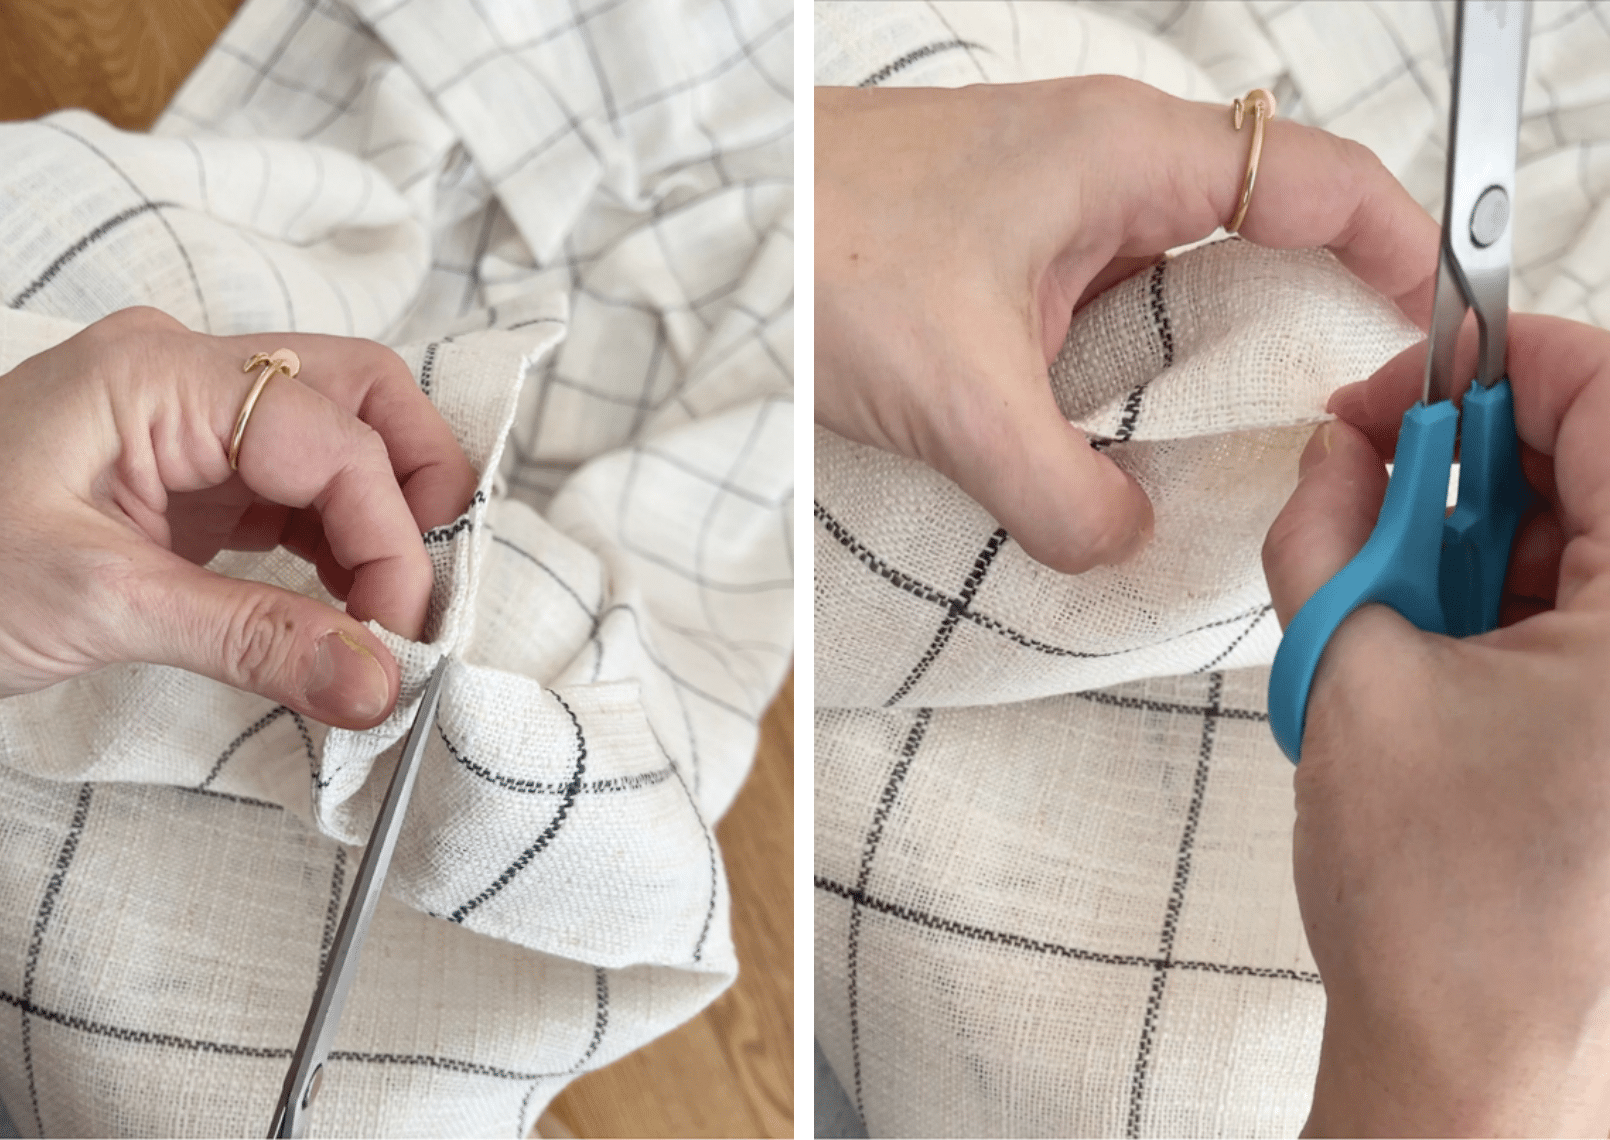
- Remove any tabs from the curtain if needed
- Lay the curtain flat on a clean surface
2. Attach Pleater Tape
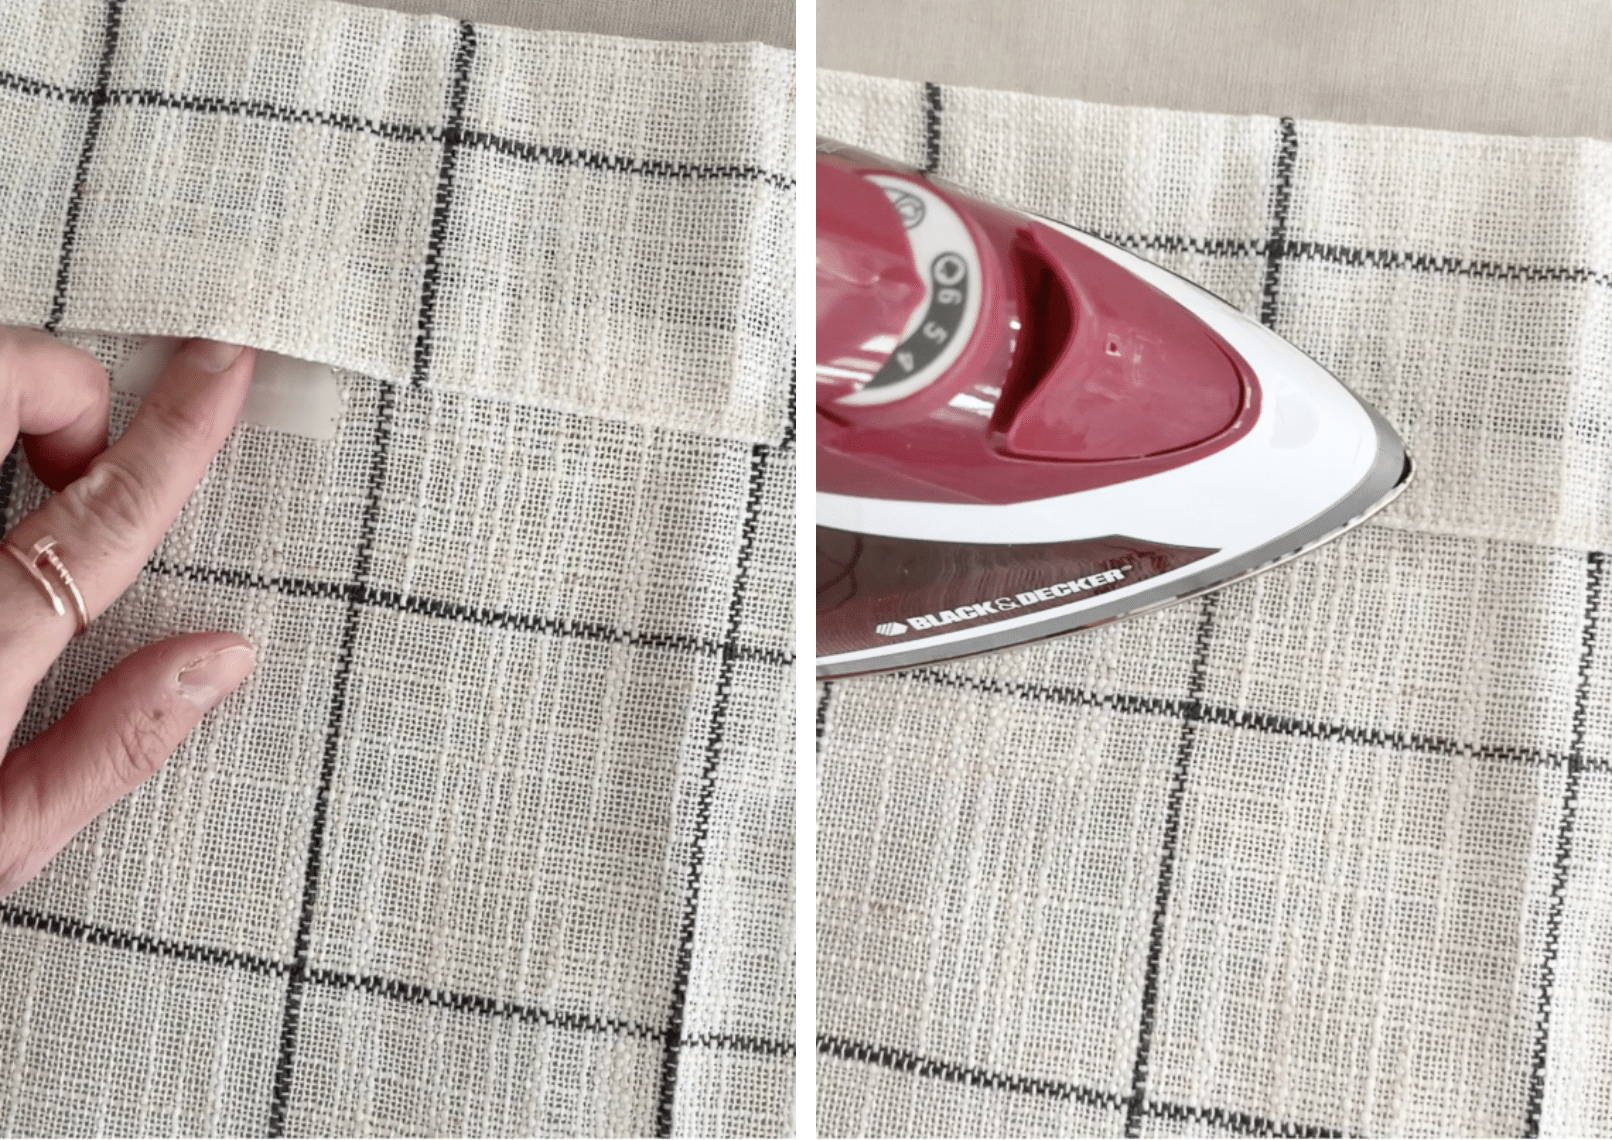
- Cut Heat Bond adhesive tape to the length of your curtain panel
- Place the adhesive tape along the top edge of the curtain
- Lay pleater tape over the adhesive tape
- Fold edges for a clean finish
- Press with a warm iron to secure, following product instructions
3. Insert Pleat Hooks
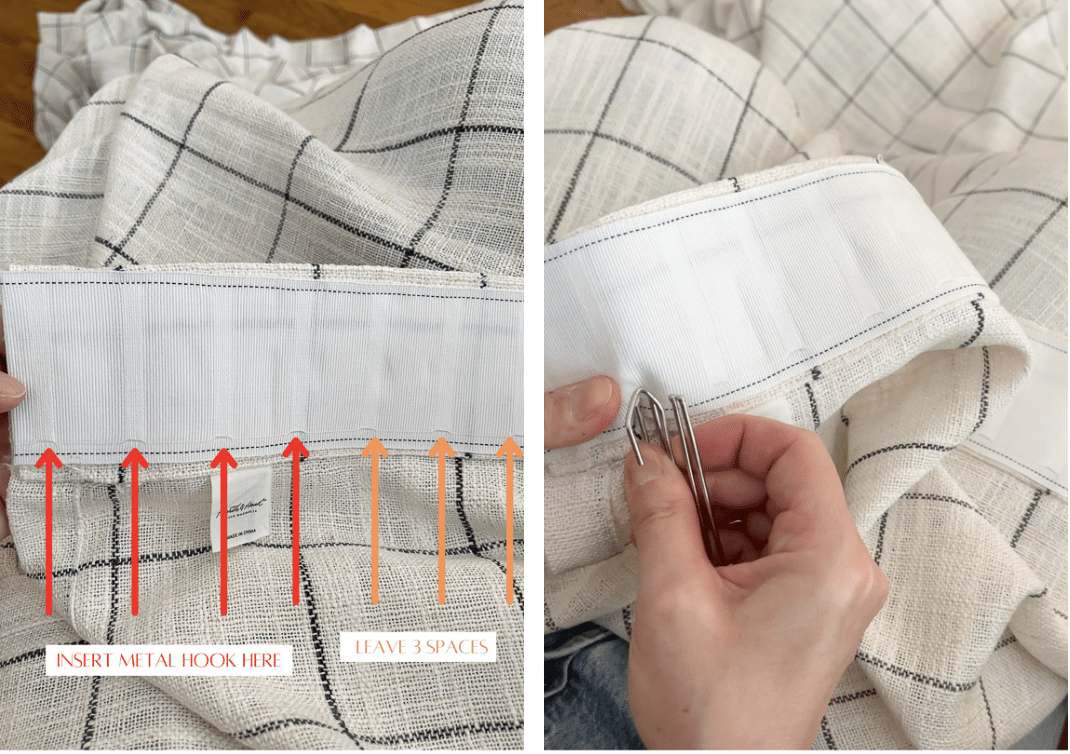
- Open slits in the pleater tape using a small tool
- Place hooks in the pleater tape at regular intervals
- Adjust spacing to achieve even pleats
4. Hang Curtains
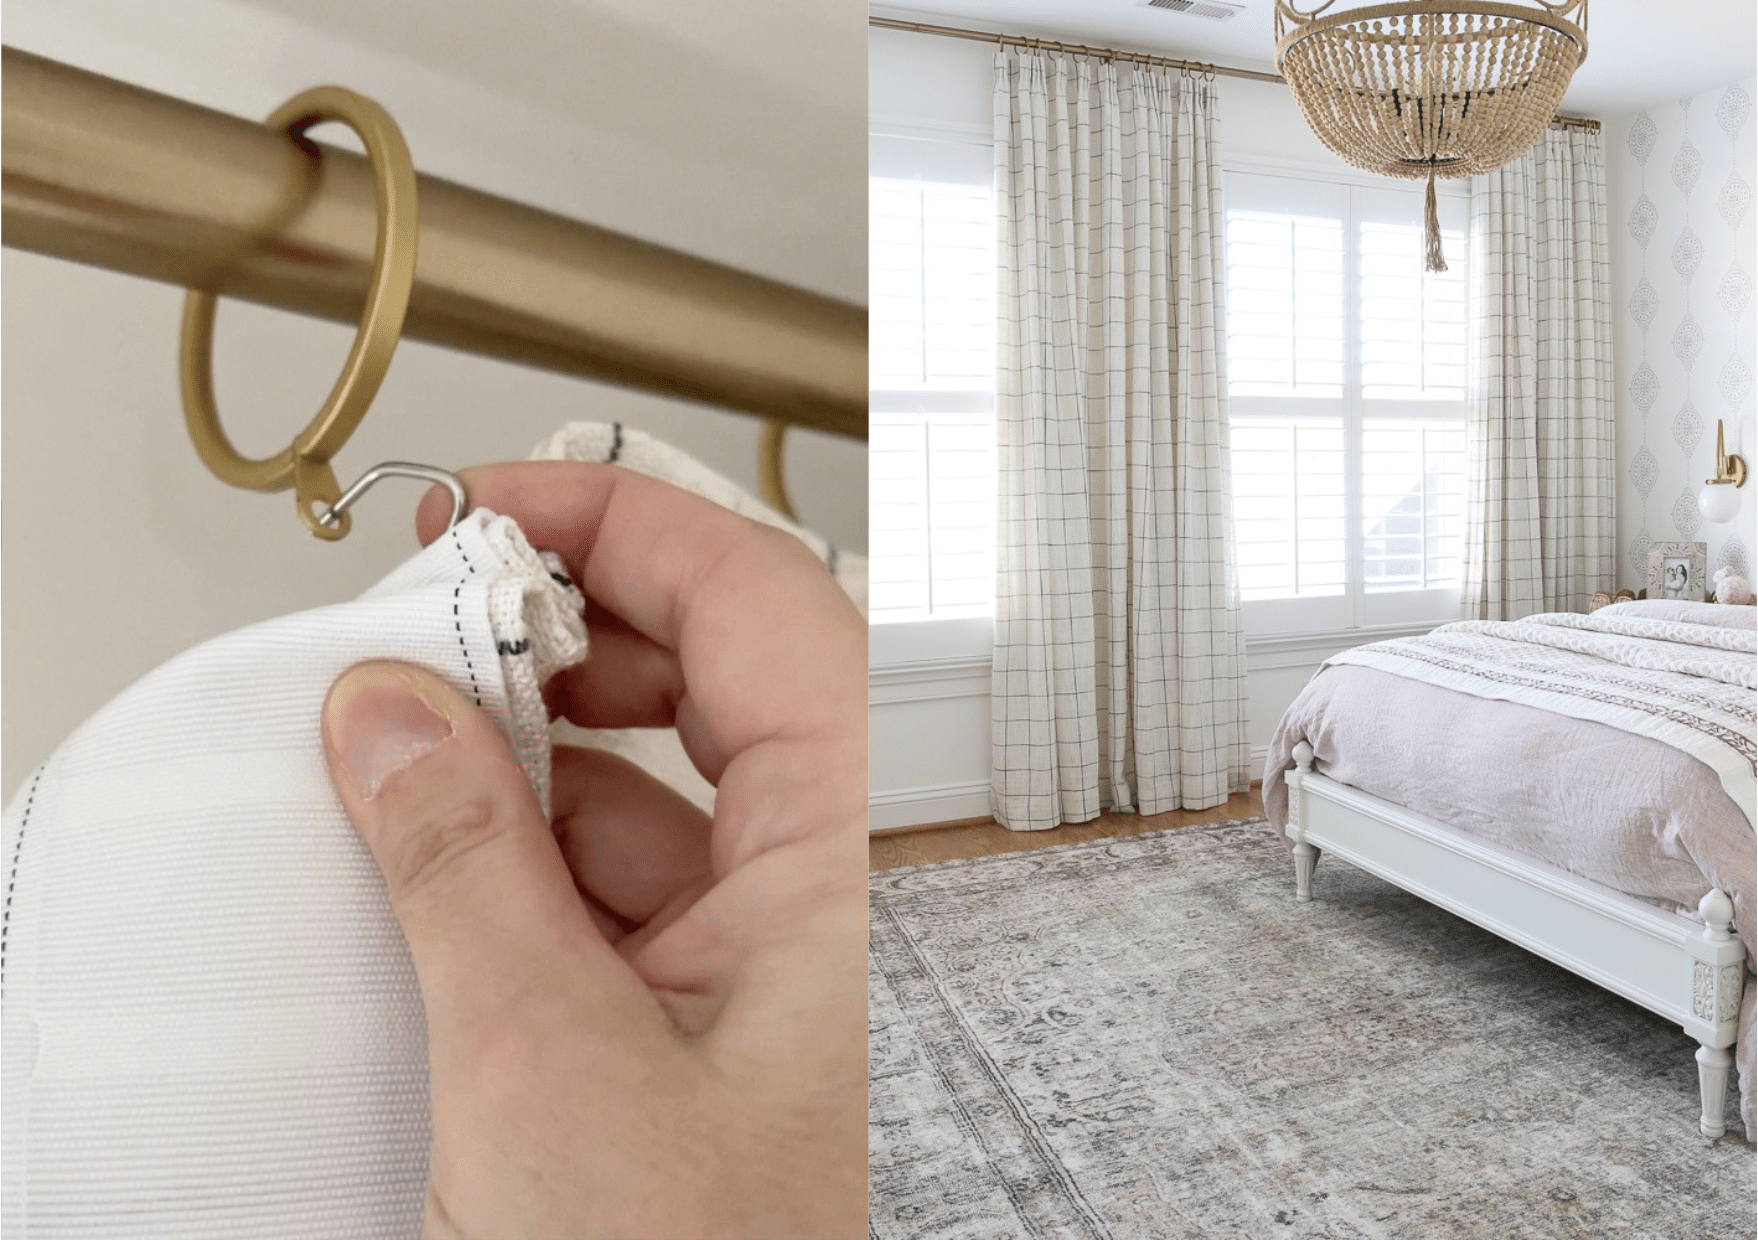
- Attach hooks to the rod rings
- Gently adjust fabric between hooks for uniform pleats
Tips and Tricks
- Choosing Pleater Tape:
- Select a high-quality pleater tape
- Ensure it works well with the weight and type of your curtain fabric
- Even Pleats:
- Ensure consistent spacing of hooks for a balanced, professional finish
For detailed instructions, visit Here.
For Sewing Method
Materials Needed
- Curtain fabric
- Drapery lining (optional)
- Drapery pleat tape
- Drapery hooks
- Sewing machine and thread
- Iron and ironing board
Step-by-Step Instructions
1. Prepare Fabric
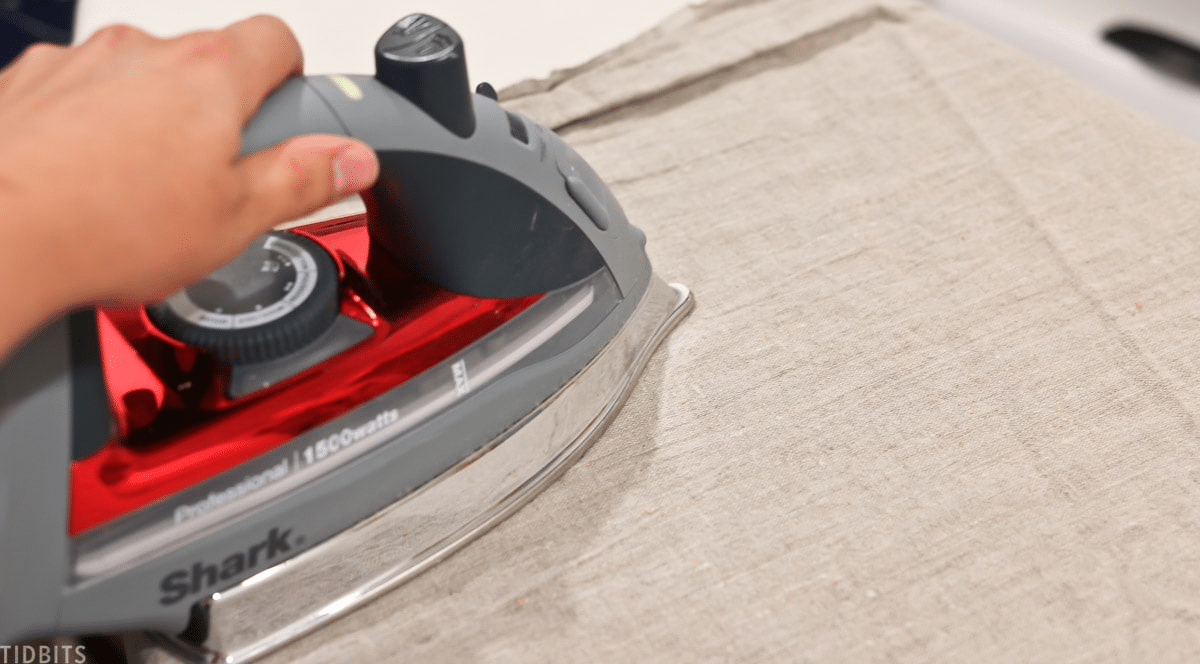
- Wash the fabric to reduce future shrinkage
- Press the fabric to remove wrinkles
- Ensure fabric is completely dry before proceeding
2. Hem the Sides and Top
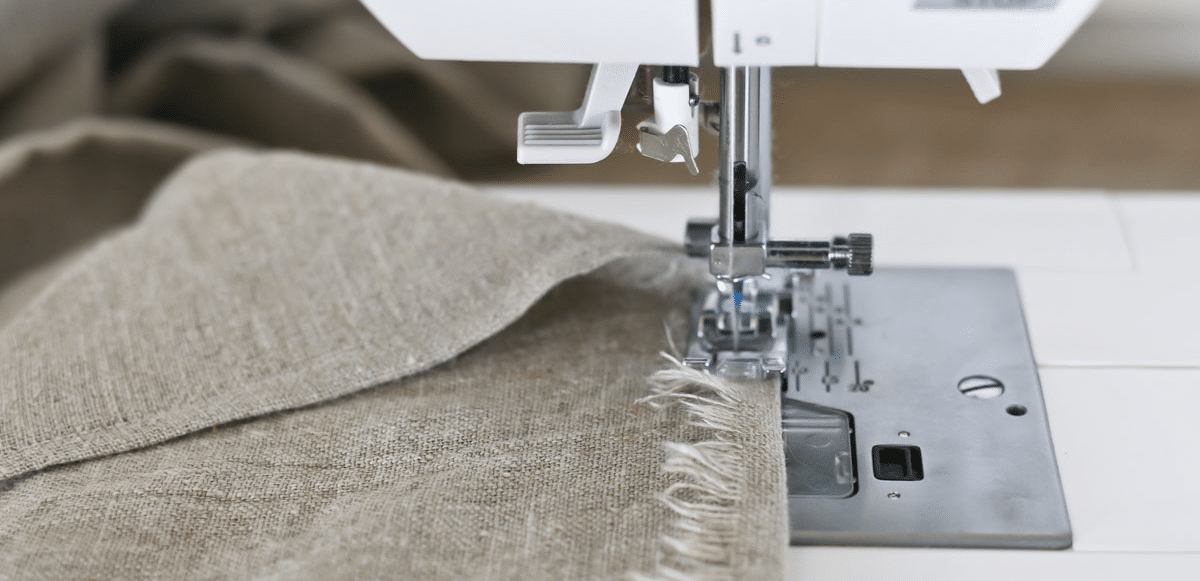
- Fold the side edges of the curtain inward
- Press the folds with an iron for a crisp edge
- Sew along the folded edges to create neat side hems
- Fold the top edge of the fabric inward
- Sew along the folded edge to encase raw edges
- This creates a clean finish at the top of your curtain
3. Sew Pleater Tape
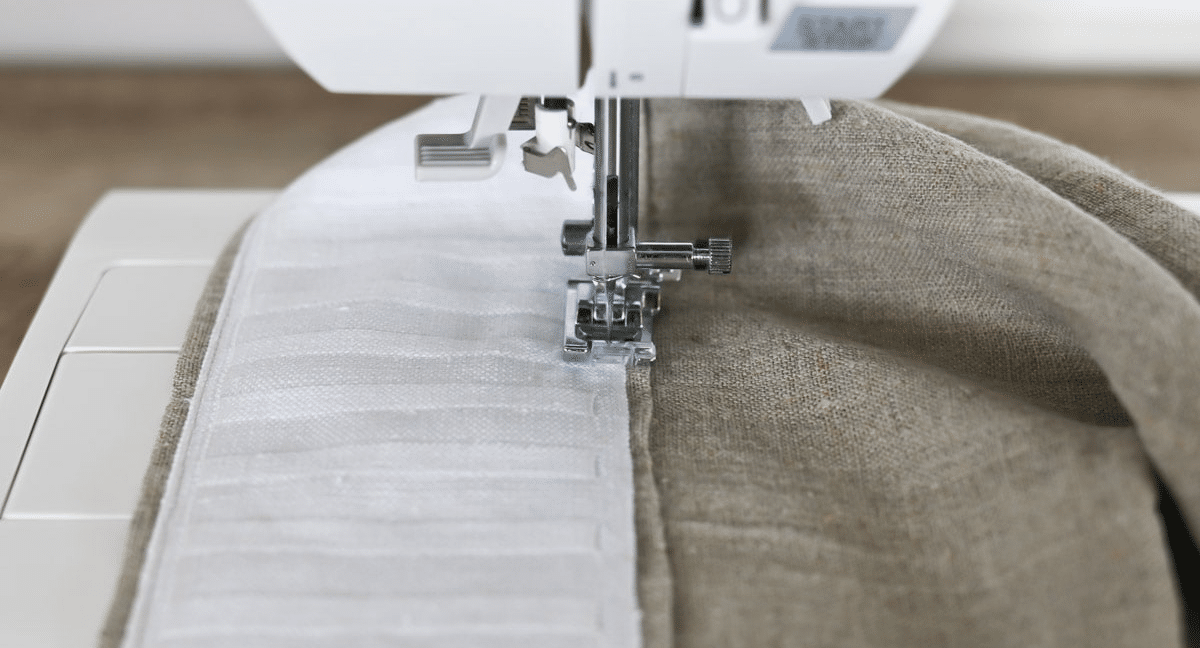
- Measure and cut pleater tape to fit the width of your curtain
- Pin the pleater tape along the top edge of the curtain panel
- Sew the pleater tape in place, following a straight line
- Make sure the tape is securely attached
4. Insert Pleat Hooks
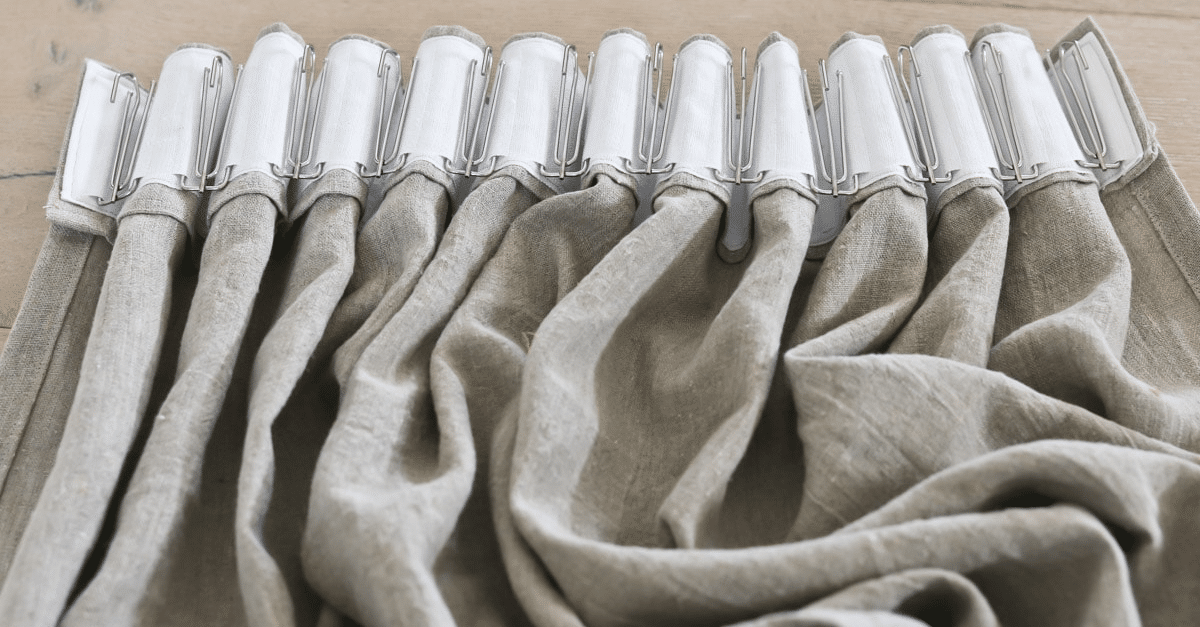
- Locate the pockets or marked areas on the pleater tape
- Insert pleat hooks into these designated spots
- Ensure hooks are evenly spaced for uniform pleats
5. Hang Curtains

- Attach the pleat hooks to your curtain rod or track
- Adjust the fabric between hooks to create even, attractive pleats
Tips
- Use a thread color that matches your fabric
- Take your time with each step for the best results
- Double-check your measurements before cutting or sewing
By following this guide, you can create custom pinch pleat curtains that add a touch of style to your windows. Remember, practice makes perfect, so don’t be discouraged if your first attempt isn’t flawless.
For detailed instructions, visit Here.
Tips for Customizing Pleated Curtains
Pleated curtains offer many ways to personalize your window treatments. By choosing the right fabric, colors, patterns, and layering techniques, you can create a look that perfectly suits your space. Let’s explore some tips to help you customize your pleated curtains.
Fabric Choices
The fabric you select can greatly impact the overall look and feel of your curtains:
- Light fabrics for a casual look: Thin cotton, linen, or sheer materials create a relaxed, airy feel. These work well in casual spaces like bedrooms or sunrooms.
- Heavier fabrics for a formal setting: Thick cotton, velvet, or brocade give a more substantial, upscale appearance. These are good choices for living rooms or dining areas where you want a more refined look.
Color and Pattern Considerations
Selecting the right colors and patterns can tie your curtains into your room’s design:
- Solid colors: These are versatile and can blend with various decor styles. Light colors can make a room feel bigger, while darker shades add coziness.
- Patterns: Stripes, florals, or geometric designs can add visual interest. Make sure the pattern size fits your room’s scale – large patterns for big rooms, smaller ones for compact spaces.
- Matching vs. contrasting: Decide if you want your curtains to blend in or stand out. Matching colors create a unified look, while contrasts can make a bold statement.
Layering Curtains
Using pleated curtains with other types can enhance functionality and style:
- Sheers + pleated curtains: Pair sheer curtains underneath pleated ones for a soft, filtered light effect. This combo allows for privacy while still letting in natural light.
- Blackout + pleated curtains: Use blackout curtains behind pleated ones in bedrooms or media rooms. This setup gives you the option of total darkness when needed.
- Valances: Add a valance above pleated curtains for a finished, decorative touch. This works well in formal dining rooms or living areas.
By considering these aspects, you can create custom pleated curtains that not only look great but also meet your practical needs. Remember, the key is to balance your personal style with the overall design of your room.
Common Mistakes to Avoid When Pleating Curtains
Creating pleated curtains can be a rewarding project, but there are some common pitfalls to watch out for. By being aware of these mistakes, you can ensure your curtains turn out looking professional and polished. Let’s explore some key errors to avoid during the pleating process.
Miscalculating Fabric Needs
One of the most frequent errors is not getting enough fabric:
- Always measure your windows carefully before buying fabric
- Remember that pleats use more fabric than flat panels
- Add extra length for hems and headers
- Consider fullness – pleated curtains often need 2.5 to 3 times the width of your window
Improper Pleat Placement
Poorly placed pleats can make your curtains look uneven:
- Mark your pleat positions before you start sewing
- Use a ruler or measuring tape to ensure even spacing
- Consider the pattern of your fabric when placing pleats
- Make sure pleats are straight and aligned with each other
Uneven Hems
Uneven hems can make your curtains look unprofessional:
- Measure and mark your hem lines carefully
- Use an iron to press your hems before sewing
- Consider using hem tape for a crisp, even edge
- Double-check that both panels are the same length
Wrong Curtain Hook Sizes
Using the wrong size hooks can affect how your curtains hang:
- Choose hooks that fit your pleating tape or rings properly
- Make sure the hooks are strong enough to support the weight of your fabric
- Use the same size hooks throughout your curtains for a uniform look
- Check that the hooks don’t show above the curtain rod when hung
By avoiding these common mistakes, you’ll be well on your way to creating beautiful pleated curtains that enhance your windows and your overall room design.
Remember, taking your time and paying attention to details will result in curtains that look professionally made.
Troubleshooting Guide
Even with careful planning and execution, you might encounter some issues when pleating your curtains.
Don’t worry – most problems have simple solutions. This troubleshooting guide will help you address common issues and achieve the perfect look for your pleated curtains.
How to Fix Uneven Pleats
Uneven pleats can make your curtains look less polished. Here’s how to fix them:
- Take the curtains down and lay them flat.
- Check the spacing of your pleat hooks. Make sure they’re evenly distributed.
- Re-insert the hooks, paying close attention to the spacing.
- If using pleating tape, check that it’s properly attached and straight.
- Hang the curtains again and adjust each pleat by hand.
How to Correct Fabric Wrinkles
Wrinkles can detract from the smooth look of your pleated curtains. Try these steps:
- Remove the curtains from the rod.
- Use a steamer or iron on the appropriate setting for your fabric.
- Start from the top and work your way down, being careful not to flatten the pleats.
- For stubborn wrinkles, lightly dampen the fabric before steaming or ironing.
- Hang the curtains immediately after steaming to prevent new wrinkles from forming.
How to Adjust Pleats After Hanging
Sometimes pleats need a little tweaking after hanging:
- Start at one end of the curtain rod.
- Gently pull the fabric between each pleat to distribute it evenly.
- Use your hands to shape each pleat, creating crisp folds.
- If pleats are too tight, loosen the gathering strings slightly.
- For loose pleats, tighten the gathering strings or move the pleat hooks closer together.
- Allow the curtains to hang for a day or two, then make final adjustments as needed.
Remember, patience is key when troubleshooting your pleated curtains. Take your time with each step, and don’t hesitate to repeat the process if needed.
With a bit of effort, you can achieve beautifully even and wrinkle-free pleated curtains that enhance your room’s decor.
Conclusion
Transforming your windows with pleated curtains is easier than you might think.
Whether you choose the no-sew method or decide to break out your sewing machine, you now have the knowledge to create beautiful, custom window treatments.
Remember, the key to success lies in careful preparation, precise measurements, and attention to detail.
By following our step-by-step guide, you can achieve professional-looking results that will enhance any room in your home.
So, what’s next? Why not give it a try? Start with a single window and see how your newly pleated curtains change the entire feel of the space.
I’d love to hear about your experiences or see photos of your finished projects. Share your results in the comments below, and don’t hesitate to ask if you have any questions along the way. Happy pleating!
Frequently Asked Questions
How do I get my curtains to pleat without sewing?
Use pleater tape and hooks. Attach the tape to your curtains with iron-on adhesive, then insert hooks into the tape’s pockets. Hang the hooks on your curtain rod for instant pleats.
Can I pleat curtains that are already made?
Yes, you can pleat ready-made curtains. Use pleater tape and hooks, or gather the fabric at the top and secure with clips or pins for a simple pleated look.
What is the best fabric for pleated curtains?
Medium to heavy fabrics work best for pleated curtains. Good choices include cotton, linen, silk, and polyester blends. These fabrics hold pleats well and drape nicely.
How do I clean and maintain pleated curtains?
Vacuum pleated curtains regularly with a soft brush attachment. For deeper cleaning, follow the care label. Most can be dry cleaned. Some may be machine washable on a gentle cycle. Iron on low heat if needed.