Old Trunk Makeover Ideas You Can Actually Try Yourself
Do you have an old trunk sitting in your attic or garage, just collecting dust? I’ve been there too, holding onto it, unsure what to do.
This guide is packed with simple, practical, and perfect old trunk makeover ideas for beginners. You’ll learn how to give your trunk a new purpose with easy paint upgrades, interior lining options, minor repairs, and even furniture transformations.
If you’re looking for more storage or want to add beauty to your space, these old trunk makeover ideas will guide you through the process step by step. Ready to get started?
Why You Should Try Old Trunk Makeover Ideas
Old trunks offer solid craftsmanship and visual interest that set them apart from store-bought options. They’re built to last and often hold unique features that add beauty to any space.
Giving one a second life is both practical and resourceful. It reduces waste and avoids the cost of new furniture. This type of project is approachable for beginners and rewarding for anyone who enjoys hands-on work.
With just a few basic tools and materials, an old trunk can be changed into both a useful and personal item.
Old Trunk Makeover Ideas for Every Style
Each trunk makeover idea brings a different function, appearance, and level of effort. Here are eight approaches with clear guidance on cost, project complexity, and where they fit best in your home.
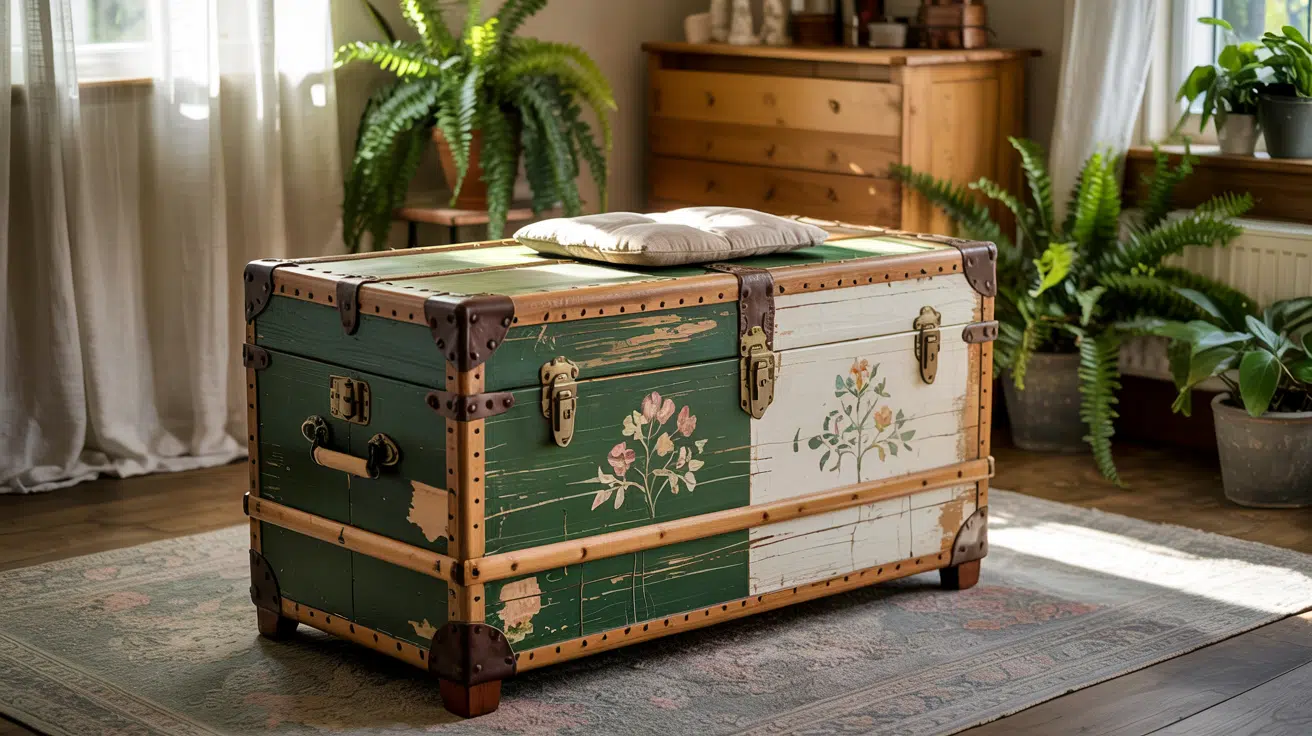
Rustic Farmhouse Chalk Paint Trunk

Use soft shades like white, cream, or sage to give the trunk a relaxed, rural look. Lightly sand the corners and edges after painting for a gently worn effect. This style works well in entryways, bedrooms, or cozy living spaces.
It’s one of the more affordable options and a great starting point for beginners. All it takes is a brush, sanding sponge, and one or two coats of furniture-friendly paint for a clean but down-to-earth result.
Industrial Trunk with Black Metal Finish

Go for a clean, hard-edged look with matte or glossy black paint. Pair it with gold or bronze accents on the handles and bolts, or add leather straps for contrast. This option fits well in home offices, studios, or modern lofts.
It has moderate difficulty because surface prep is essential, especially for metal. Use rust-protective primer and strong adhesives if adding metal detail. This style makes the trunk feel heavier and more purposeful in design.
Boho Color Pop with Floral Stencils

Apply a bright, unexpected color like coral, mustard, or teal. Then use floral or tribal stencils to decorate the surface, either with soft-toned paint or gold accents.
Line the inside with colorful paper or fabric for a full effect. This design adds warmth to craft areas, kids’ rooms, or creative corners. It’s an intermediate project with affordable materials.
It requires more care when stenciling and layering, so it’s best for someone with a bit of DIY experience.
Nautical Rope-Handled Trunk
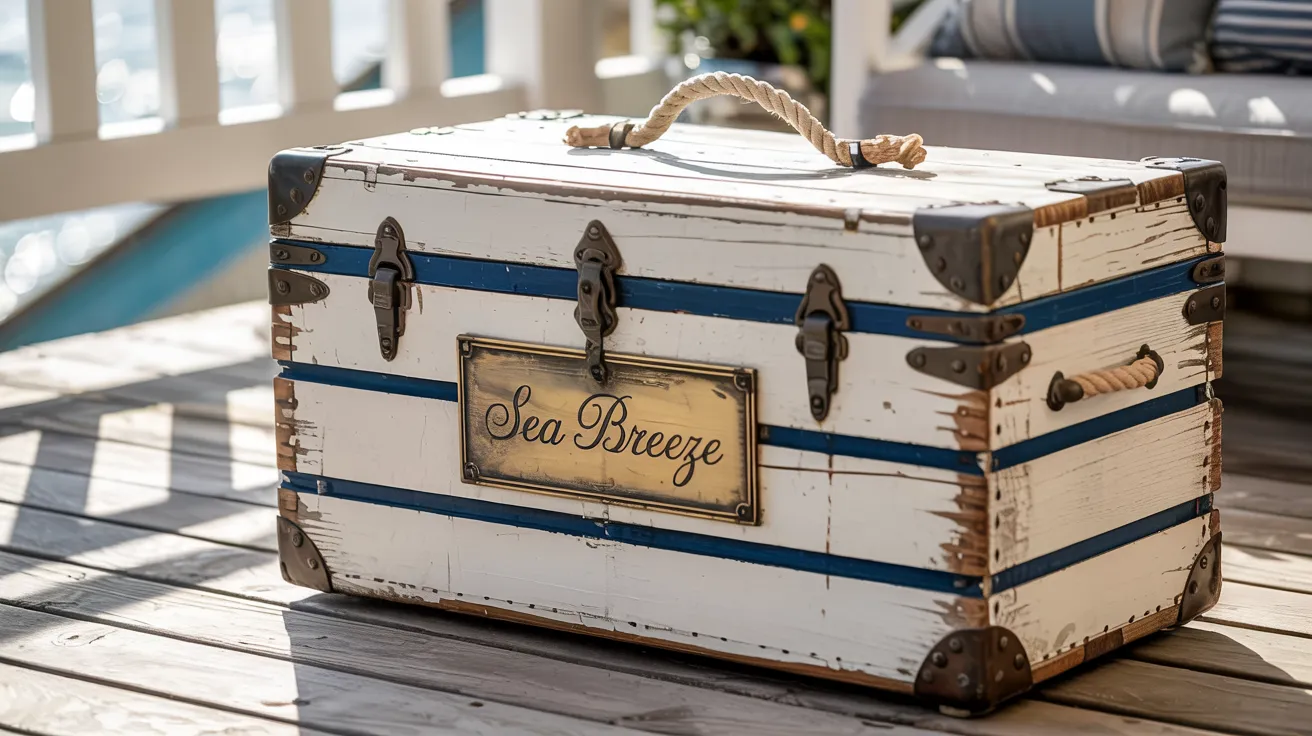
Choose a base color, such as navy or crisp white, and then add rope handles to the sides.
Decorative striping or compass patterns add a nice touch if you have the time. This idea suits beach houses, bathrooms, or patios if sealed well.
The materials are budget-friendly, though screwing in new handles takes some effort. Light should be used moderately since rope handles wear down over time. A great weekend project with minimal mess.
Vintage Decoupage with Book Pages

Glue down pages from old books or maps across the surface for a layered finish. Let each section dry before moving to the next.
Apply a clear protective coat after the paper has set. This project works well in studies, libraries, or reading rooms.
You’ll need patience for cutting and gluing the pages neatly, but it’s low-cost and doesn’t require sanding or painting. Works best on flat surfaces and rectangular trunks with minimal curves.
Coffee Table Conversion with Casters
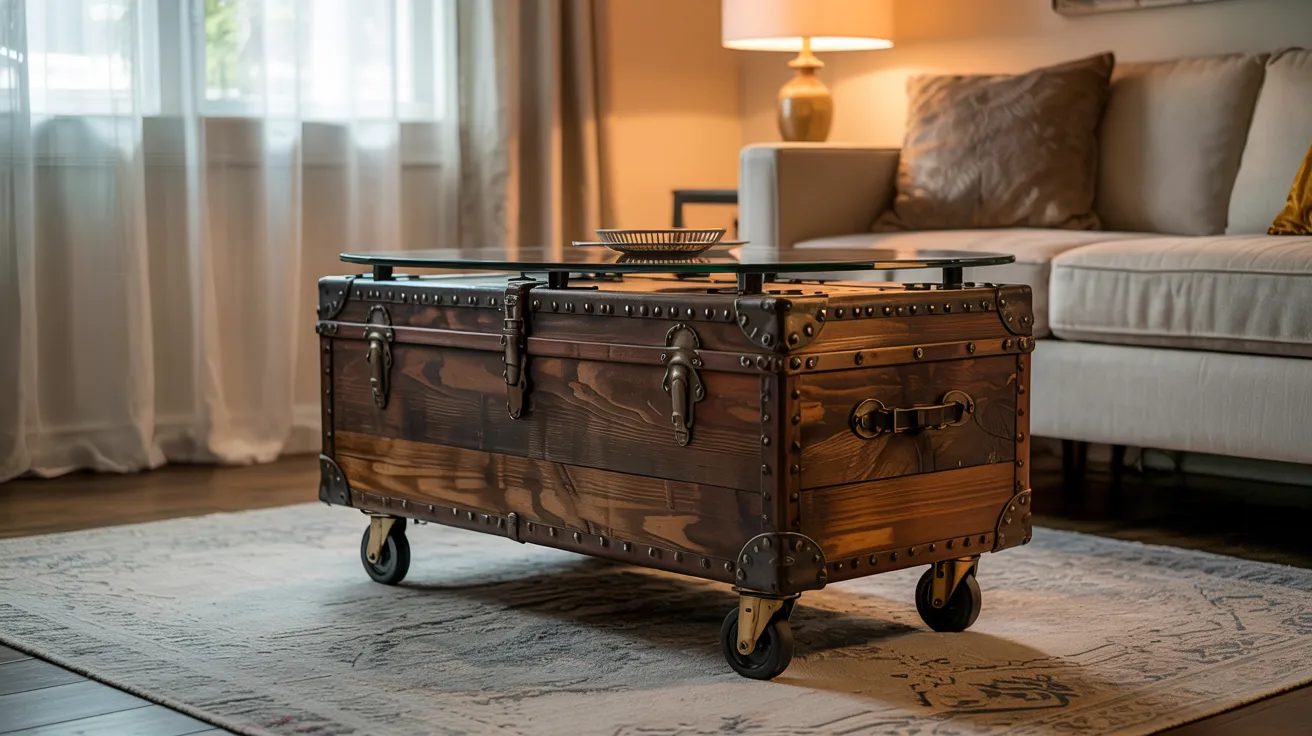
Paint or stain the trunk, then install caster wheels on the bottom. This makes it easier to move and gives it a solid role in your living room setup.
You can also add a glass or a flat wood top if needed. This design is practical and fits many home layouts. The main challenge is attaching wheels securely, using washers and proper bolts.
Moderate cost depending on the hardware, but a lasting result with strong function.
Blanket Box with Upholstered Lid
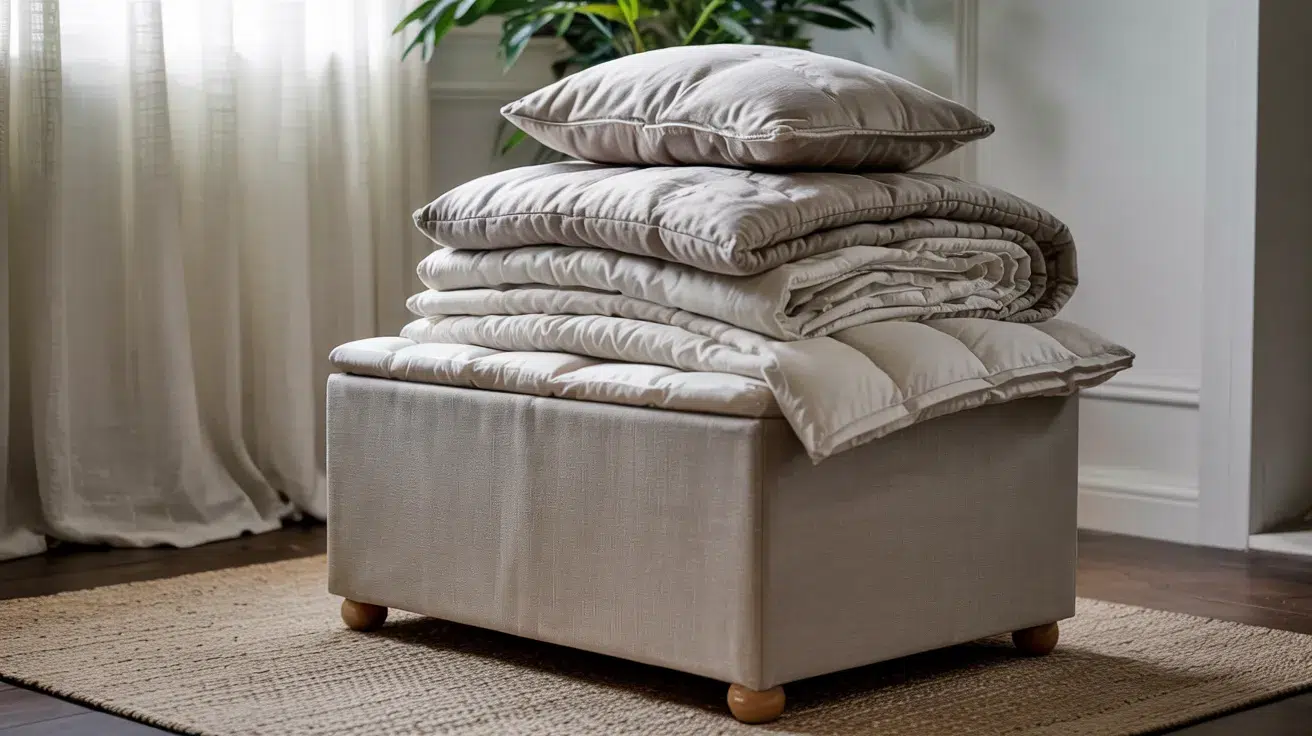
Cover the top of the trunk with foam and durable fabric to make a cushioned lid. This design adds comfort and makes the piece work well in bedrooms or under windows.
Store blankets, pillows, or seasonal items inside. Tools include a staple gun and scissors; materials include foam, batting, and cloth. It’s slightly more advanced than painting, but worth the effort.
Choose a fabric that complements your room and resists wear.
Kid’s Toy Chest with Chalkboard Paint
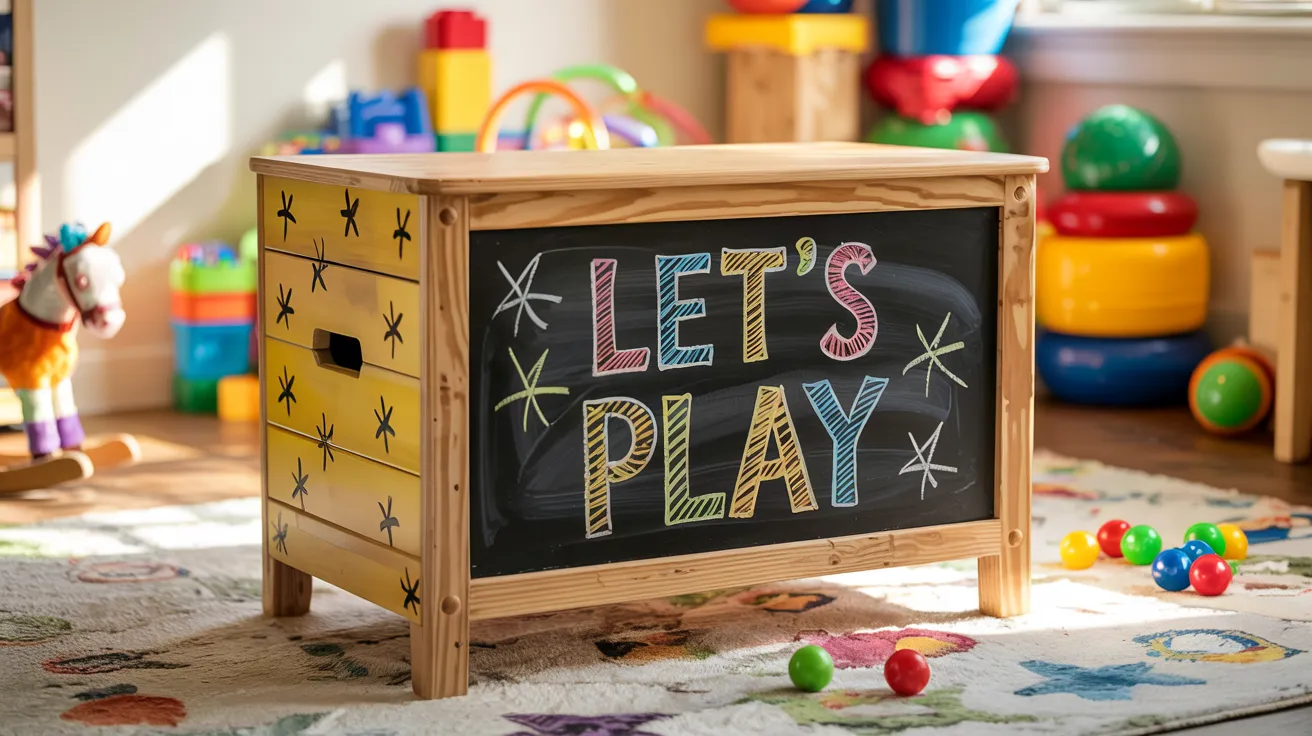
Apply black or green chalkboard paint to the front panel or lid, allowing kids to draw directly on it. Paint the rest of the trunk in a fun color or pattern. This project is great for playrooms, bedrooms, or preschools.
It’s beginner-friendly and allows for regular design changes using chalk. Keep the corners smooth and consider adding soft-close hinges for safety. Very affordable, highly functional, and interactive for children.
Interior Lining Ideas for Function & Beauty
Lining the inside of a trunk improves both appearance and use. It hides rough surfaces, adds character, and protects stored items.
The material you choose depends on your style, durability needs, and what the trunk will be used for.
Choosing the right material depends on your project’s goal and how the trunk will be used. Here’s a quick comparison:
|
Material |
Pros |
Cons |
Best For |
|
Fabric |
Soft, versatile, easy to match decor |
Can stain or sag over time; needs adhesive |
Blanket boxes, seating trunks, toy storage |
|
Decorative Paper |
Affordable, easy to install, and wide designs |
Tears with moisture, less durable |
Keepsake chests, decorative use |
|
Cedar Panels |
Natural scent repels insects, and is durable |
Higher cost, more tools needed |
Long-term storage, clothing, and heirloom items |
Step-by-Step: How to Make Over an Old Trunk
Changing an old trunk into a functional home piece doesn’t require complex tools or special skills. This process is easy to follow, practical for all experience levels, and highly rewarding.
Step 1: Apply Primer
Begin by covering the entire surface of the trunk with a base primer. This helps the paint stick evenly and last longer. Use a brush or roller to coat all sides thoroughly.
Allow it to dry completely before moving forward; rushing this step can lead to poor results. Primer also helps cover stains or imperfections in the original finish.
A single coat is usually enough unless the wood is very dark or uneven. Make sure the room is well-ventilated while working.
Step 2: Paint the Trunk
Choose a paint shade that suits your space and slightly thin it with water for smooth application. Use a wide brush or sponge to coat the entire surface evenly. Aim for full coverage with no streaks or clumps.
Depending on the color and texture, you may need a second coat after the first has dried. Be patient during drying; about six hours is a good benchmark.
Avoid touching the surface while it dries to prevent marks or dust from sticking.
Step 3: Add Raised Stencil Work
To create a decorative pattern, place a stencil on the painted trunk. Spread texture paste across the stencil using a sculpting knife or flat blade. Apply firm but even pressure so the paste forms a clean pattern.
Carefully lift the stencil straight up to avoid smearing the design. Let this layer dry thoroughly before handling.
Repeat the stencil application across other parts of the trunk, such as the front and sides, to create a consistent pattern that adds visual interest and depth.
Step 4: Highlight the Design
After the textured pattern dries, gently apply metallic wax over each design using your finger or a soft sponge. This improves the surface detail without overpowering the base color.
Focus only on the raised parts to create contrast and depth with the wax. Blend gently to avoid harsh edges. You can also vary the pressure for a softer or bolder look. This step works best under good lighting, so you can see how the highlights catch and reflect light.
Step 5: Add Detail with Paint
Enhance the stenciled areas further by adding a thin layer of gold paint. Use a fine brush to go over the raised patterns for added shine, carefully. This step is optional, but it can boost the final look.
You can also paint trunk hardware, such as handles and bolts, in the same shade for consistency. Allow everything to dry before handling. The metallic paint catches light well and brings out the pattern’s texture while keeping the rest of the surface subtle.
Step 6: Attach Legs or Feet
If you’d like the trunk to sit higher, attach short legs or feet to the bottom. Position each one carefully to ensure balance. Mark the spots and screw them in from inside the trunk for a clean look.
Choose legs that suit the overall color and shape of the trunk. This modification helps convert the piece into a functional bench, table, or storage box. Make sure everything is tightly fastened before use to avoid wobbling or tipping.
Step 7: Seal with Varnish
Once painting and detailing are complete, apply a clear water-based sealant to protect your work.
Use a brush or sponge to apply it in even strokes across all surfaces. This finish helps guard against moisture and scratches, extending the trunk’s lifespan. Choose a matte or glossy finish based on the style you prefer.
Allow the coat to dry fully before using the trunk. This step is crucial if the trunk will hold heavier items or be moved around.
Step 8: Add Cushion (Optional)
For added comfort and function, place a soft cushion on top of the trunk. You can have one made to fit the exact size or repurpose a similar-sized cushion from home.
A cushioned top makes the trunk a great seat or bench while still serving as storage. Choose a fabric that matches your room’s color palette and is easy to clean. Fasten the cushion with ties or keep it loose if you plan to use the trunk for multiple purposes.
Pro Tips & Restoration Advice
Avoid common errors and plan to make your trunk project smoother, cleaner, and longer-lasting with these trusted restoration practices.
Don’t Skip These DIY Mistakes
A few overlooked steps can lead to messy finishes or reduced durability. Keep these simple points in mind before and during your project:
- Sanding matters: Light sanding improves surface grip and smooths out flaws.
- Paint bleed prevention: Use painter’s tape around edges and hardware.
- Sealant smudging: Allow enough drying time before touching or stacking items.
Best Paints and Sealers for Trunks
Choosing the right paint and sealer depends on use, surface material, and the result you want. Here’s a complete comparison:
|
Paint Type |
Advantages |
Notes |
Popular Brands |
|
Chalk Paint |
Easy to apply, requires minimal prep |
May need a top coat for long-term use |
Rust-Oleum, Asian Paints |
|
Mineral Paint |
Strong adhesion, often no top coat needed |
Suitable for pieces used frequently |
Fusion, Asian Paints |
|
Latex Paint |
Easily available, washable |
Primer and top coat are recommended |
Berger Paints, Dulux |
Fixing Tough Issues
For rusty hinges, scrub thoroughly and use a rust-preventive product. Replace broken latches with similar ones from a hardware store.
If water damage is present, dry the area thoroughly, sand gently, and clean with a mild vinegar solution. These repairs help preserve both appearance and function with minimal expense
Conclusion
Now you’ve got plenty of ways to turn that old trunk into something you’ll use and enjoy.
If you painted it, lined it, added feet, or gave it a cushion top, it’s now something you can be proud of.
I hope this helped you feel more confident about tackling a makeover like this.
If you’re still thinking about your next project, I’ve got more tips and weekend-ready guides waiting.
Go check them out, and don’t let another great piece sit unused.