How to Build a Budget-Friendly DIY Concrete Fireplace
Are you tired of your outdated fireplace dragging down your home’s look? Imagine transforming it into a sleek, modern centerpiece that will make your guests think you spent thousands.
A concrete fireplace might be just the solution you’re looking for. This budget-friendly DIY project can revolutionize your living space without breaking the bank.
With less than $100 and some elbow grease, you can create a stunning concrete fireplace that rivals professional installations.
The clean lines and contemporary concrete look will instantly upgrade your room’s style. Plus, the satisfaction of crafting it yourself is priceless.
Ready to roll up your sleeves and give your home a dramatic makeover?
This guide will walk you through every step of creating your concrete fireplace, from demolition to the final touches. Let’s get started on your fireplace transformation!
Why Choose a Concrete Fireplace?
Opting for a concrete fireplace offers numerous advantages, making it an attractive choice for homeowners. Firstly, it’s incredibly cost-effective, allowing you to achieve a high-end look without the hefty price tag of professional services.
This DIY approach can save you thousands of dollars while delivering stunning results. Concrete provides a modern look that’s highly sought after in contemporary interior design.
Its clean lines and minimalist appearance create a sleek, sophisticated focal point in any room. Thirdly, concrete is surprisingly versatile and customizable.
You can experiment with different textures, finishes, and colors to perfectly match your style and existing decor.
Concrete boasts impressive durability and withstands high temperatures and daily wear and tear. This ensures your fireplace will maintain its beauty for years, making it a wise long-term investment for your home.
Materials and Tools Needed
Here’s what you will need while building a budget-friendly concrete fireplace.
- Demolition hammer: A powerful electric tool for breaking up hard surfaces like stone or concrete. It can be rented from hardware stores for specific projects.
- Cement board: A rigid panel made of cement and reinforcing fibers used as a tile backing board or underlayment in construction.
- Mesh tape: A self-adhesive fiberglass tape used to reinforce joints between cement boards or drywall panels.
- Electric drill: A handheld power tool used for drilling holes and driving screws.
- Masonry drill bit and screws: Specialized drill bits designed to penetrate brick or concrete, along with screws suitable for masonry applications.
- 14-inch Drywall tray: A rectangular plastic or metal tray used to hold and mix drywall compound or, in this case, concrete mix.
- 12-inch Drywall knife: This wide, flat-blade tool is for spreading and smoothing drywall compound or concrete mix.
- Ardex Feather Finish or Henry’s Feather Finish are self-drying, cement-based finishing underlayment products designed for smooth and durable surface preparation.
- 5-gallon bucket: A large plastic container for mixing concrete or other construction materials.
- Drill attachment mixer: A mixing paddle attaches to an electric drill to efficiently mix concrete or other compounds.
The DIY Process
Before we start, I need to clarify something. This method worked for us, but your situation might be different. We checked our chimney and talked to an expert first.
We ensured the stone on our fireplace was just for looks and could be safely removed without damaging the chimney.
If you’re not 100% sure about your fireplace, please ask a professional for help. Also, our instructions assume there’s brick under your stone covering. If you understand all this and you’re ready, let’s begin!
Time needed: Two days
Follow these steps to make your concrete fireplace
1. Remove the Fireplace Insert and Mantel
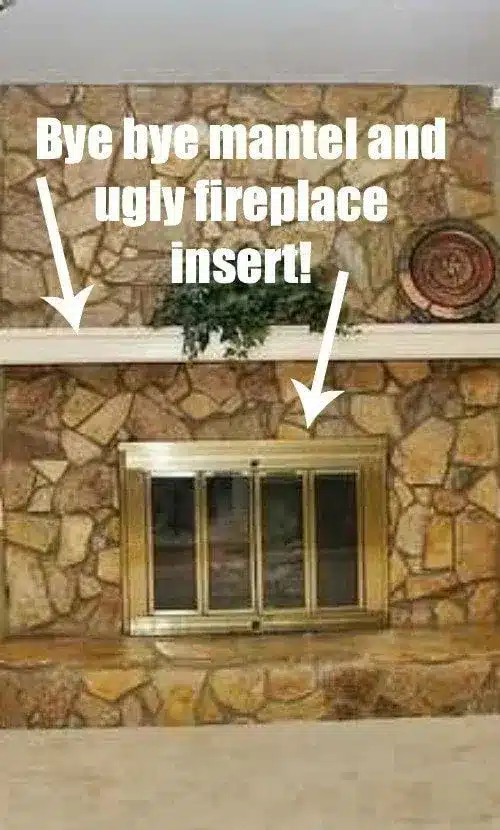
Remove any outdated fireplace inserts or mantels from the existing structure to properly prepare your fireplace. This will ensure a clean and safe environment for any updates or replacements.
2. Remove the Old Facade (if Needed)

If you need to remove an existing stone covering to prepare for installing a new fireplace, a demolition hammer is recommended due to its efficiency over a chisel and hammer.
By carefully using this tool, you should be able to uncover the bricks underneath the stone covering.
Note: We added a hidden electrical outlet behind our TV. If you want to do this, ask an electrician for help.
3. Attach Cement Board

When attaching the cement board to the brick, it’s important to use an electric drill (not battery-powered) equipped with masonry bits and screws.
Cover the seams with mesh tape for added reinforcement once the cement board is secured to the brick.
4. Apply the Concrete
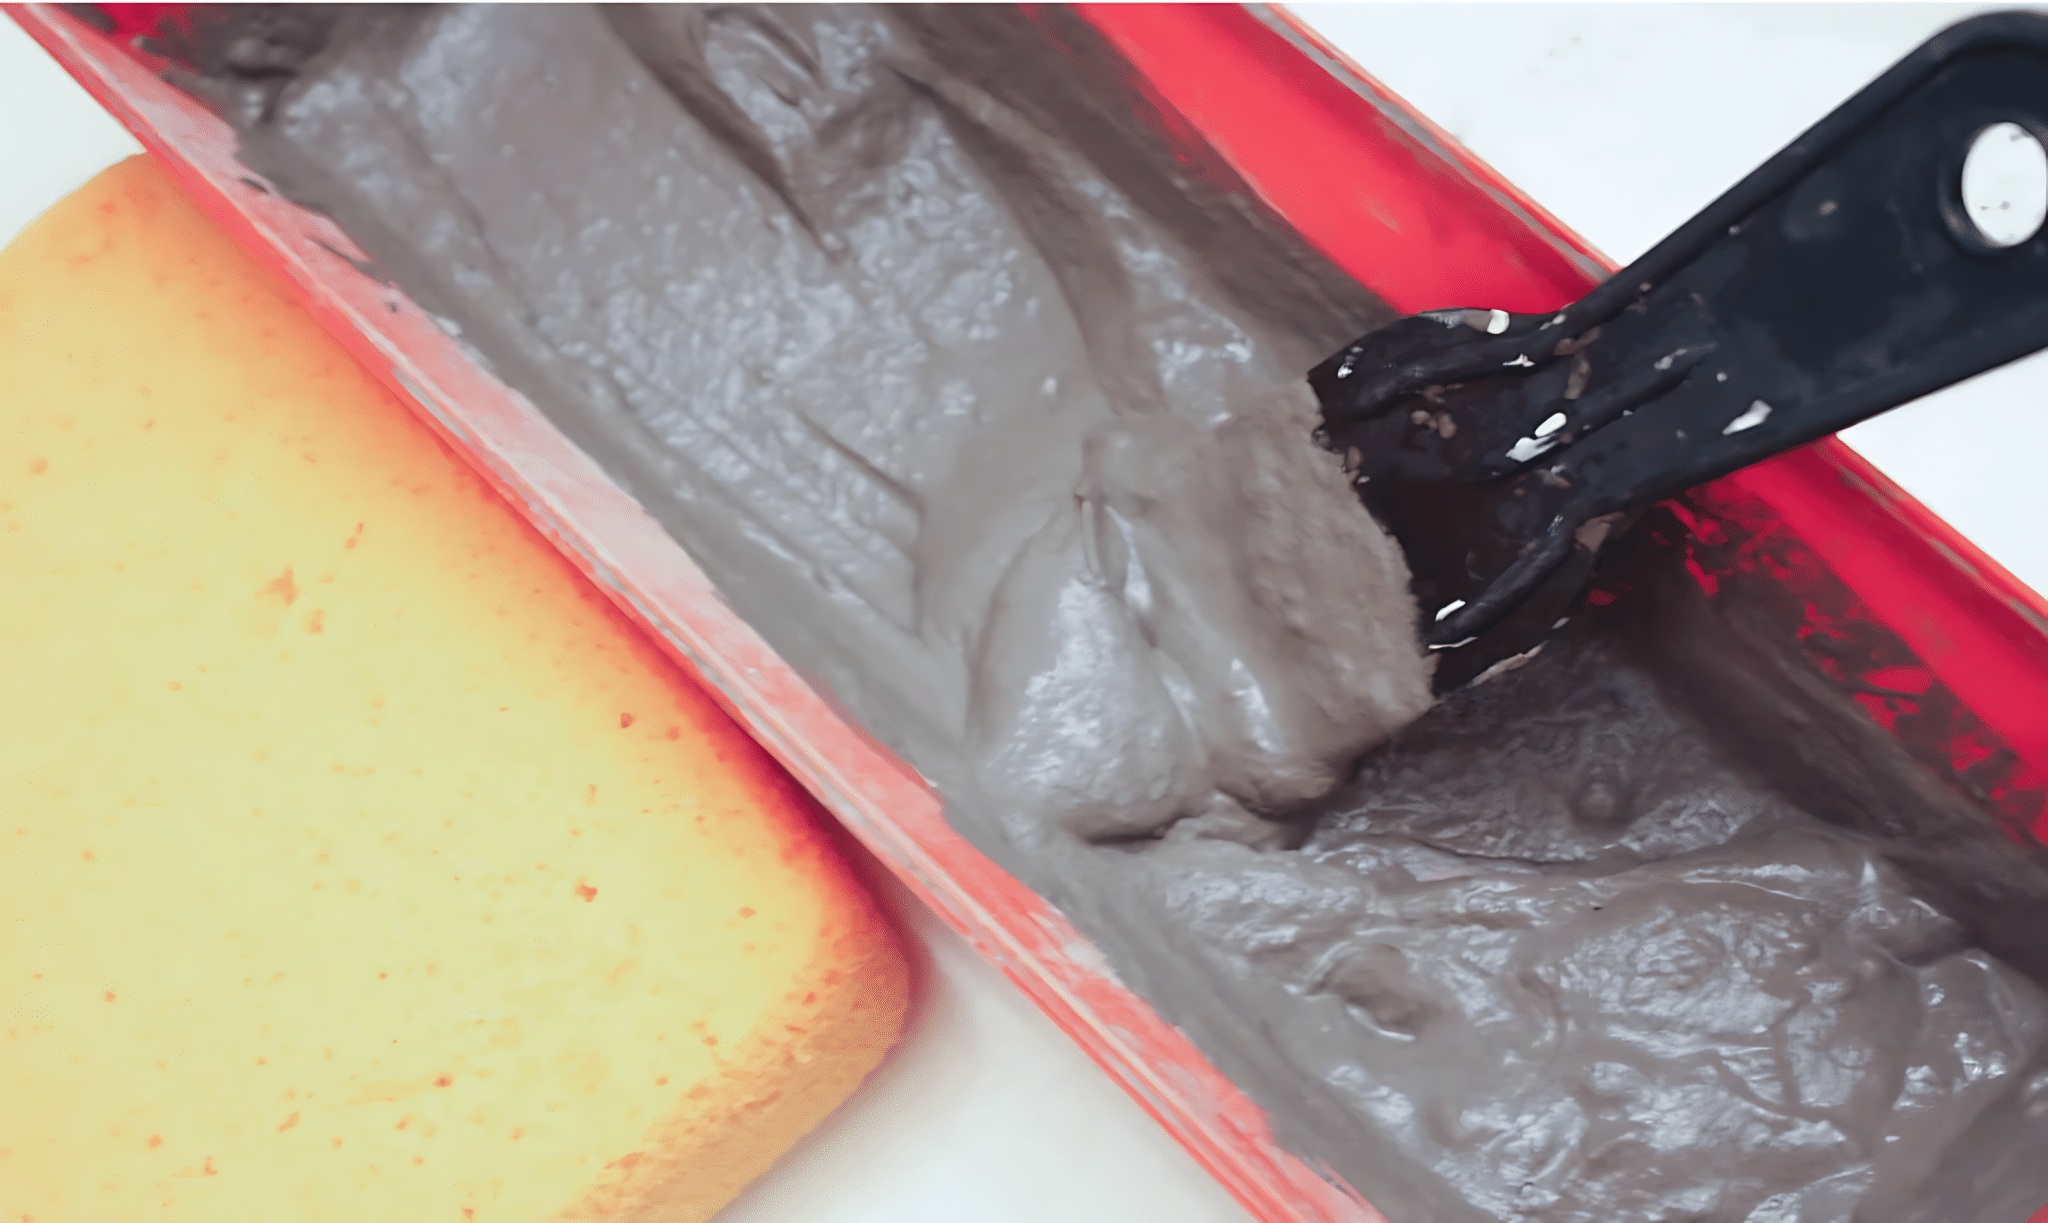
Mix Ardex Feather Finish with water until it’s like thin pancake batter. Let it sit for 5 minutes, then mix again.
Use a drywall knife to apply thin layers of the mixture. Start with the seams, then cover everything else. Use your fingers for the edges.
Apply 4-5 coats, letting each one dry before the next. As you add more coats, the seams will disappear.
5. Optional: Sanding and Sealing

We suggest skipping sanding – it’s messy and unnecessary if you like the hand-troweled look. We also didn’t seal ours, but you can if you want a shiny finish.
That’s it! For less than $100, you can transform your fireplace into a beautiful, modern focal point.
Tips and Considerations
Before venturing on your DIY concrete fireplace project, remember these important tips.
1. Chimney inspection: Prioritize safety by having a professional inspect your chimney to ensure it’s structurally sound before starting any work.
2. Consistency is crucial: When mixing the concrete, aim for a thin pancake batter consistency. This optimal texture ensures smooth application and durable results.
3. Layer application: Apply the concrete mixture in thin, even layers. This technique promotes a smooth finish and helps prevent cracking or peeling.
4. Sanding is optional: The author recommends skipping sanding to preserve the unique, hand-troweled texture. This not only saves time but also maintains an organic, artisanal look.
5. Sealing considerations: While not always necessary, sealing the concrete can provide additional protection and a subtle sheen. Consider your lifestyle and look preferences when deciding whether to seal.
6. Patience pays off: Allow each layer to dry completely before applying the next. This ensures a strong, long-lasting finish.
7. Practice first: If possible, test your technique on a small, inconspicuous area to gain confidence before tackling the entire fireplace.
The Final Result

The fireplace transformation using a do-it-yourself (DIY) concrete method is truly impressive. The clean lines and smooth finish achieved through this process have created a beautiful focal point within the family room.
A DIY metal sliding barn door fireplace screen has been added to complement this, contributing to a stunning and modern look that homeowners adore.
Before and After
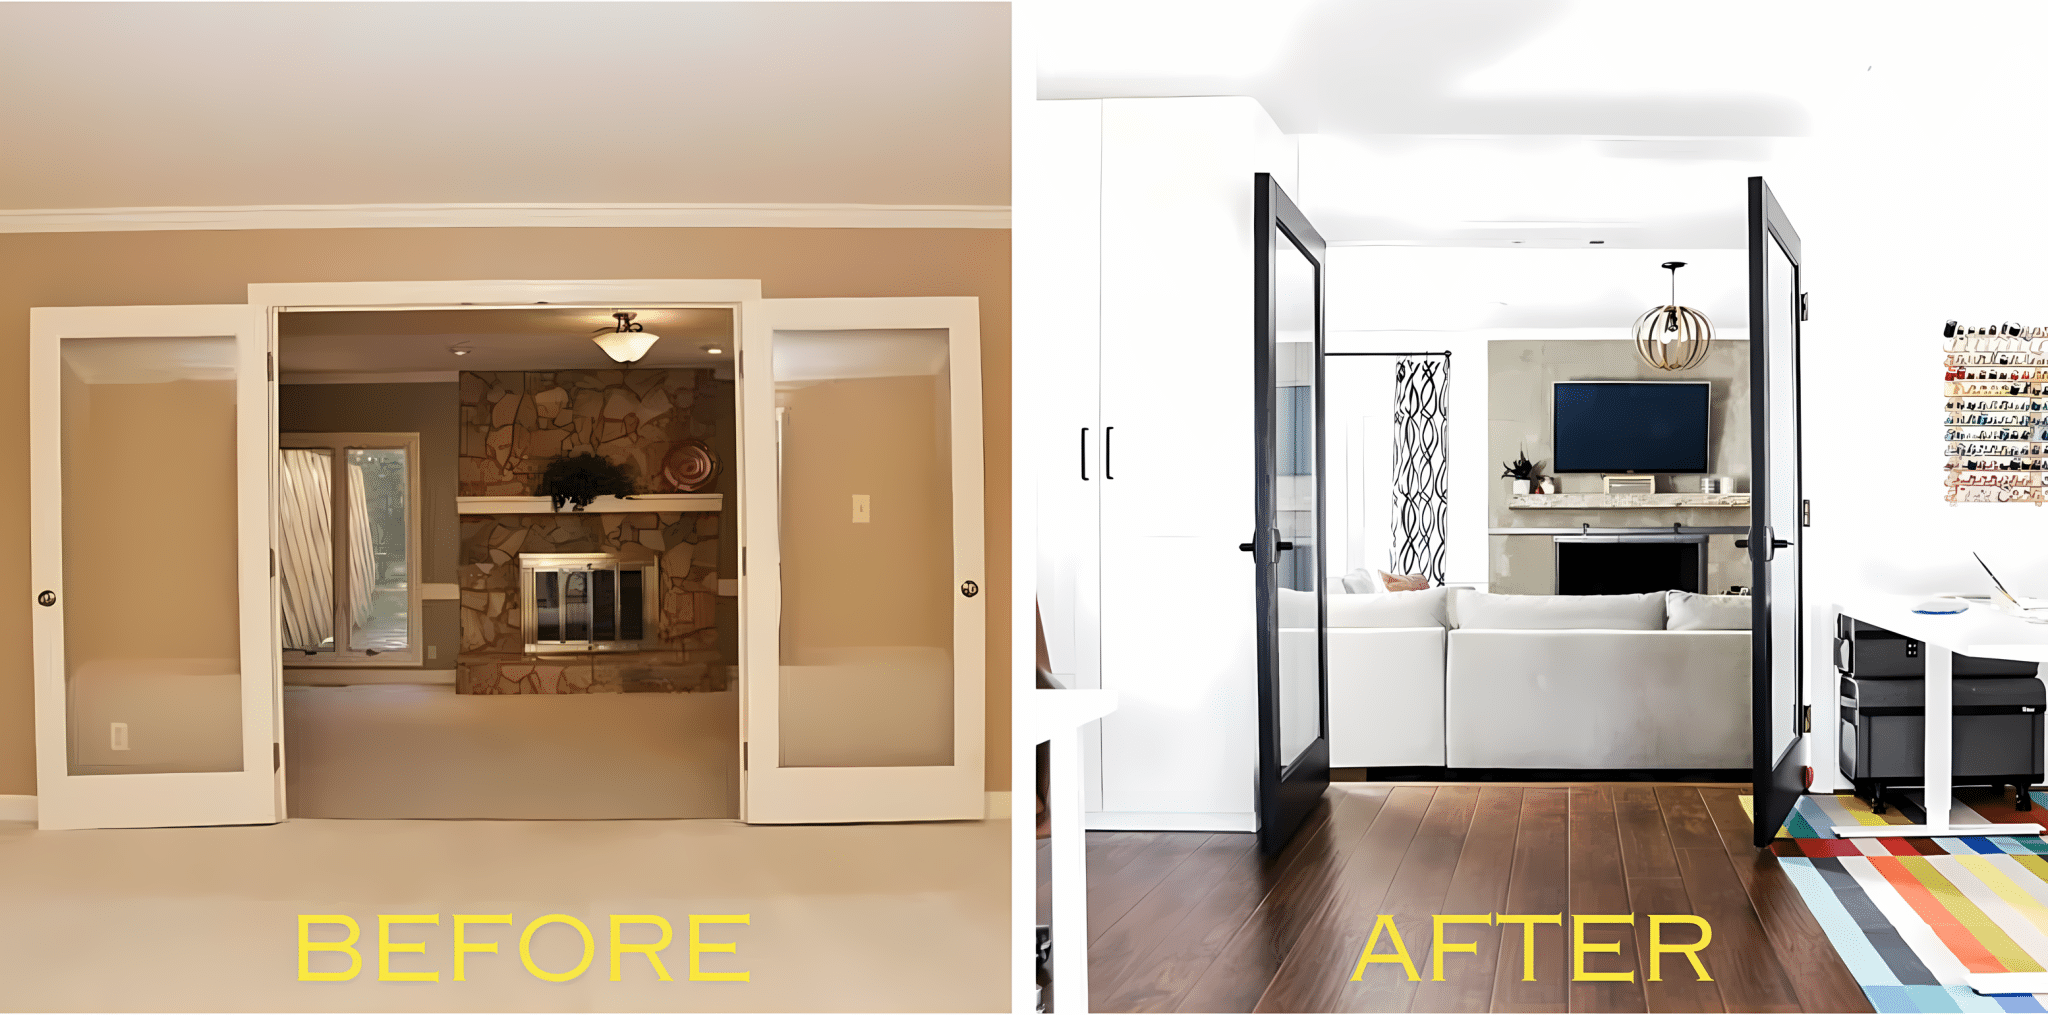
The previous stone veneer fireplace, which had become outdated, has been completely transformed with a modern concrete version.
This upgrade revived the fireplace and deeply impacted the overall ambiance and appearance.
Conclusion
Transforming your concrete fireplace is a rewarding DIY project that offers stunning results on a budget.
By following this guide, you can create a modern, sleek concrete fireplace that becomes the centerpiece of your room.
Remember to prioritize safety by inspecting your chimney before starting, and take your time with each step, especially when mixing and applying the concrete.
The key to success lies in patience and attention to detail. While the process may seem daunting initially, the result is well worth the effort.
Your new concrete fireplace will update your space and showcase your DIY skills.
So, gather your materials, roll up your sleeves, and get ready to enjoy the satisfaction of a beautifully transformed concrete fireplace that you created with your own hands.