DIY Coffee Filter Flowers at Home
Looking for a fun way to brighten your space without spending much? I’ve got something you’ll love coffee filter flowers! These aren’t just easy to make, they’re relaxing too.
You don’t need fancy tools or skills. If you’ve got a few filters, markers, and water, you’re already halfway there.
In this blog, I’ll walk you through every step. You’ll learn how to color your filters, shape them into petals, and build flowers that look great on tables, walls, or gifts.
I’ll also share ways to fix common mistakes, plus ideas to make each one feel unique. If you’re crafting with kids or making décor for a party, you’re in the right place. Let’s get started!
Why Are Coffee Filter Flowers So Popular
Coffee filter flowers are easy, affordable, and fun to make. You don’t need fancy materials or crafting skills, just a few simple supplies and a little time.
They’re perfect for beginners, fun for kids, and surprisingly beautiful when finished. From home decor to party centerpieces, these flowers work for almost any occasion.
Plus, they’re a great way to reuse everyday items and enjoy a relaxing, hands-on project. If you want to decorate, teach, or gift something homemade, coffee filter flowers are a go-to craft.
Coffee Filter Flowers: A Step-by-Step Tutorial
Follow these easy steps to make your own coffee filter flowers. Each part of the process is simple and fun, and the results are beautiful no matter your skill level.
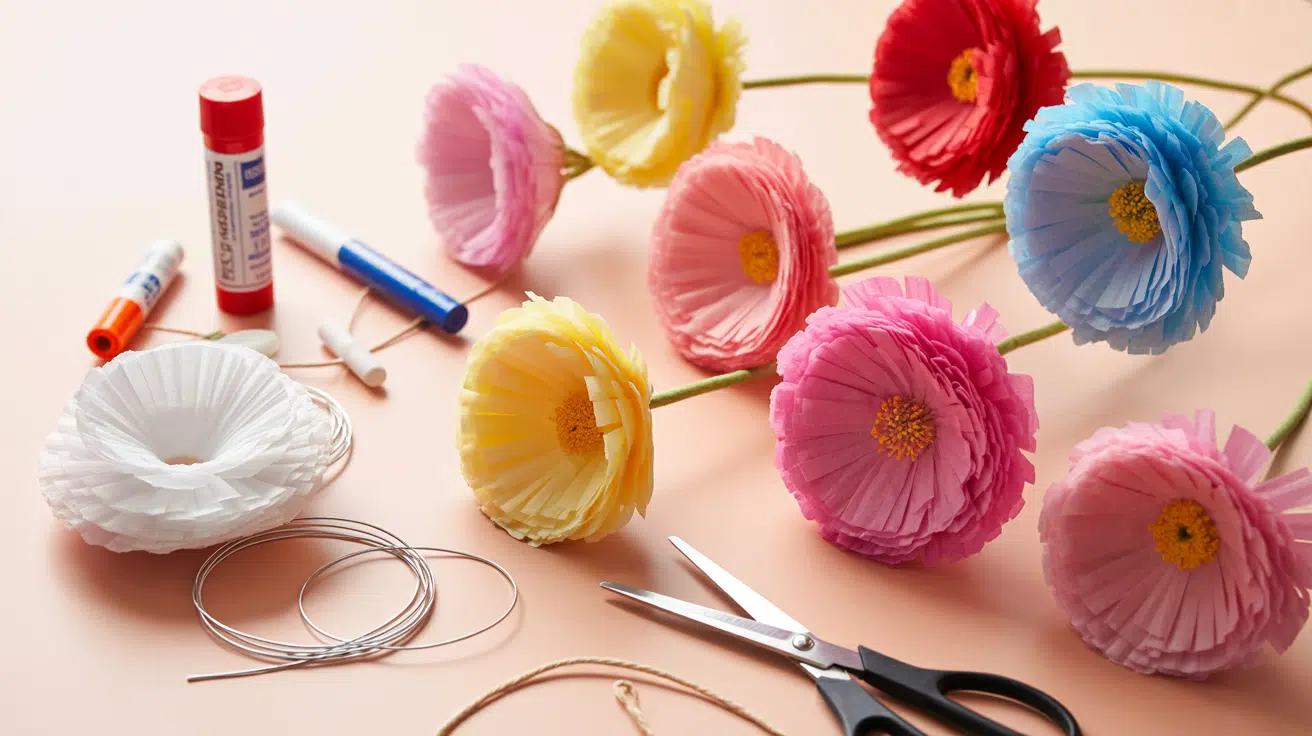
Essential & Optional Supplies
- Coffee filters: Basket-style works best for shaping petals.
- Scissors: For cutting petal shapes.
- Glue: White glue or a hot glue gun will both work.
- Water: Used to blend marker colors or prepare dyes.
- Pipe cleaners or floral wire: For making sturdy flower stems.
- Floral tape (optional): Adds a neat finish to wrapped stems.
- Hot glue gun (optional): Speeds up assembly and holds layers tightly.
Step 1: Prepare the Filters (Flattening, Folding)

Start by laying out the filter materials on a clean, dry surface. If the filters are pleated or structured, gently flatten them using your hands to remove any creases that may affect airflow.
Be careful not to tear the material. Apply light, even pressure, and work slowly from one end to the other.
Next, fold the filter according to the size and shape required for your specific project. Use a ruler or flat edge to help make sharp, consistent folds.
If you’re assembling multiple layers, make sure they align properly to maintain a snug fit later. This step helps ensure the filters will sit evenly and function without obstruction once installed.
Step 2: Cut Petal Shapes

Once dry, fold each filter again and cut along the edge to create petal shapes. You can freehand for a natural look or use a printed template for symmetry.
Make pointy or rounded tips based on the flower style you want. Unfold the filter after cutting, and you’ll have a complete flower layer ready to use.
Step 3: Assemble the Flower

Stack 3 to 5 colored filters to create a full bloom. Rotate each one slightly for volume. To add a stem, poke a floral wire or a pipe cleaner through the center and twist it underneath.
Secure everything with glue and shape the petals by gently fluffing and bending them outward. Your flower is now ready to brighten up any space.
Here is the YouTube video for more details:
Flower Design Variations
You can make all kinds of flowers from coffee filters. Here are a few fun designs to try, with tips on how many filters to use and what makes each one special.
Roses

Filters Needed: 3 to 5 filters per flower
To make a rose, start by cutting soft, round petals. Stack 3 to 5 filters, each with petals cut a little differently, some tighter, some wider.
Roll the first filter into a tight cone for the center. Then wrap the others around it, one at a time, adding glue in between.
Press the bottoms together and shape the top with your fingers. Roses look great in red, pink, or even light yellow shades.
Hydrangeas
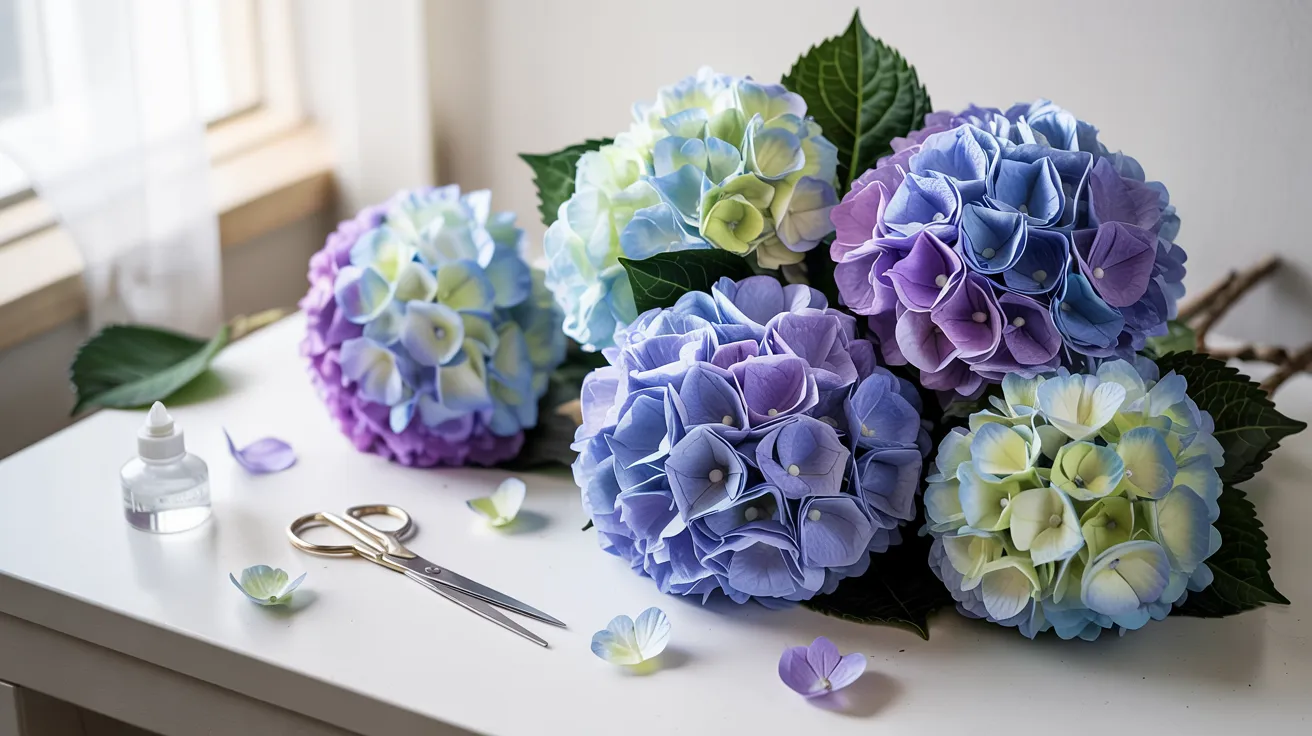
Filters Needed: 4 to 6 filters per bunch
Hydrangeas are fluffy and full. Use lots of small petals instead of one big shape. Cut each filter into four small circles.
Color them in soft blues, purples, or light greens. Crumple each piece a little, then glue a bunch of them close together on top of a ball-shaped base (like a paper ball or crumpled paper).
This makes a full, rounded look, just like a real hydrangea.
Wisteria
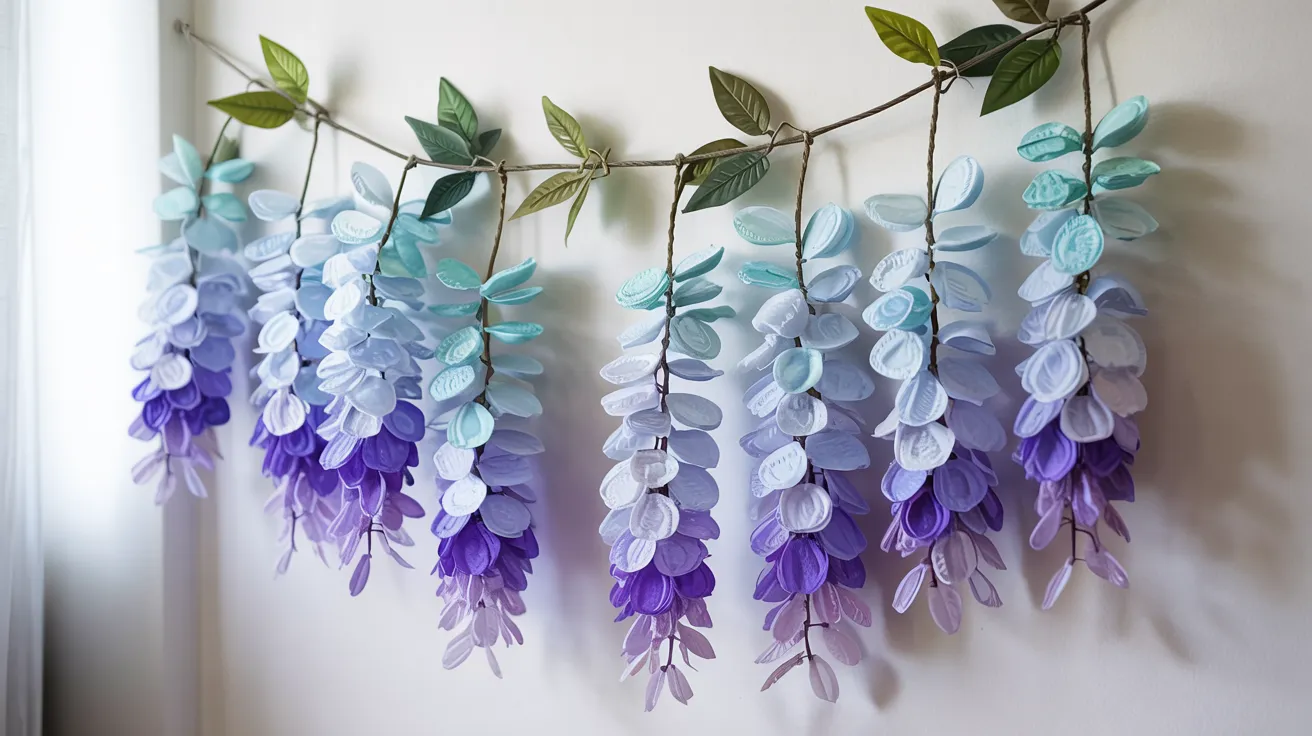
Filters Needed: 8 to 12 filters for a hanging bunch
Wisteria flowers hang down in long, drooping shapes. Cut each filter into tiny oval or teardrop shapes. Color them in purples or light blues.
Glue the petals along a string, wire, or pipe cleaner so they hang down in rows. Make each row shorter as you go up to create the wisteria shape. Hang a few strands together for a bigger display.
Giant Statement Flowers

Filters Needed: 8 to 10 filters per flower
Want to make one big flower that really stands out? Use 8 to 10 filters and cut large, bold petal shapes. Color them in bright shades like yellow, orange, or hot pink.
Layer the filters and turn each one slightly to make the flower look big and round. Glue all the layers at the center. Add a big button or paper circle in the middle as the center of the flower.
These are great for wall decorations or party displays.
Creative Uses and Ideas
Use coffee filter flowers to decorate your home, celebrate events, or make gifts. They’re fun for kids, great for classrooms, and add color and charm to any space.
Home Decor
Coffee filter flowers can brighten up your home. Place them in a vase on the mantel or use them in a bowl as a table centerpiece.
Mix colors to match your room. Try different flower styles. You can even tape them to the wall for a fun display.
Events
Make your events look special without spending too much. Use these flowers for party backdrops, table decorations, or even photo booth props.
Choose colors to match your theme. They look great in bunches or hung from the ceiling. Guests will love the handmade touch and personal style they bring.
Classroom or Art Projects
Coffee filter flowers are perfect for school or group art activities. They’re easy, low-cost, and fun for all ages.
Students can learn about shapes, colors, and layering. Let kids try their own designs. These flowers can be used for bulletin boards or sent home as cute crafts.
Mother’s Day or Valentine’s Gifts
Handmade flowers make thoughtful gifts for moms, teachers, or friends. Kids can make a small bouquet or a single rose. Add a note or card to go with it.
Use red, pink, or soft pastels. These flowers last longer than real ones and show love in a creative way.
Tips & Troubleshooting:
Fix small tears with glue, use less water if colors run, dry filters flat to stop crumples, and spray with clear sealer to help flowers last longer.
- Fixing tears: Use clear glue or tape on the back to patch small rips. Add extra layers if needed.
- If colors bleed too much, use less water or let markers dry before adding water.
- To prevent sagging or crumpling, let filters dry flat on paper towels.
- Preserve with spray sealants: Lightly spray flowers with clear craft sealer to keep colors and shape.
Wrapping Up
You’ve learned how to make different types of coffee filter flowers, from basic blooms to bold, oversized ones.
The steps are easy to follow, and you don’t need fancy tools or a big budget. I hope this has helped you feel ready to give it a go.
These crafts are great for quiet afternoons, party setups, or adding something fun to your space. You can make just one or build a whole bunch.
If you had fun with this project, I’d love for you to try more. There are plenty of other paper flower ideas out there, too.
Check out more posts for tips, styles, and fresh ways to keep creating with what you already have.


