
DIY Bunk Beds with Drawers for Smart Space Saving
Got more kids than space? I’ve been there, and custom bunk beds were the best fix for our busy, shared room. They helped us use vertical space better, added storage, and made things feel way less messy.
Store-bought beds didn’t fit our needs, so building our own gave us control. The good news? You don’t need expert skills to do it right.
In this post, I’ll share real custom bunk bed ideas that worked for us—plus easy steps to help you plan your own. You’ll find tips on storage, ladder spots, and keeping it all safe and sturdy.
And with a few simple finishing touches, the whole room can feel pulled together.
Let’s turn that crowded space into something that really works.
Why Choose Custom Bunk Beds?
Bunk beds designed to your exact needs offer many benefits for homes of all sizes. When you pick a bed built for your specific space, you get the most value and use from every inch of your room.
Unlike store-bought options, custom designs work with your unique room shape and size, making them worth the extra effort.
Save Space in Shared Rooms
When you have more than one child sharing a bedroom, floor space becomes precious. Custom bunk beds allow two or more sleeping spots without taking up extra floor area.
- Great for families with multiple kids
- Ideal for small bedrooms or apartments
For small homes or apartments where every square foot matters, these space-smart designs help keep rooms open for play, study, and living.
Designed to Your Needs
Unlike ready-made beds from stores, custom options can include exactly what your family needs. You might add drawers beneath the bottom bunk, a desk area for homework, or reading lights for each level.
- Built-in storage, desks, or lighting
- Can match renter-friendly or permanent needs
Some designs work well for renters who need to take the bed when they move, while others can be built into walls for a more lasting setup.
Step-by-Step: Building Custom Bunk Beds from Scratch
Before jumping into the build, it’s important to have a clear plan and the right tools. These step-by-step instructions will guide you through the process, making it easier to create bunk beds that are safe, sturdy, and built to fit your space perfectly.
Step 1: Clearing the Room and Planning
The first step to any room makeover is clearing everything out. Take down old beds, move dressers and other items to storage or another room temporarily.
This gives you a clean slate to work with. While the room is empty, it’s the perfect time to sort through toys, books, and clothes that are no longer needed.
Before cutting any wood, plan your design carefully. Measure your wall space and decide how much walking area you need.
For this project, the family needed sleeping space for four kids while maximizing floor area for play. Drawing a simple sketch with measurements helps keep your build on track.
Step 2: Creating the Frame
Making a cut list before you start helps keep track of all the pieces you’ll need. Mark off each piece as you cut it to stay organized.
For the frame, you’ll need to build side panels that will hold up the mattress platforms.
When building against walls, remember to account for baseboards by using small wooden shims or spacers. For this project, half-inch shims helped the frame sit flush against the wall despite the baseboard bump.
The mattress platforms were simple rectangles with center support beams, all checked with a level to ensure they were flat.
Step 3: Securing and Leveling
For safety, attach the frame to wall studs using screws. This makes the whole structure sturdy and prevents tipping. In this case, the builder used just 20 screws total into the walls, with five screws for each horizontal mattress support where it meets the wall.
Most homes, especially older ones, don’t have perfectly straight walls. Use wooden shims between the frame and wall to make up for any gaps or curves.
This helps keep your bunks level both on their own and compared to each other – an important step when building multiple bunks side by side.
Smart Add-Ons That Make a Big Difference
What sets custom bunk beds apart from store-bought options is the ability to include features that make them more useful for your family.
These thoughtful details can turn simple sleeping spots into multi-purpose pieces.
Step 4: Built-In Storage Drawers
One of the most useful additions to bunk beds is storage space underneath. Full-length drawers that slide out from the bottom of the bed make use of space that would otherwise go to waste.
To create these drawers, build a framed box that fits beneath the bottom bunk to hold the drawer slides. The drawers themselves can be made with basic wood joined with pocket hole screws.
While our example builder initially skipped wood glue to keep the project “renter-friendly,” they later admitted that adding glue makes the drawers more sturdy without preventing future moves.
Step 5: Personal Reading Lights
Giving each child their own light source makes sharing a room more pleasant. Everyone can read or play without disturbing siblings who want to sleep.
A clever way to add lighting without changing the electrical setup is using outlet extenders at each bunk.
Since this is meant to be renter-friendly, the extenders are attached with finishing screws instead of permanent methods, making them easy to remove later.
Step 6: Safe Ladders and Guardrails
Safety features are essential for bunk beds, especially with younger children. Well-built ladders and guardrails prevent falls while maintaining the bed’s look.
For ladders, 2×2 wood pieces make perfect rails and steps. For guardrails, use half-inch plywood as backing with 2×2 posts and 1×2 horizontal rails.
Adding edge banding creates a clean, finished look without sharp edges. Most importantly, sand all wood thoroughly to prevent splinters.
Finishing Touches for Style and Comfort
The final steps of your bunk bed project upgrade it from a functional frame to a piece that looks professionally made. These finishing touches make all the difference in how the beds look and feel.
Scribing and Facing
To give your bunk beds a clean, finished look, add facing to cover the frame. Since removing trim isn’t an option in most rental homes, you’ll need to notch out the plywood to fit around it.
This process, called scribing, lets your facing sit flush against the wall even with trim in the way.
Use half-inch plywood for the facing, adding small wood pieces to the frame first if needed to give the facing something to attach to. Use shims where necessary to keep everything flush and even.
Sanding and Smoothing
Thorough sanding is crucial for both safety and finish quality. No parent wants their child getting splinters from rough wood.
A smooth surface not only feels better but also allows paint to stick better and look more even.
After sanding, clean the room completely before painting. Vacuum the floors, wipe down surfaces, and make sure no dust remains that could mix with wet paint.
Painting and Color Details
Semi-gloss white is a practical choice for the bed frame itself – it’s bright, clean-looking, and easy to wipe down when little hands leave marks.
For a playful touch, consider adding color in unexpected places. A green ceiling paired with yellowish walls creates a fun contrast that kids love.
If your room will be shared by both boys and girls, neutral wallpaper patterns work well as they appeal to everyone.
These final touches turn a simple wood structure into a special place your kids will enjoy.
Final Reveal: The Complete Custom Bunk Room
After all the planning, building, and finishing work, the upgrade is complete. What was once a cramped, chaotic shared bedroom has become an organized, functional space that makes the most of every inch.
The finished bunk room balances looks and practicality with its clean white semi-gloss paint and soft wall colors. Each child now has their own defined sleeping space with personal lighting, while built-in storage drawers keep toys and clothes neatly tucked away.
Despite being completely secure, the entire structure uses just 20 screws into the wall studs, making it truly renter-friendly.
All other connections are made within the bed structure itself, with screws that remain accessible for future disassembly when it’s time to move.
This project proves that with basic tools and careful planning, anyone can create custom solutions that work for their family’s needs without compromising on safety or style.
For a visual demonstration of this entire process, check out the step-by-step tutorial from Simply Handmade on their YouTube channel below.
Their detailed walkthrough will help you visualize each step before you pick up your tools!
Creating bunk beds for your specific space might seem like a big job, but with careful planning and basic tools, you can make a setup that fits your room perfectly.
This guide walks you through the main steps based on a real family’s experience turning a small, shared bedroom into a well-planned sleeping area for four children.
More Custom Bunk Bed Ideas to Try
Custom bunk beds offer nearly endless design options that can be matched to your space, needs, and children’s ages.
Beyond the basic stacked design, there are many ways to make your bunk beds more useful and fun.
1. Loft + Desk Combo

A popular option for school-age children is the loft bed with desk combo. By raising a single bed high enough, you can fit a complete study area underneath with desk, chair, and even shelving.
This setup works perfectly in smaller rooms where floor space is limited.
2. Triple Stack for Tall Ceilings

For rooms with extra-high ceilings, consider a triple-stack design. These three-level bunks maximize sleeping capacity in minimal floor space, making them ideal for vacation homes or rooms shared by many children.
Just be sure to include sturdy ladders and safety rails for the highest levels.
3. Slide Exit for Younger Kids

Younger kids will love a bunk bed with a slide exit. Rather than climbing down a ladder, they can whoosh down a slide attached to the side or end of the bed.
This playful addition makes bedtime more appealing and adds a touch of playground fun to the bedroom.
4. Privacy Curtains or Panels
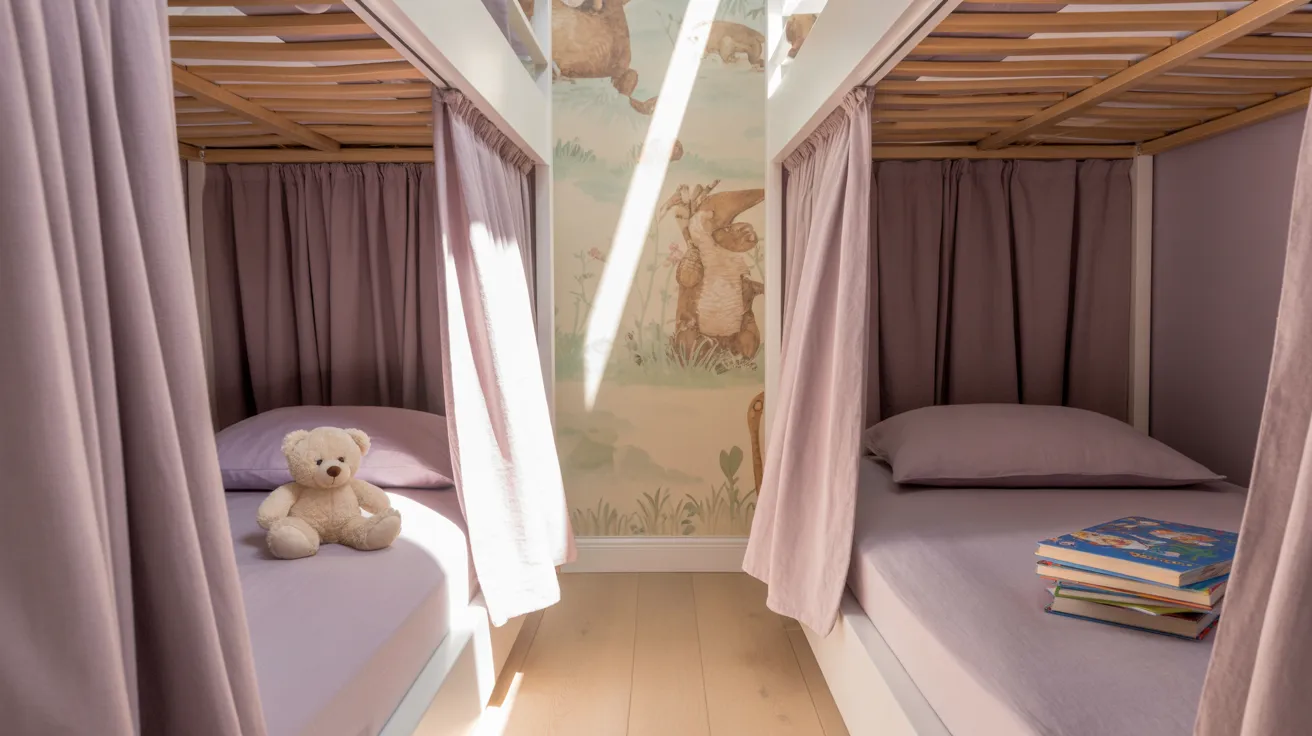
Privacy is important even in shared spaces. Adding curtains or sliding panels to each bunk creates mini “rooms” where kids can retreat with a book or toy.
These simple additions help reduce conflicts in shared bedrooms by giving each child control over their own space.
5. Bookcase Ladders

For a smart space-saving idea, consider turning the ladder into a bookcase. By designing wider ladder steps that double as small shelves, you create storage for books and small items while still providing safe access to the top bunk.
This clever combination reduces the need for separate bookshelves in the room.
6. L-Shaped Corner Bunks

Maximize awkward corner spaces by designing L-shaped bunks that allow for better movement and floor space. This smart layout takes advantage of room corners that often go unused, turning them into functional sleeping areas.
The L-shape creates a natural division in the room while keeping the center area open for play or study.
7. Convertible Bed-to-Desk Setup

Use a fold-up mechanism to upgrade a lower bunk into a homework desk during the day. This clever design saves valuable floor space by letting the same area serve double duty – sleeping at night and studying during daylight hours.
A simple hinge system allows the bed to tilt up against the wall, revealing a desk surface underneath.
Helpful Tips for Your Build
Even the most successful DIY projects come with valuable lessons. Learning from someone else’s experience can save you time, money, and frustration as you tackle your own custom bunk beds.
- Start with a detailed plan and cut list before making any cuts.
- Don’t waste time moving furniture to storage if you won’t be keeping it.
- Use wood glue on drawer assemblies, even for “temporary” builds.
- Label each piece as you cut to stay organized.
- Track screws with a checklist to ensure nothing is missed.
- Never skip thorough sanding – it affects both safety and appearance.
- Use clamps liberally – they’re essential for precise assembly.
- Account for uneven floors and walls in older homes.
- Consider the full disassembly process if you might move later.
- Take your time with facing and finishing – these details make the difference.
Final Thoughts
Custom bunk beds aren’t just space savers, they’re personal, practical, and built to last. When we started running out of room, building our own helped us take back control of our space. Whether you’re renting, remodeling, or just outgrowing your current setup, a custom build can make daily life smoother.
Think about what your family really needs. Small touches like shelves, storage, or reading lights can make a big difference.
And don’t worry about making it perfect. Done is better than perfect. Your bunk bed doesn’t need to be flawless to be useful.
If you’re new to building, start simple. Go at your own pace, stick to your plan, and trust yourself.
Check out more DIY tips to build something that truly fits your home.


