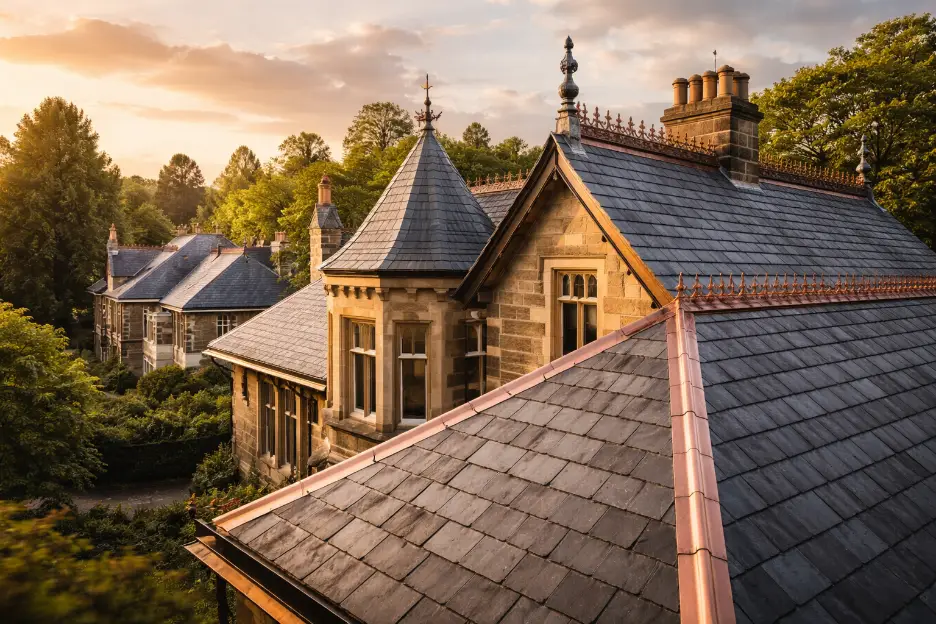
Lean-To Roof Ideas, Costs, and Design Guide
A lean-to roof is one of the simplest and most practical roofing styles you can add to your home.
Its single-slope design makes it ideal for sheds, patios, garages, and small extensions.
Many homeowners look for lean-to roof ideas because they are affordable and easy to build. They require fewer materials and work well in tight spaces.
The right design depends on your space, budget, and weather conditions. Material choice, roof pitch, and proper installation all play a key role in performance.
This guide covers practical lean-to roof ideas, materials, sizing tips, and common mistakes to avoid.
What is a Lean-To Roof?
A lean-to roof is a single-slope roof that attaches to an existing wall or building.
In the United States, a lean-to roof is often called a shed roof. In some regions, it may also be referred to as a skillion roof. All three terms describe the same single-slope roof design that attaches to a wall or stands independently with support posts.
This roof style is known for its simple structure and practical use. It does not require complex framing or multiple roof sections.
Lean-to roofs are commonly used for sheds, patios, carports, and small home additions. They work well in tight spaces where a full roof structure may not fit.
Because of their straightforward design, they are often more affordable to build. They also allow quick installation compared to more complex roof types.
Benefits of Lean-To Roof
Lean-to roofs offer more than just a simple structure. Their single-slope design helps water drain quickly in one direction, which reduces the risk of pooling and long-term damage.
Because there are fewer joints and connection points than multi-slope roofs, there are also fewer areas where leaks can develop. This makes inspection and maintenance easier over time.
Lean-to roofs also make smart use of an existing wall for support. That reduces structural complexity and keeps the layout clean. If you plan to expand later, the design can often be extended without rebuilding the entire structure.
In everyday use, this roof style delivers practical coverage with fewer complications.
Lean To Roof Ideas by Project Type
Lean-to roofs can be adapted to different areas around your home. The design stays simple, but the purpose changes based on the project.
Below are practical lean-to roof ideas based on common uses:
1. Lean-To Roof for Backyard Shed
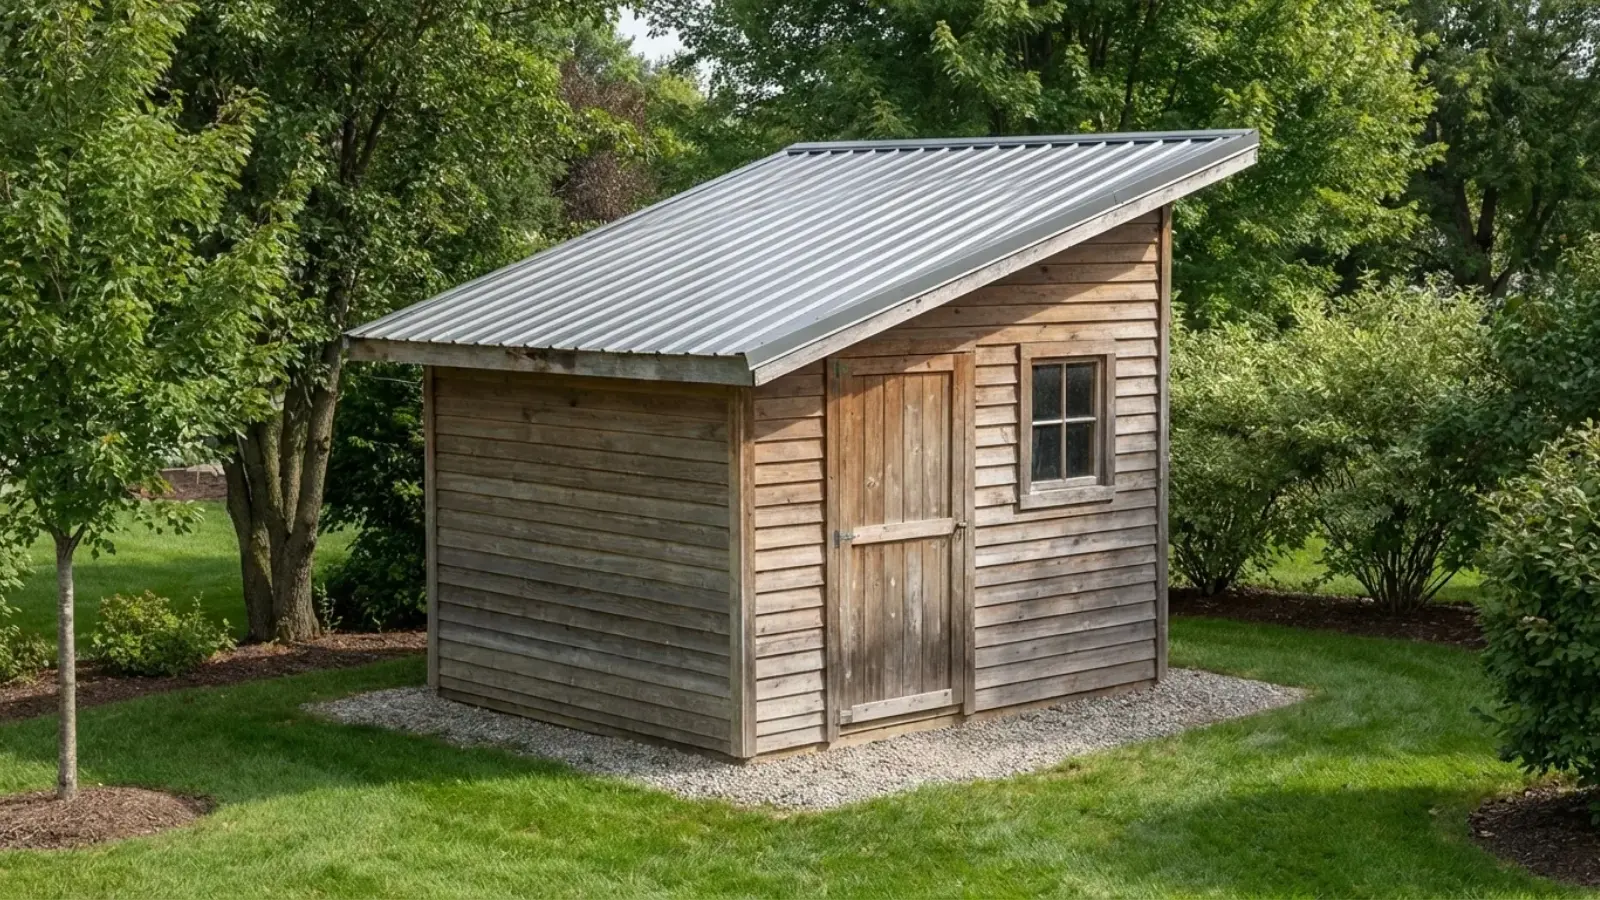
A lean-to roof is ideal for sheds because of its simple structure and good drainage. This can be a simple corrugated metal roof for durability or a painted panel roof that matches your shed for a clean, uniform look.
- Single slope directs rainwater away from the entrance
- Metal roofing panels offer durability and low maintenance
- Small overhang protects shed walls from rain
- Steeper pitch helps in heavy rainfall areas
- Easy to build with basic framing tools
This setup keeps stored items dry and improves the shed’s lifespan.
2. Lean-To Roof for Patio Cover
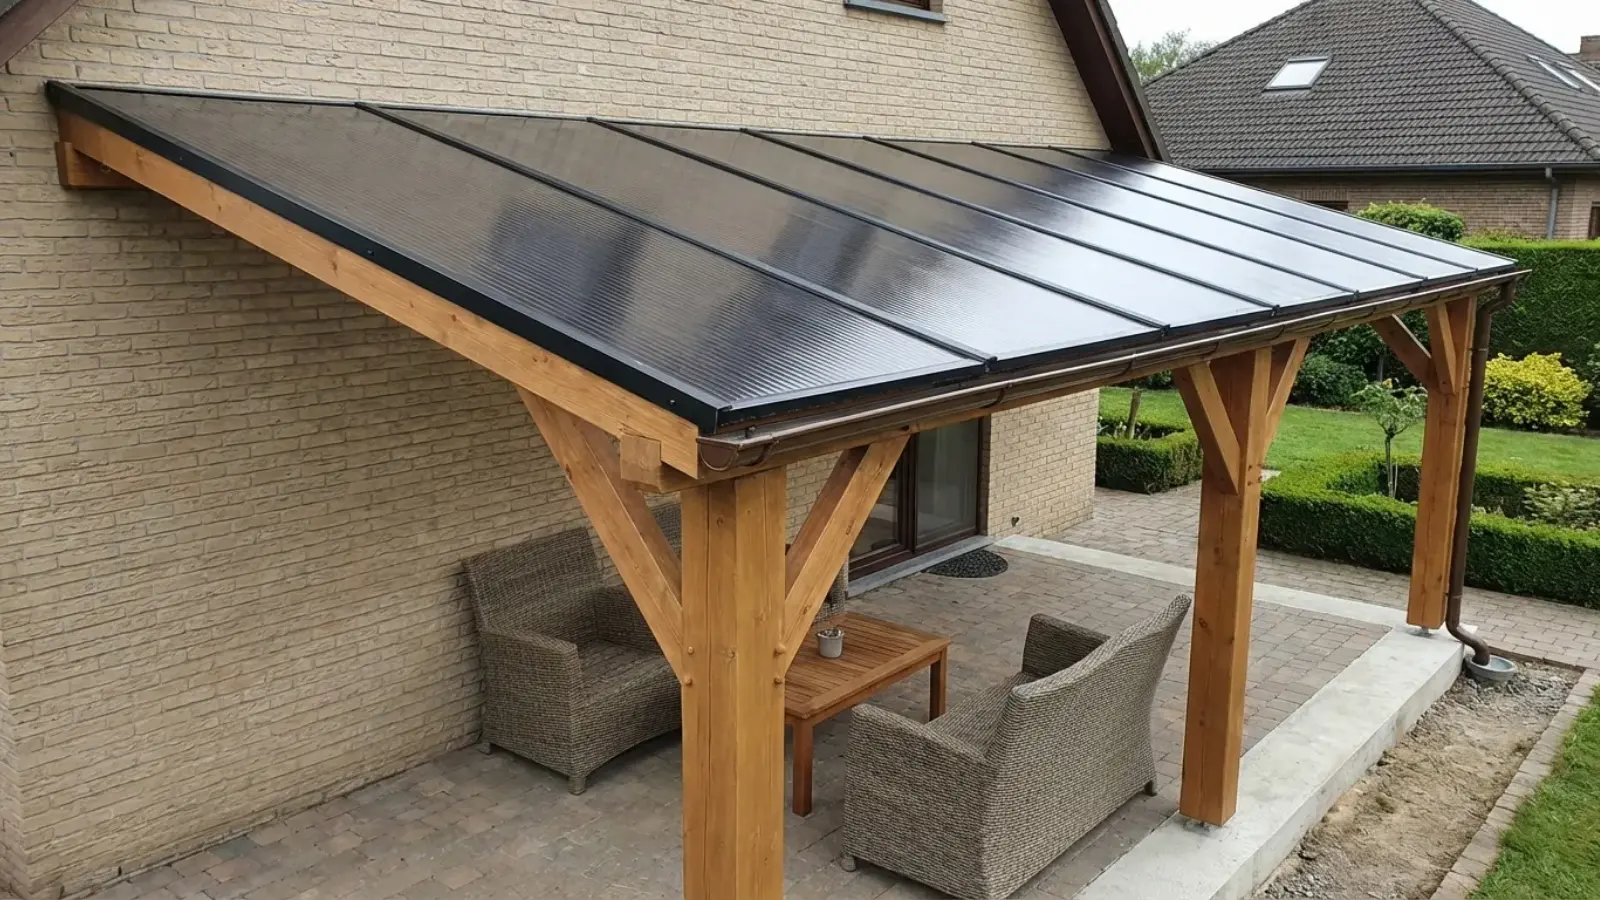
A patio lean-to roof creates shade and weather protection. This can be a transparent patio cover that allows natural light or a solid metal roof for full shade and stronger weather protection.
- Attach the higher side to the house wall
- Use polycarbonate panels to allow natural light
- Choose metal panels for stronger shade
- Add gutters to manage rainwater runoff
- Extend the roof slightly beyond the seating area for better coverage
This design makes outdoor spaces more comfortable year-round.
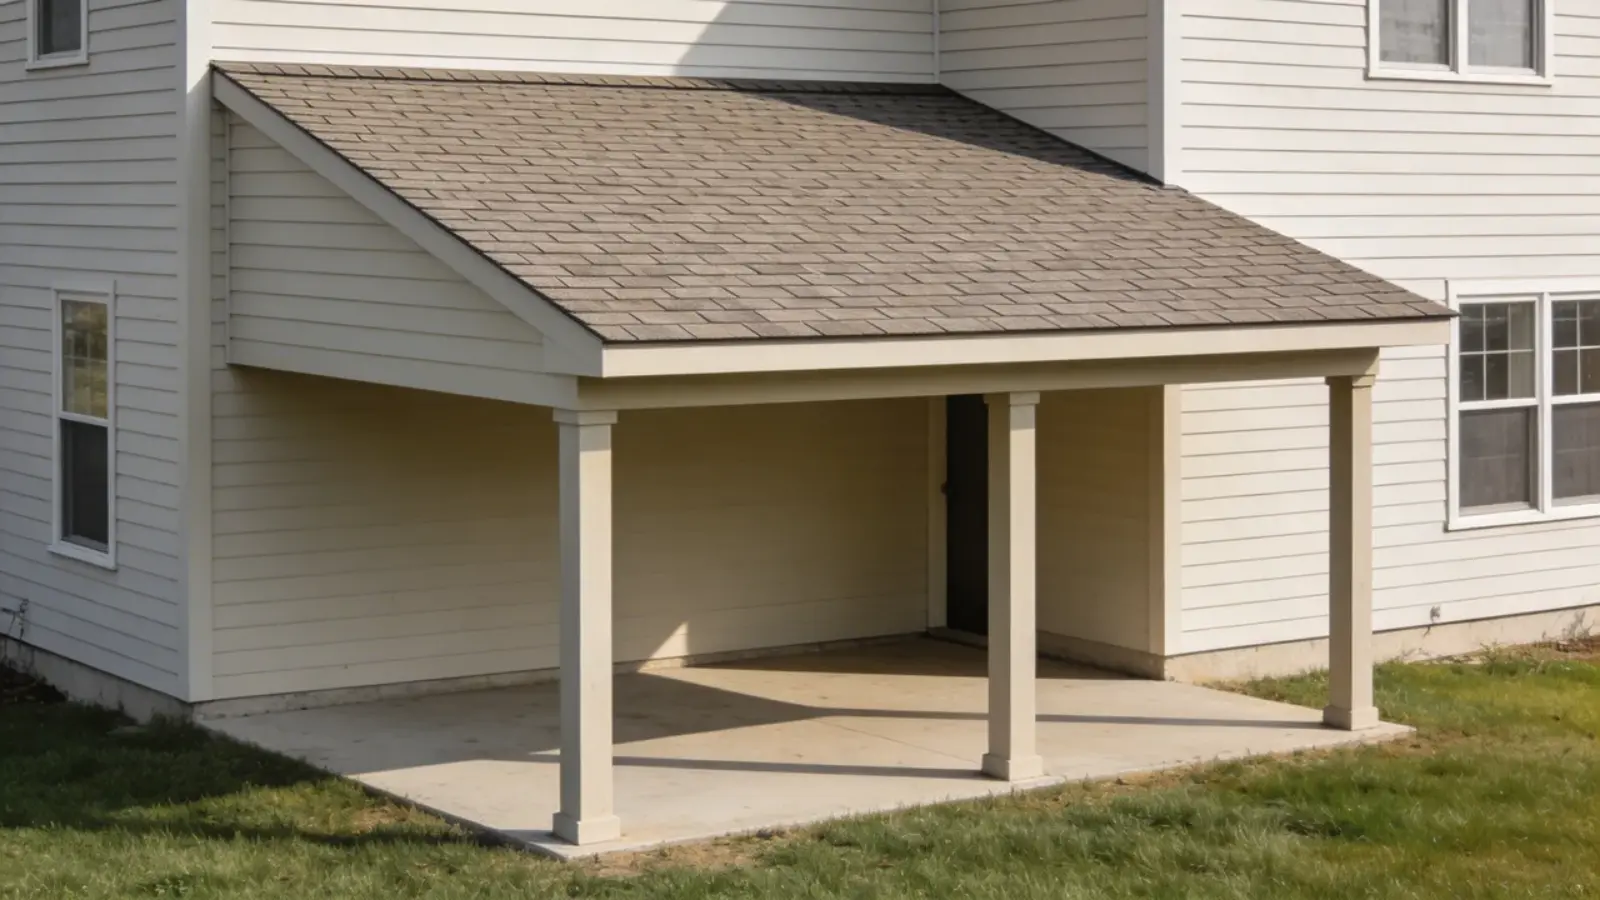
3. Lean-To Roof for Garage Extension
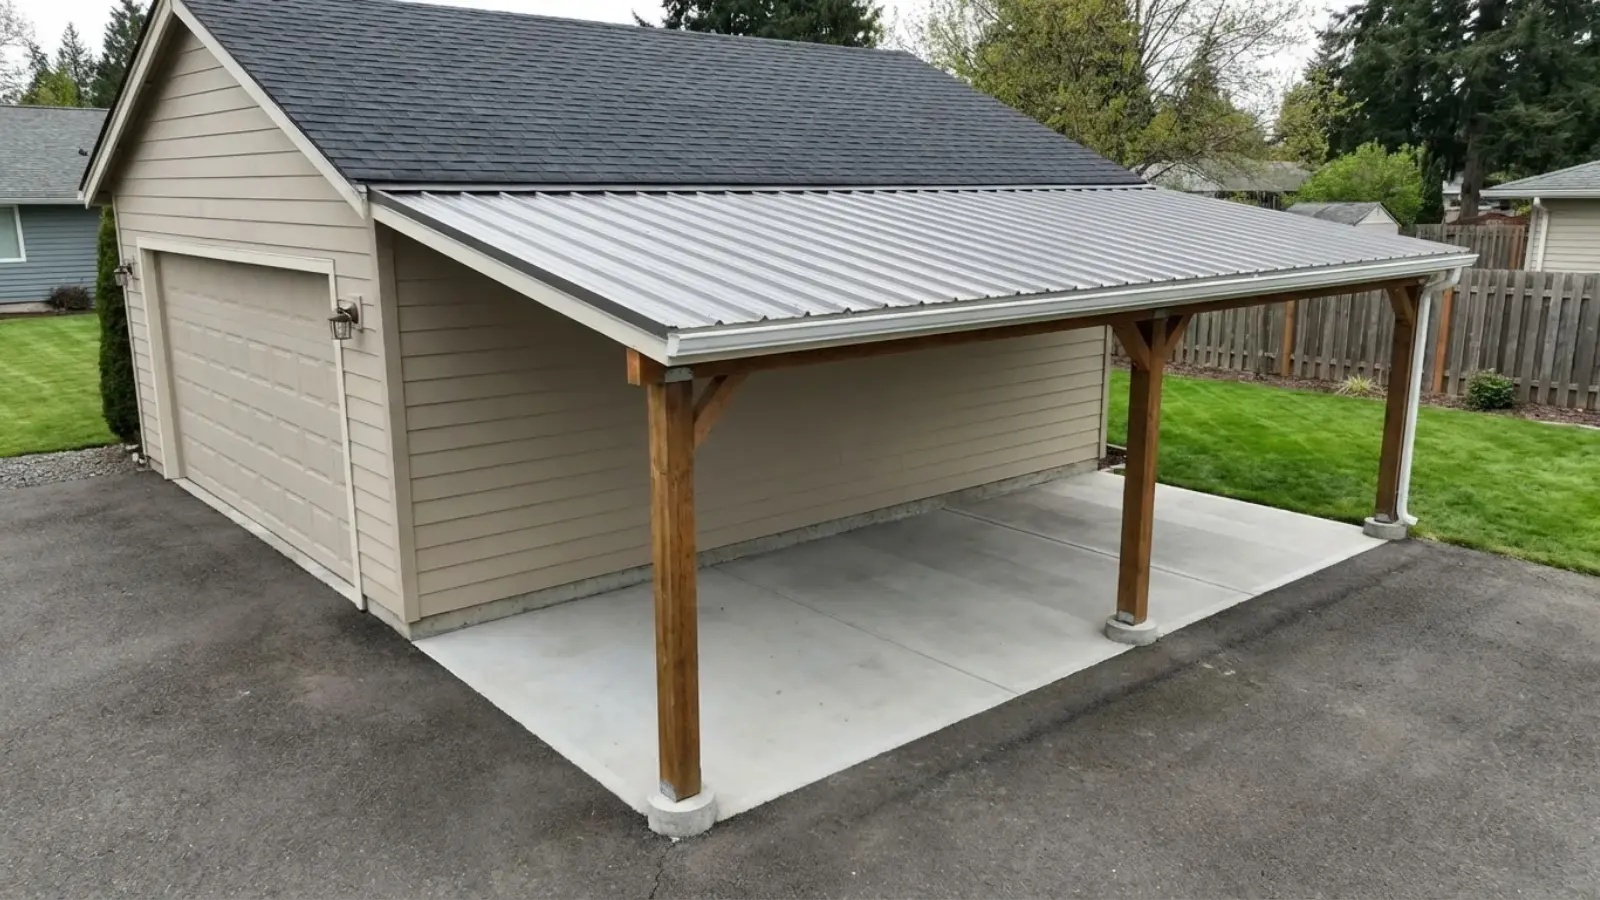
A lean-to roof can turn part of your driveway into a covered carport. This can be an open-sided carport style roof for quick access or a partially enclosed lean-to for added wind and rain protection.
- Extend the roof from the garage wall outward.
- Use strong support beams for stability
- Metal roofing handles weather exposure well
- Direct slope away from driveway
- Optional side panels provide wind protection
It adds a functionally covered space without major construction.
4. Lean-To Roof for Porch or Entryway
A small lean-to roof improves protection at entrances. This can be a compact sloped roof that blends with your home’s exterior or a slightly extended cover that adds stronger protection from rain and sun.
- Install the above front or back doors
- Match roofing material with the main house roof
- Angle slope away from the doorway
- Keep design compact for visual balance
- Use flashing to prevent leaks at the wall connection
Even a small structure can protect doors from rain and sunlight.
5. Lean-To Roof for Garden Tool Shelter
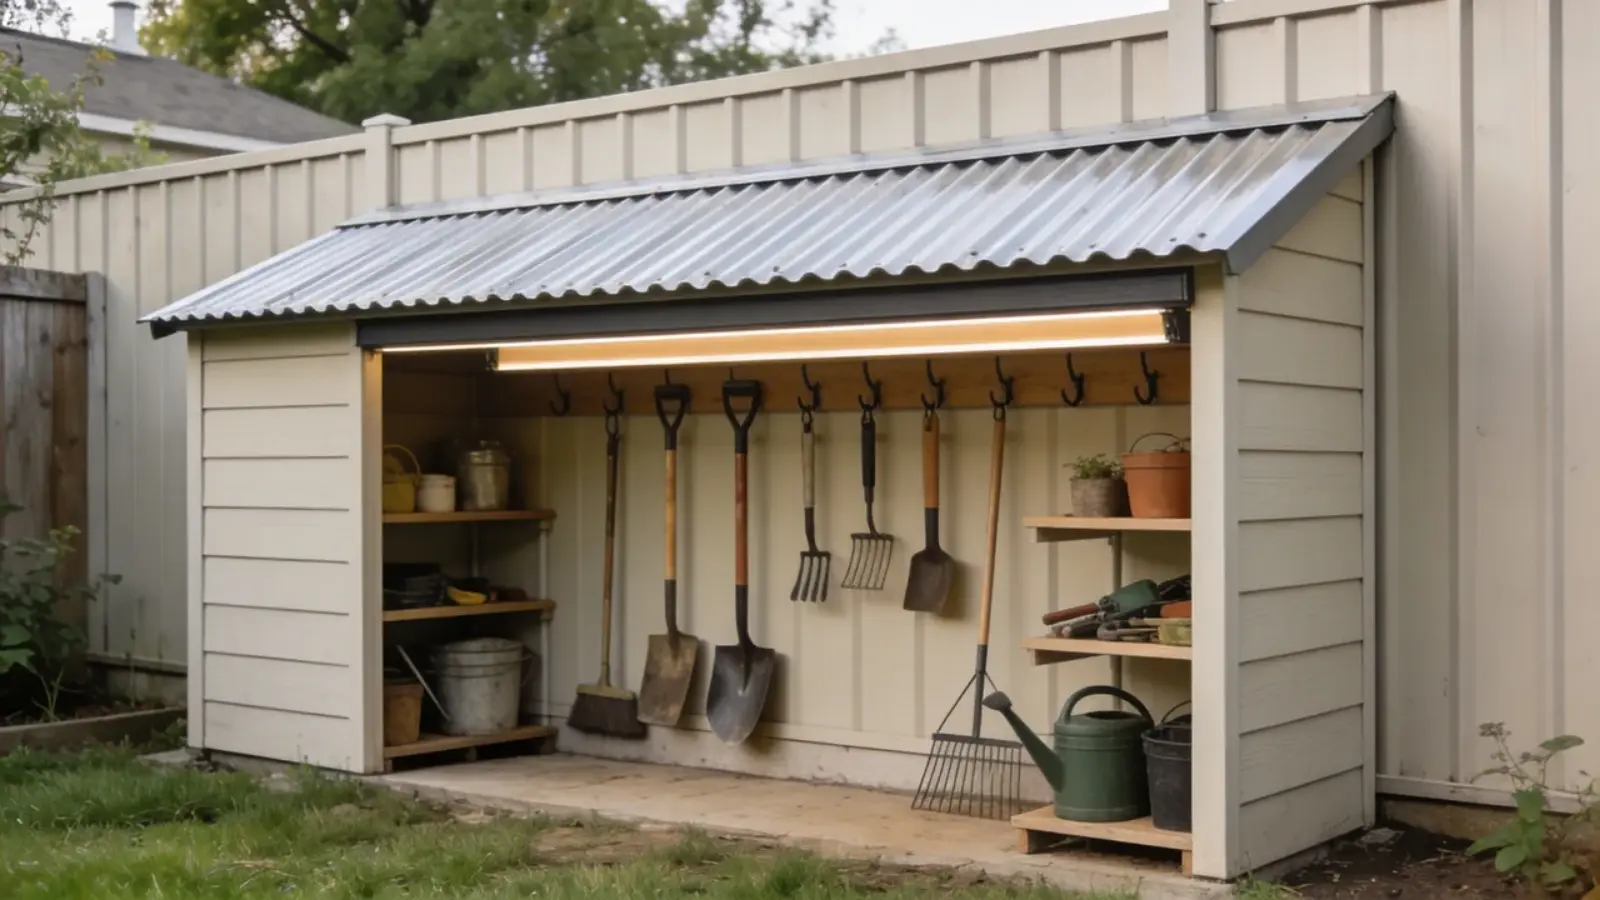
A lean-to roof works well for a compact garden tool shelter along a fence or backyard wall.
This setup often looks like a narrow covered strip attached to a fence, keeping tools organized and off the ground.
- Attach the high side to an existing wall or sturdy posts
- Use metal or corrugated panels for durability
- Keep the slope facing away from stored tools
- Add a small side panel to block wind-driven rain
- Include hooks or shelves under the covered space
This type of lean-to keeps shovels, rakes, and lawn equipment protected without taking up much yard space.
6. Lean-To Roof for Bike Storage Area
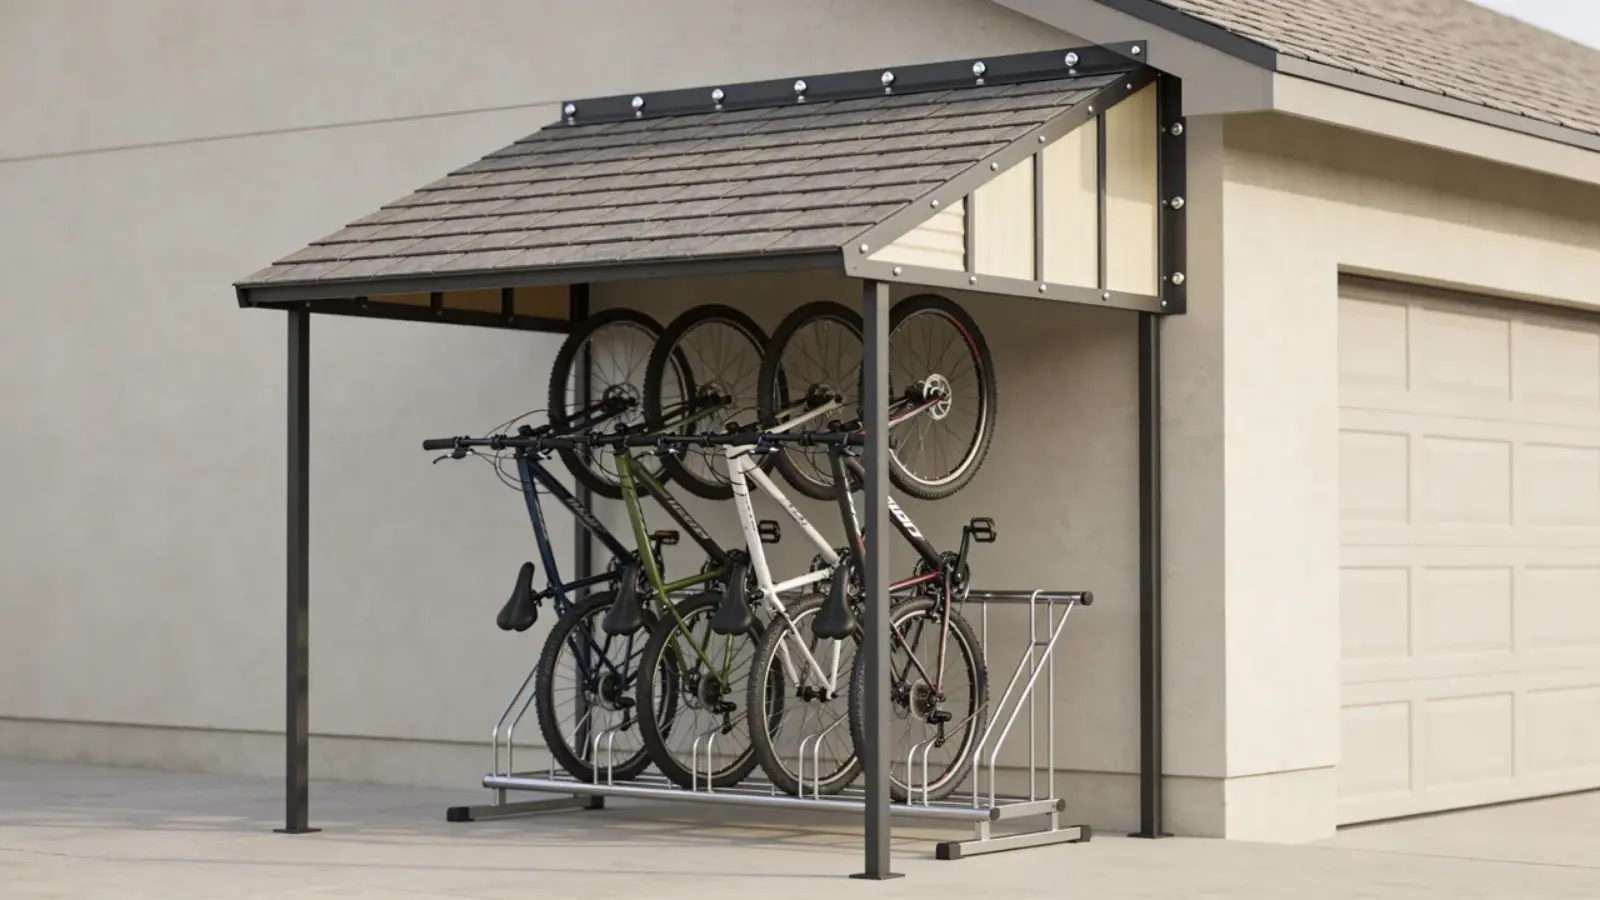
A lean-to roof can create a simple and clean bike storage zone beside a garage or side yard. It forms a slim covered zone that shields bikes from rain while keeping them easy to access.
- Install the higher edge against the house or garage wall
- Use a moderate slope for steady water runoff
- Extend the roof slightly beyond the bike rack
- Add partial side panels for extra rain protection
- Use treated wood framing for outdoor durability
This setup keeps bikes dry and reduces rust while keeping access quick and convenient.
7. Lean-To Roof for Small Greenhouse Cover
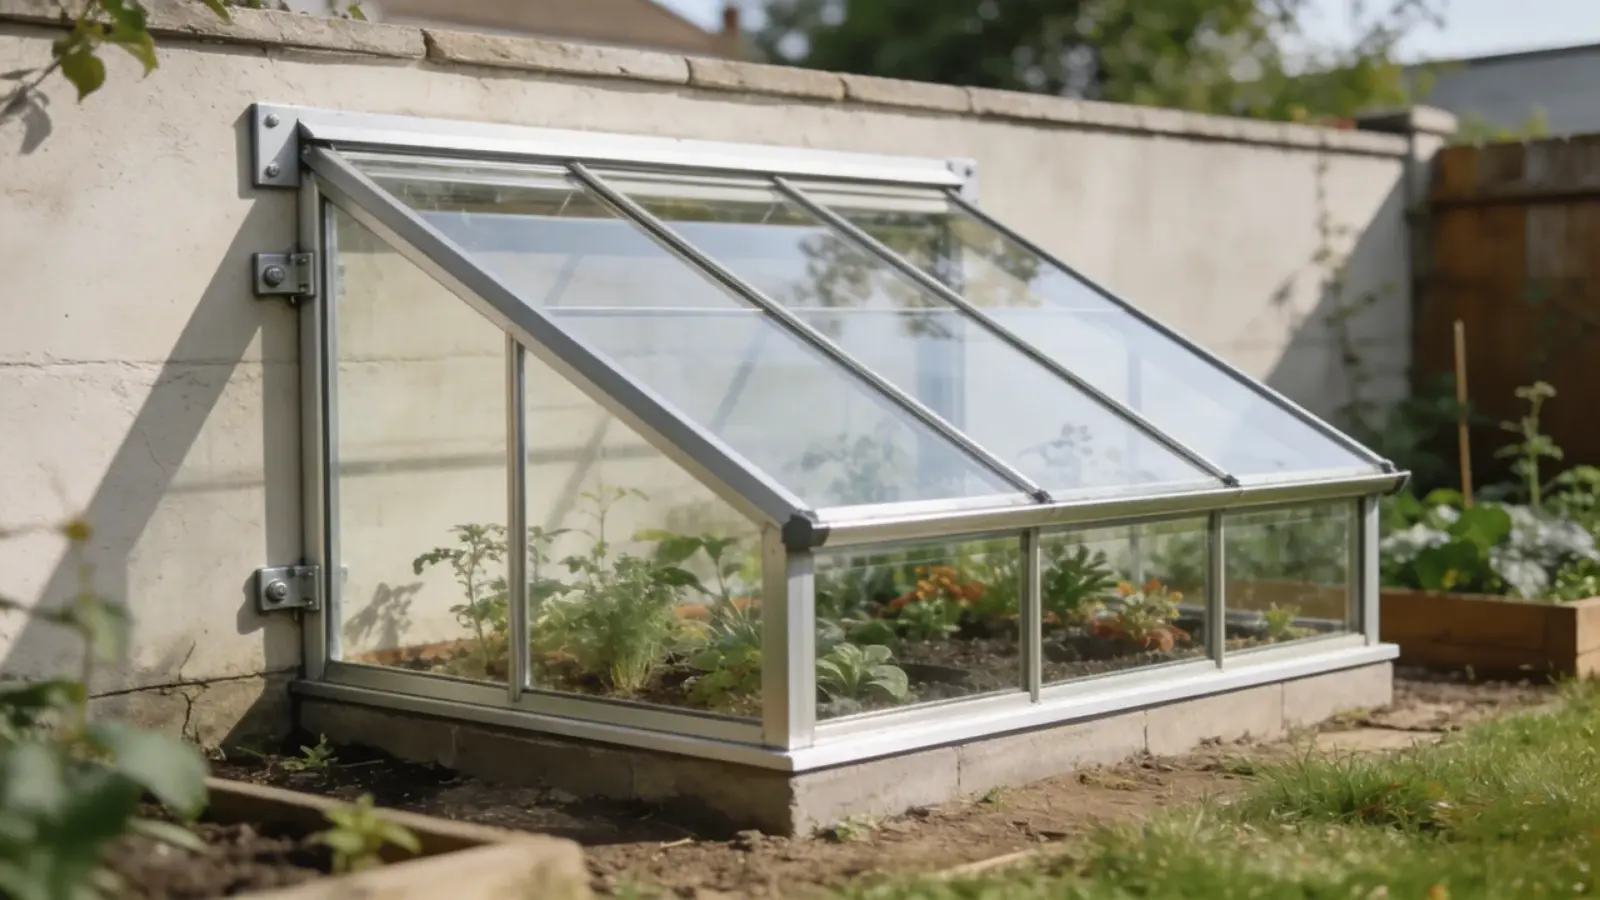
A lean-to roof design can support a small greenhouse attached to a home or garden wall.
With clear or translucent panels, it creates a bright growing area that uses the wall for warmth and support.
- Use polycarbonate or clear panels to allow sunlight
- Angle the roof to maximize sun exposure
- Seal joints carefully to prevent leaks
- Include ventilation panels for airflow
- Install gutters to direct rainwater away
This option works well for growing herbs or vegetables while using minimal backyard space.
Lean-To Roof Materials Comparison Guide
Choosing the right material affects how long your lean-to roof lasts, how much maintenance it needs, and how well it handles rain, wind, or sun. Use this comparison to quickly see which option fits your project.
| Material | Best For | Lifespan (Approx.) | Maintenance Level | Main Advantage | Main Limitation |
|---|---|---|---|---|---|
| Metal Roofing Panels | Sheds, garages, carports | 20–40 years | Low | Strong water runoff and long durability | Can be noisy during heavy rain without insulation |
| Polycarbonate Sheets | Patios, greenhouse covers, walkways | 10–20 years | Low to Moderate | Allows natural light while staying lightweight | Requires careful sealing to prevent leaks |
| Asphalt Shingles | Porch covers, home extensions | 15–30 years | Moderate | Matches most house roofs and is widely available | Needs solid roof decking underneath |
| Wood Panels | Rustic patios, outdoor seating areas | 10–25 years (with care) | High | Natural appearance that can be painted or stained | Requires sealing and regular maintenance |
This gives you a quick decision framework. Match the material to your climate, budget, and how much upkeep you are willing to handle.
Simple Design Tips for Better Results
A lean-to roof may look simple, but small design choices make a big difference.
Planning carefully improves durability and performance.
Here are practical design tips to follow:
- Maintain Proper Roof Pitch: Ensure the slope is steep enough for water runoff. Low pitch can cause pooling.
- Allow Enough Overhang: Extend the roof slightly beyond the walls to protect the structure from rain.
- Install flashing at the wall connection: Flashing prevents water from seeping between the roof and the main building.
- Use Strong Support Beams: Proper framing keeps the structure stable during wind and heavy rain.
- Add Gutters for Drainage: Gutters control water flow and protect the foundation area.
- Secure Fasteners Properly: Tight screws and bolts reduce movement and leaks over time.
Check Local Building Codes and Structural Requirements
Before building a lean-to roof, check your local building codes and permit requirements.
Some areas require approval for attached structures, especially if the roof connects to your house.
Verify minimum slope requirements for your climate. In snow-prone regions, stronger support beams and a higher pitch may be necessary.
Also, confirm drainage rules to prevent water runoff from affecting neighboring properties.
Taking time to review local regulations helps avoid fines and ensures the structure meets safety standards.
How to Estimate Lean-To Roof Size
Estimating the right size is important before buying materials. Accurate measurements prevent waste and extra costs.
Start by measuring the width of the area you want to cover. This is the distance along the wall where the roof will attach.
Next, measure how far out you want the roof to extend. This determines the overall depth of the structure.
Then calculate the slope. A common rule is at least 1/4 inch of rise per foot of run, but steeper slopes handle heavy rain better.
To estimate roof area, multiply the width by the sloped length. Always add a little extra for overhang and cutting adjustments.
Careful measuring ensures proper drainage and a stable structure.
Cost Considerations and Budget Tips
The cost of a lean-to roof in the U.S. depends on size, materials, and whether you install it yourself or hire a professional. Adding clear estimates helps you plan more accurately and avoid unexpected expenses.
Here is a realistic cost breakdown:
| Project Type | DIY Cost (Materials) | Professional Cost | What It Includes |
|---|---|---|---|
| Small Shed Lean-To | $200–$800 | $800–$2,000 | Basic framing, simple roofing panels |
| Patio Cover Lean-To | $500–$2,500 | $2,000–$6,000 | Larger coverage, better materials like polycarbonate or metal |
| Carport / Garage Extension | $1,000–$4,000 | $3,000–$8,000+ | Strong framing, weather-resistant roofing |
| Porch / Entry Roof | $300–$1,500 | $1,500–$4,000 | Compact structure, aesthetic finish |
| Greenhouse Lean-To | $800–$3,000 | $3,000–$7,000 | Clear panels, ventilation setup |
Material Cost Guide (Per Sq. Ft.)
| Material | Cost Per Sq. Ft. | Notes |
|---|---|---|
| Metal Panels | $5–$12 | Durable, low maintenance |
| Polycarbonate Sheets | $8–$15 | Allows light, needs proper sealing |
| Asphalt Shingles | $4–$10 | Budget-friendly, requires decking |
| Wood Panels | $6–$14 | Natural look, higher maintenance |
These ranges can vary based on location, labor rates, and design complexity.
Budget Tips to Save Money
- Measure carefully to avoid buying extra materials
- Compare prices across local suppliers and online stores
- Choose materials based on climate to avoid future repairs
- Reuse existing walls or supports when possible
- Keep the design simple to reduce labor and material costs
- Consider DIY for small projects if you have basic tools
- Buy materials in bundles or during seasonal sales
Planning with realistic numbers helps you stay on budget while building a durable and functional lean-to roof.
Why Lean-To Roofs Work for Small Spaces?
Lean-to roofs are a smart solution when space is limited. Their single-slope design makes them easy to fit into tight areas.
Because they attach directly to an existing wall, they do not require extra support posts on all sides. This saves space and keeps the layout simple.
They also need fewer materials than complex roof styles. This makes them practical for small backyard projects.
Lean-to roofs work well in side yards, narrow patios, and compact storage areas. They provide coverage without overwhelming the structure. Their clean, straightforward design keeps construction manageable.
For small spaces, this roof style offers both function and efficiency.
Common Mistakes to Avoid
Even though a lean-to roof is simple, small mistakes can lead to problems. Planning carefully helps prevent leaks, weak framing, and extra repairs.
- Building with Too Little Slope: A shallow pitch slows water runoff. This can cause pooling and long-term damage.
- Weak Wall Attachment: If the roof is not securely fastened to the main structure, it may shift over time. Strong anchors and proper framing are essential.
- Skipping Flashing Installation: Without flashing where the roof meets the wall, water can seep inside. This often leads to hidden leaks.
- Using Incorrect Materials for Your Climate: Heavy snow or strong winds require stronger support and suitable roofing material.
- Ignoring Local Building Codes: Some areas require permits or specific structural standards. Skipping this step can cause legal issues.
Avoiding these mistakes improves safety and durability. Careful planning leads to a stronger, longer-lasting lean-to roof.
Conclusion
A well-planned lean-to roof is not just about adding coverage, but about making smart choices that improve long-term performance.
The right combination of materials, sizing, and structure helps prevent common issues and keeps maintenance low over time.
Once you understand how lean-to roof ideas apply to your space, it becomes easier to build something that works efficiently without overcomplicating the design.
Paying attention to small details during planning often leads to better results after installation. Take the time to evaluate your space and needs, and start planning your lean-to roof project with clarity today.