How to Plumb a Bathroom: Step-by-Step Guide
If you are planning a brand-new bathroom or updating an old one, plumbing is the part that makes everything function properly. It controls how water comes in and how waste goes out.
Learning how to plumb a bathroom before you start can save you time, stress, and money. Even a small misstep behind the walls can lead to leaks, water damage, or costly repairs later.
When you understand the basics, you can plan smarter, choose the right materials, and decide which part you can handle yourself and when it’s best to consult a professional.
Know Your Purpose First
Before you pick up any tools, be clear about what kind of bathroom plumbing work you are doing. Each type needs a different approach.
- Rough-In: This is the first stage, which involves installing supply lines, drain pipes, and vents before walls and floors are finished.
- Repair: Fixing leaks, clogs, or broken parts in an existing system.
- Upgrading: Replacing old pipes or fixtures with newer, better ones.
- Inspection: Ensuring compliance with U.S. plumbing codes and local regulations.
Knowing your purpose keeps your plumbing project on track. It also helps you choose the right tools and materials.
What System Bathroom Plumbing Includes?
Bathroom plumbing works through interconnected systems. Once you understand how these systems and parts work together, planning and installation become much easier.
1. Water Supply System (Potable Water)
This system brings clean water into your bathroom. It includes:
- Hot and cold supply lines (usually ½ inch pipes)
- Shutoff valves for maintenance and emergencies. It is a small control valve installed on a water supply line that lets you stop water flow to a specific fixture without turning off water to the entire house.
- Supply connections to toilets, sinks, and showers
Hot water comes from the water heater. Cold water comes directly from the main line. Both must be properly spaced and secured to prevent leaks and pressure issues. Without this system, fixtures cannot function.
2. Drain-Waste System (Sanitary Drainage)
This system removes wastewater safely from your bathroom.
- Toilet drain line (typically 3–4 inches)
- Shower drain line (typically 2 inches)
- Sink drain line (1.25–1.5 inches)
- Main waste stack
- Cleanouts for maintenance access
Drain lines must slope at ¼ inch per foot to allow gravity to move waste efficiently. Improper slope is one of the most common plumbing mistakes. This system protects your home from backups and water damage.
3. Vent System (Airflow and Pressure Control)
The vent system balances air pressure inside the drain pipes.
- Vent stacksare vertical pipes in a building’s plumbing system, typically extending through the roof and designed solely to circulate air, not to carry waste.
- Branch vents are a crucial plumbing component that connects one or more individual fixture vents to a main vent stack or stack vent
- Air admittance valves (where allowed by code) eliminate the need for traditional roof-penetrating vents in specific scenarios, such as island sinks or renovations, while sealing to prevent sewer gases from entering
Vents prevent suction that can empty P-traps and allow sewer gases to enter the home. Proper venting is required by U.S. plumbing codes. Without proper venting, drainage slows, and odors can become a problem.
Key Venting Concepts
Two things matter most in venting: distance and layout.
Trap-to-Vent Distance:
Each P-trap must be close to a vent. If the vent is too far, the trap can lose its water seal and allow sewer gases inside.
Typical limits:
- 1.5-inch pipe: about 3.5 feet
- 2-inch pipe: about 5 feet
Always confirm with the local code.
Wet Venting vs. Individual Venting:
Wet venting uses one pipe for both drainage and venting. It saves space but must follow strict code rules.
Individual venting gives each fixture its own vent. It is more reliable and easier to troubleshoot, but uses more materials.
Both methods work if installed correctly and approved by code.
4. Fixtures and Traps
Fixtures are the visible plumbing endpoints.
- Toilet
- Sink
- Shower or bathtub
Each fixture connects to both supply and drainage systems. Beneath most fixtures, you’ll find a P-trap. This curved pipe holds water and blocks sewer gases from entering the bathroom. Every fixture must be correctly aligned with both the drain and the vent systems.
Step-by-Step Plumbing Guide for Rough-In
It is the most critical phase of the entire installation process. Follow each step carefully to avoid costly errors and ensure your bathroom functions properly from the start.
Tools and Materials You’ll Need
- PEX, copper, or PVC pipes
- Pipe fittings and connectors
- Shutoff valves
- Pipe clamps and hangers
- Teflon tape
- Pipe sealant
- Drain assemblies
- P-traps
- Vent pipes
- Measuring tape
- Pipe cutter
- Wrench set
- Level
Step 1: Layout and Standard Measurements
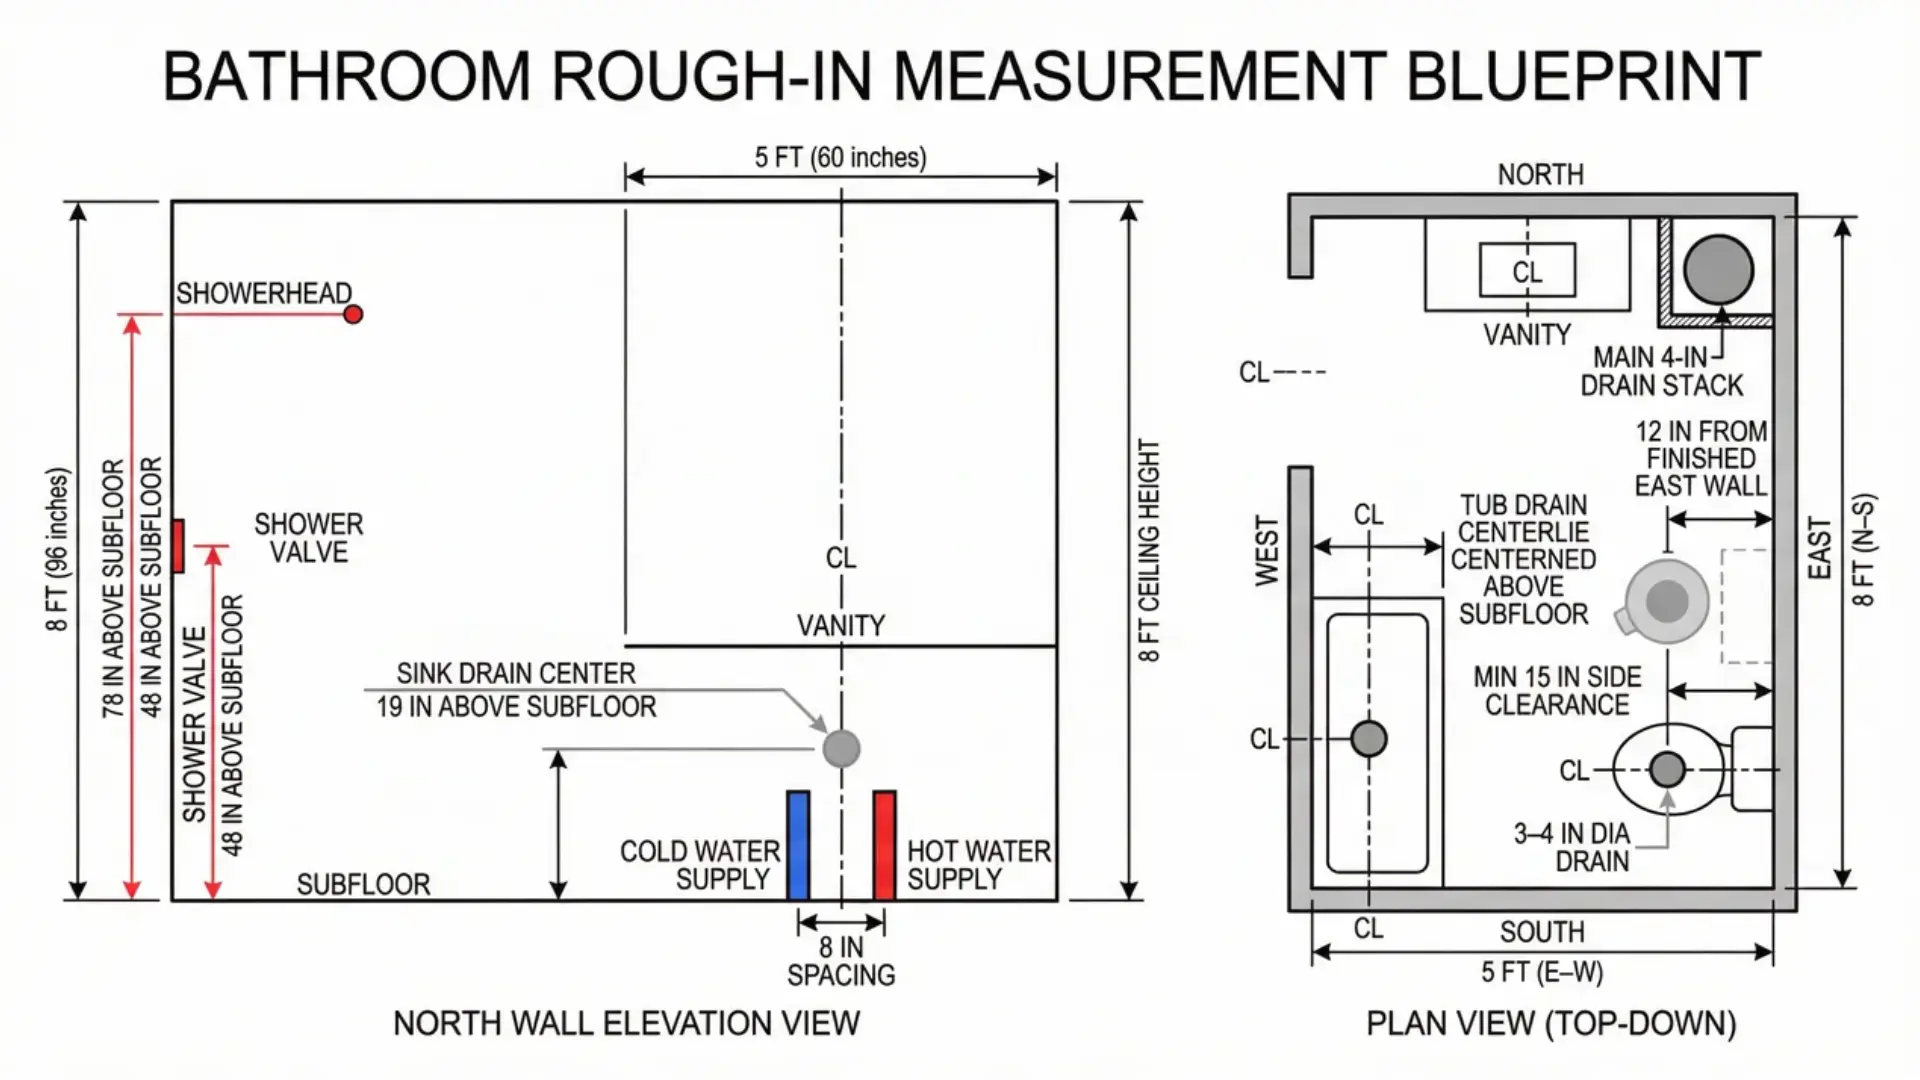
This is the foundation of your entire bathroom plumbing project. If the layout is wrong, everything else becomes harder to fix later. Take your time here. Measure carefully. Mark clearly. Double-check before cutting or drilling.
Start by marking the location of each fixture on the floor and wall. This includes the toilet, sink, and shower. Use a measuring tape and a pencil to mark the exact center points for drains and supply lines.
Always follow local building codes, but here are common U.S. standards to guide you.
Toilet Placement
- Standard rough-in: 12 inches from the finished wall to the center of the drain
- Minimum side clearance: 15 inches from the center to the side wall or cabinet
- Recommended front clearance: 21–30 inches
- Drain pipe size: 3–4 inches
Pro Tip: Measure from the finished wall, not the framing studs. This prevents misalignment after drywall and tile are installed.
Sink (Vanity) Placement
- Standard sink height: 30 to 34 inches from the floor
- Drain height: about 18–20 inches from the floor
- Hot and cold water lines: typically 8 inches apart
Pro Tip: Make sure there is enough room underneath for the P-trap and pipe fittings. Also check cabinet dimensions before finalizing drain placement.
Shower Placement
- Shower drain sits at floor level
- Drain pipe size: typically 2 inches
- Shower valve height: around 48 inches from the floor
- Showerhead height: 72–80 inches from the floor
Pro Tip: Confirm the drain location matches the shower base design before installing.
Step 2: Running Drain and Waste Lines
Once your layout is finalized, the next step is installing the drain and waste lines. These pipes carry wastewater from the toilet, sink, and shower to the main sewer line. If this step is done incorrectly, you may face clogs, slow drainage, or leaks later.
1. Start with the Main Drain Line: Locate the main waste stack or sewer connection point. This is where all fixture drains will connect.
2. Measure and Mark Pipe Routes: Use a measuring tape to mark the path of each drain pipe from the fixture location to the main line. Keep the route as straight as possible.
3. Set the Proper Slope: For horizontal pipes, maintain a slope of ¼ inch per foot toward the main drain. Use a level to confirm the slope before securing pipes.
4. Cut and Dry-Fit the Pipes: Cut pipes to size and assemble them without glue first. Check alignment, slope, and fitting placement.
5. Connect Fixture Drains:
- Toilet: Connect to a 3–4 inch drain pipe.
- Shower: Use a 2-inch drain pipe.
- Sink: Use a 1.25–1.5 inch drain pipe.
6. Install Cleanouts: Place cleanouts where required by code. These allow future access if a clog occurs.
7. Glue and Secure the Joints: Once everything aligns correctly,
- Apply primer (if required)
- Apply solvent cement evenly
- Join pipes firmly with a slight twist
Hold for a few seconds to secure the bond.
8. Support the Pipes: Use pipe hangers or straps to prevent sagging. Unsupported pipes can lose slope over time.
Take your time during this step. Good drainage is the backbone of bathroom plumbing.
Step 3: Running Water Supply Lines
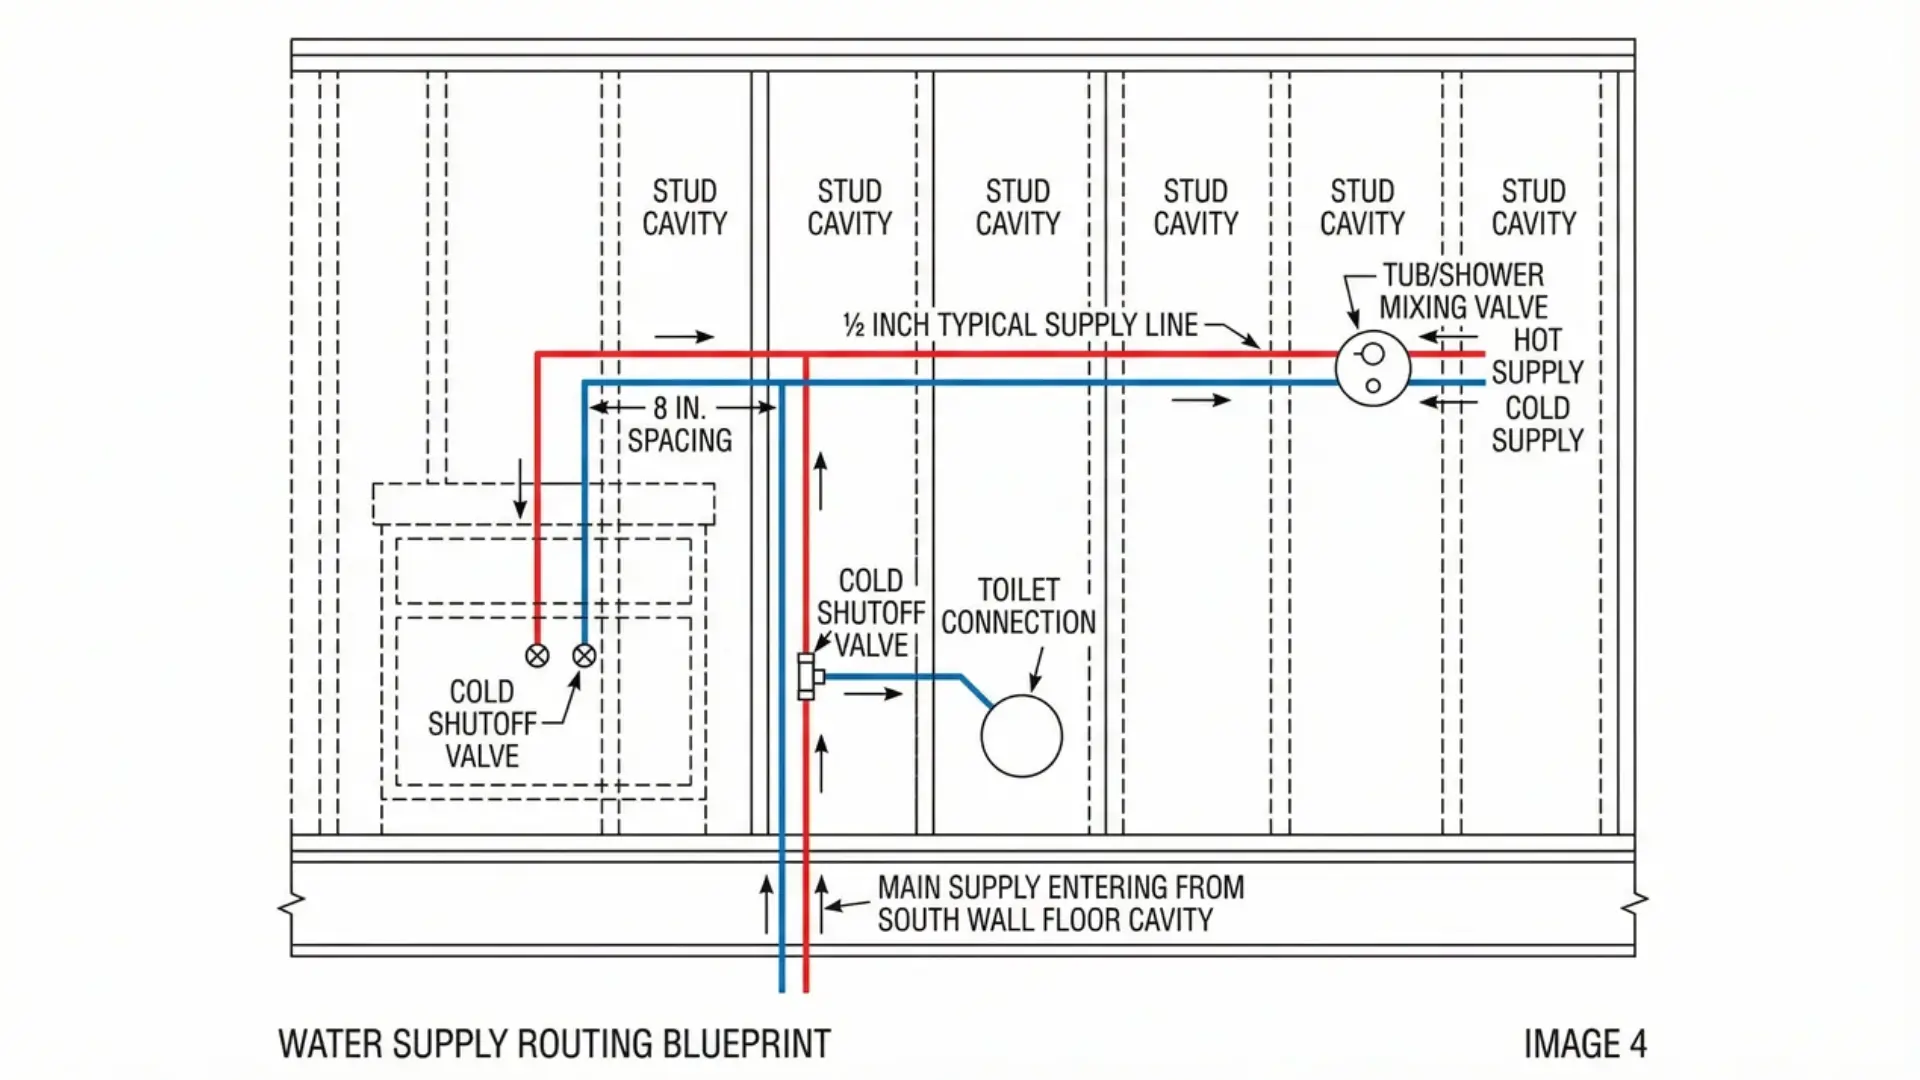
With the drain lines in place, the next step is installing the water supply lines. These pipes bring clean hot and cold water to your toilet, sink, and shower. Accuracy matters here because pressure leaks can cause serious damage inside walls.
1. Identify the Main Water Source: Locate where the bathroom supply lines will connect to the home’s main hot and cold water lines.
2. Choose Approved Pipe Material: Use code-approved materials such as
- PEX (flexible and easy to install)
- Copper (durable and long-lasting)
- CPVC (budget-friendly option)
3. Plan Separate Hot and Cold Routes: Run separate lines to each fixture. Keep hot and cold lines spaced about 8 inches apart at the fixture wall.
- Toilet: Cold water only
- Sink: Hot and cold
- Shower: Hot and cold
4. Measure and Cut Pipes: Measure carefully before cutting. Dry-fit connections first to ensure proper alignment.
5. Install Shutoff Valves: Place shutoff valves at each sink, each toilet, and accessible locations for maintenance.
6. Secure and Support the Pipes: Use pipe straps or hangers to prevent movement. Proper support reduces vibration and long-term stress on joints.
7. Connect to Fixtures: Once lines are secured,
- Connect supply lines to fixture valves
- Tighten fittings firmly, but avoid over-tightening
8. Pressure Test the System: Turn the water back on slowly. Check every joint and connection for leaks.
Take your time here. Clean, secure connections prevent future leaks and expensive repairs.
Step 4: Establishing Venting
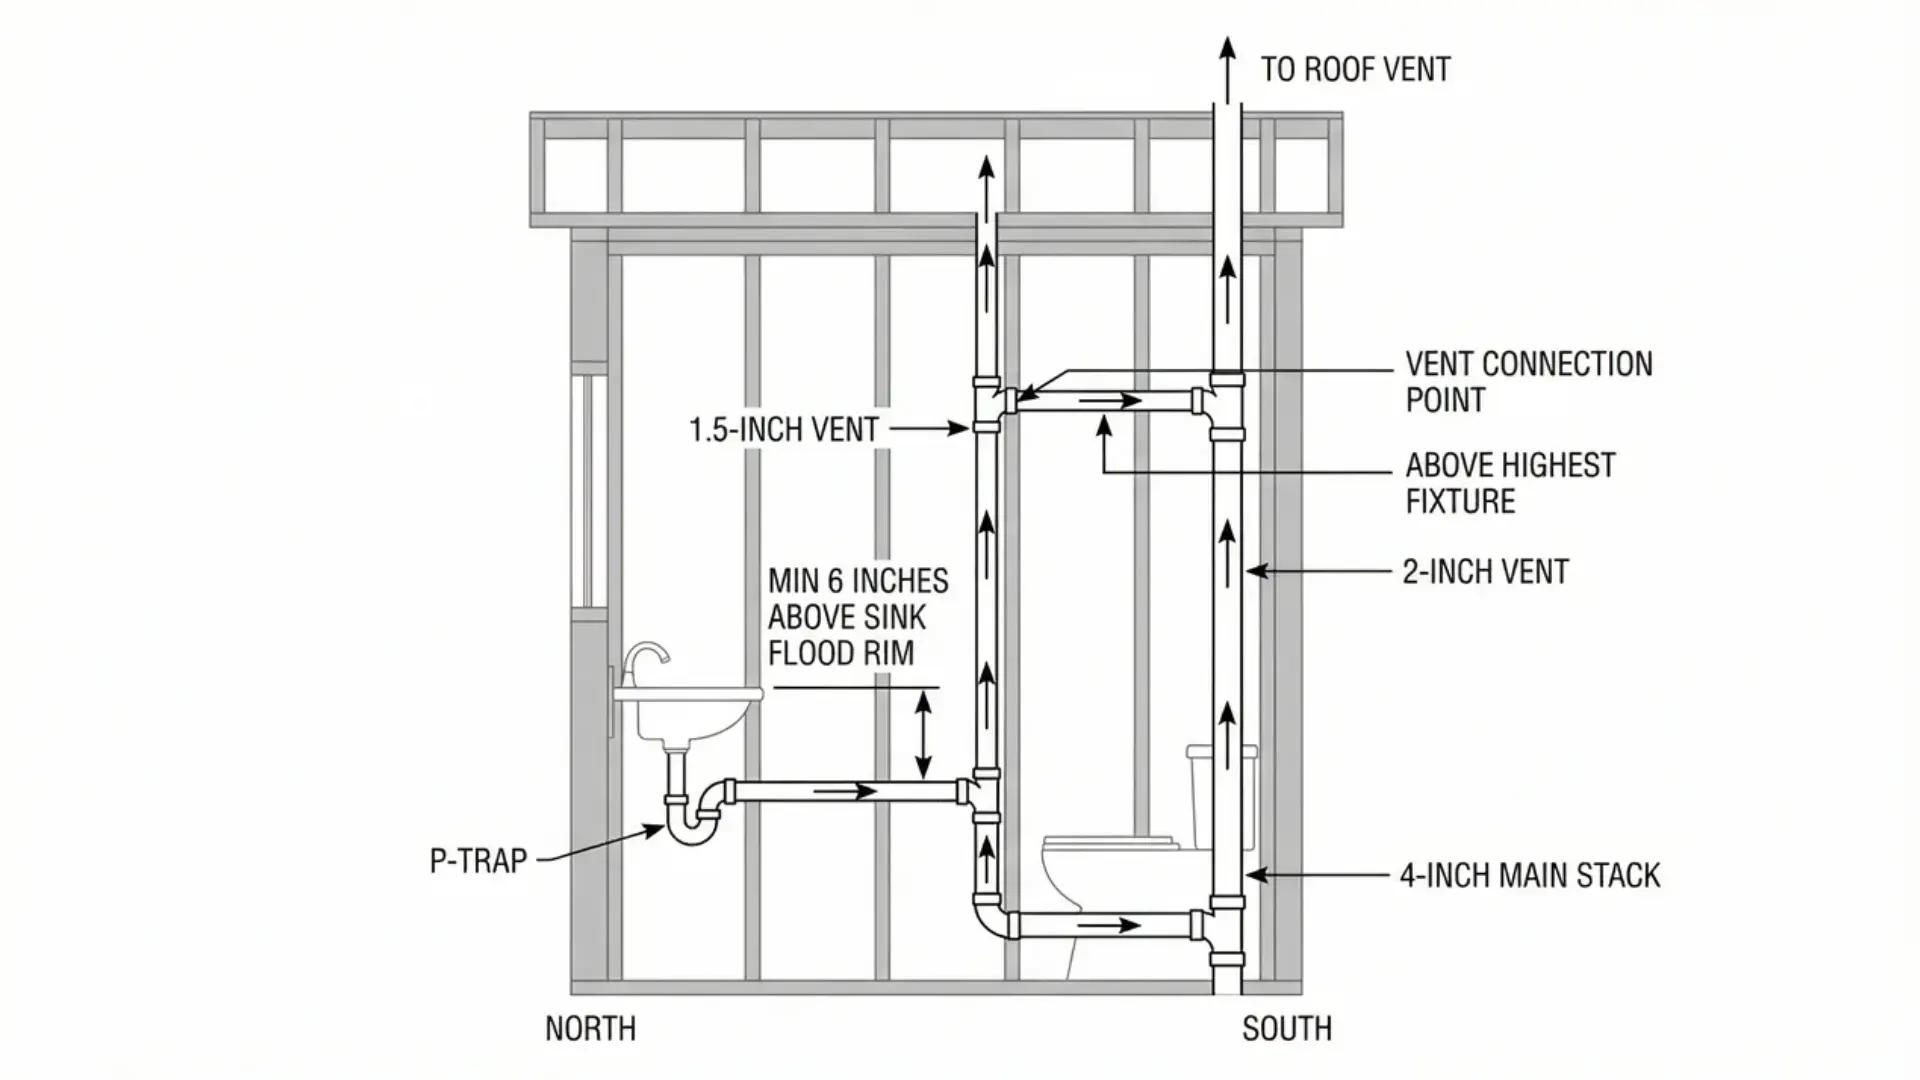
After installing the drain and supply lines, the next step is setting up the vent system. Venting may not be visible once the walls are closed, but it is critical for proper drainage and safety. Vents allow air to enter the plumbing system. This balances pressure and prevents water from being pulled out of P-traps.
1. Locate the Main Vent Stack: Your new bathroom vent lines must connect to this stack or run independently through the roof, depending on layout and code.
2. Connect Each Fixture to a Vent: Every plumbing fixture must be vented. This is usually done by running a vertical vent pipe from the drain line and connecting it to the main vent stack above the flood level of the fixture.
3. Follow Proper Vent Sizing: Vent pipes are typically 1.5 to 2 inches in diameter, depending on the number of fixtures they serve. Always confirm sizing based on local code.
4. Maintain Correct Vent Angles: Vent pipes should rise vertically whenever possible. Horizontal vent runs must stay above the drain’s flood level rim to prevent blockage.
5. Secure and Support Vent Pipes: Use pipe straps to keep vent pipes stable inside walls.
To prevent the unpleasant odors, perform this task carefully.
Step 5: Finishing and Sealing
With drain lines, supply lines, and vents in place, it’s time to secure everything and prepare the system for testing. This step ensures your bathroom plumbing is watertight, stable, and ready for long-term use.
1. Secure All Fixtures: Install and anchor the toilet, sink, and shower base according to manufacturer instructions. Make sure each fixture sits level and stable.
2. Seal the Toilet Properly: Place a wax ring on the toilet flange and press the toilet firmly into position. Tighten bolts evenly to avoid cracking the base.
3. Tighten All Supply Connections: Connect flexible supply lines to shutoff valves and fixture inlets. Tighten securely, but do not over-tighten.
4. Seal Around Fixtures: Apply silicone sealant around the toilet base (if required by code), sink edges, and shower edges. This prevents water from seeping under fixtures.
Check glued drain joints and threaded connections one more time before testing. Make sure everything is properly aligned and supported.
Plumbing Steps for Other Common Purposes
Rough-in plumbing is the most complex stage. Other types of bathroom plumbing work follow different steps and are usually quicker.
Repair Plumbing
Repairs deal with fixing existing issues. The goal is to restore normal function without changing the full system.
- Identify the problem (leak, clog, low pressure)
- Shut off the water supply
- Remove damaged parts
- Replace or fix the component
- Test for leaks and proper flow
Repairs are usually small in scope but need quick action to prevent damage.
Upgrading Plumbing
Upgrading improves performance or replaces old systems. It often overlaps with repair work.
- Inspect current pipes and fixtures
- Choose new materials or fixtures
- Remove outdated components
- Install upgraded parts
- Test system performance
This is common in older homes where pipes may be worn out.
Inspection Plumbing
Inspection focuses on checking system health and safety. It is often done before buying a home or after installation.
How Inspection is Done and What to Look For
Inspection follows a clear process to confirm the system works properly and meets code.
| Check Type | How It’s Done | Pass Indicator | Fail Indicator |
|---|---|---|---|
| Visual Leak Check | Turn the water on and inspect all joints and connections | No moisture or dripping | Visible leaks, damp fittings, or water stains |
| Water Pressure Test | Open multiple fixtures at once | Steady and consistent flow | Weak flow or sudden pressure drops |
| Drain Flow Test | Run water and flush fixtures | Fast, smooth drainage | Slow draining, pooling water, or gurgling |
| Trap Seal Check | Inspect P-traps under fixtures | Water present, no odor | Dry trap or sewer smell |
| Venting Performance | Observe and listen during drainage | Quiet and smooth flow | Gurgling sounds or suction issues |
| Code Compliance Review | Compare the setup with the local plumbing code | Correct pipe size, slope, and layout | Wrong sizing, poor slope, or missing vents |
A proper inspection ensures the system works now and prevents hidden issues later.
When to Call a Professional
Some plumbing tasks are best handled by experts to prevent costly damage and safety risks.
- Major pipe replacements require specialized tools and precise installation to maintain proper pressure and durability.
- Sewer line problems, including blockages or backups, often need advanced equipment for safe repair.
- Complex venting systems must be installed correctly to avoid sewer gas leaks and ensure code compliance.
- Issues related to plumbing codes are also best managed by licensed plumbers who understand IPC or UPC regulations and inspection requirements.
- Persistent leaks may signal deeper structural or system problems that require professional diagnosis.
If you feel unsure at any stage, contacting a licensed plumber is the safest decision.
Cost to Plumb a Bathroom in the U.S.: DIY vs. Professional
On average, plumbing a new bathroom in the U.S. costs between $3,000 and $10,000. Larger or more complex projects can exceed that range.
| Purpose / Task | DIY Cost Estimate | Professional Cost Estimate | What To Consider |
|---|---|---|---|
| Rough-In Plumbing | $1,000–$3,000 (materials only) | $1,500–$4,000 | DIY requires strong plumbing knowledge and permits. Mistakes can be costly. |
| Fixture Installation | $300–$1,500 (materials + basic tools) | $500–$2,500 | DIY works for simple replacements. Complex setups are better handled by pros. |
| New Pipe Installation | $1,000–$3,500 | $1,000–$5,000 | Access difficulty and pipe material affect cost. Professionals ensure pressure balance and durability. |
| Permit & Inspection Fees | $100–$500 | Usually included or managed by a plumber ($100–$500) | DIY requires you to handle approvals yourself. |
| Hourly Labor | No labor cost (your time) | $45–$200 per hour | Professionals charge based on location and experience. |
| Total Estimated Cost (Full Bathroom) | $1,500–$5,000 | $3,000–$10,000+ | Larger or more complex projects increase the cost significantly. |
Plumbing costs can vary a lot depending on the size of the bathroom, your location, and whether you’re starting from scratch or replacing old pipes.
I’ve seen homeowners underestimate this part of the project, and that’s where surprises happen. Understanding the typical price range helps you plan your budget realistically.
Modern Plumbing Upgrades You Can Consider
Upgrading your bathroom plumbing isn’t just about aesthetics. Modern plumbing innovations improve efficiency, reduce water waste, and enhance convenience.
- Tankless Water Heaters: Provide hot water on demand without a storage tank. Energy-efficient, space-saving, and ideal for continuous supply.
- Smart Leak Detection Systems: Monitor plumbing in real time and send alerts for leaks. Some models automatically shut off water to prevent damage.
- Touchless Faucets: Use motion sensors to control water flow. Improve hygiene and reduce water waste.
- PEX Manifold Systems: Distribute water from a central panel with individual shutoffs for each fixture. Simplifies maintenance and improves pressure control.
- Greywater Recycling Solutions: Reuse lightly used water for irrigation or toilet flushing. Help reduce water waste and lower utility costs.
These upgrades can save water and improve comfort. Some also reduce long-term costs.
Conclusion
Plumbing a bathroom is not just about connecting pipes; it’s about building a system that works reliably every day without problems.
When you understand how water supply, drainage, and venting work together, it becomes easier to plan and avoid costly mistakes.
Learning how to plumb a bathroom gives you the confidence to handle simple tasks and recognize when expert help is needed. Careful planning, accurate measurements, and proper installation all play a key role in long-term performance.
Take what you’ve learned here and start planning your bathroom plumbing project with confidence today.
Frequently Asked Questions
When to Use PEX, Copper, and PVC?
PEX is flexible and easy to install. Copper is strong and long-lasting. PVC is low-cost and best for drains, not for a hot water supply.
How Long Does Rough-In Plumbing Take?
Rough-in plumbing usually takes 2 to 5 days. The timeline depends on bathroom size, layout complexity, and the experience level of the installer.
What are the US Plumbing Regulations and Codes?
U.S. plumbing rules follow the IPC or UPC, adopted by states with local amendments. They regulate pipe sizing, drainage, materials, permits, and inspections for safety.