How to Decorate a Christmas Tree in Easy Steps
Most Christmas trees look fine. But professionally decorated trees stand out instantly.
The difference isn’t cost; it’s technique. Pros layer lights at specific depths, follow color ratios, and place ornaments strategically.
This blog shows you the exact process. You’ll learn the measurements and placement strategies that make trees look balanced and polished from every angle.
No guesswork. Just proven methods for professional results.
Choose Your Style Before You Start
Pull out your most-worn pieces. What do they share? Similar colors, cuts, or fabrics show your natural style.
Quick discovery tips:
- Save 20+ outfit images you love
- Spot the patterns: minimalist, casual, or classic?
- Pick three style words like “comfortable,” “polished,” and “edgy.”
- Use these as your shopping filter
Match clothes to your actual life. Office jobs need different pieces than remote work. Parents need washable, flexible options.
Test styles before buying. Borrow from friends or hit thrift stores first.
Review your closet twice yearly. Donate what doesn’t fit your current lifestyle.
Gather Your Materials
| Item | Quantity/Details |
|---|---|
| Tree lights | 100 bulbs per foot of tree height |
| Ribbon or garland | 3-4 strands for a 6-foot tree |
| Large ornaments | 10-15 pieces |
| Medium ornaments | 20-30 pieces |
| Small ornaments | 30-40 pieces |
| Tree topper | 1 |
| Extension cords | 2-3 |
| Outlet timer | 1 (optional) |
| Step stool | 1 |
Sort ornaments by size before starting. This makes decorating faster and spacing easier.
Test your lights first. Dead bulbs are easier to fix before they’re on the tree. Set up near an outlet to avoid stretching cords across the room.
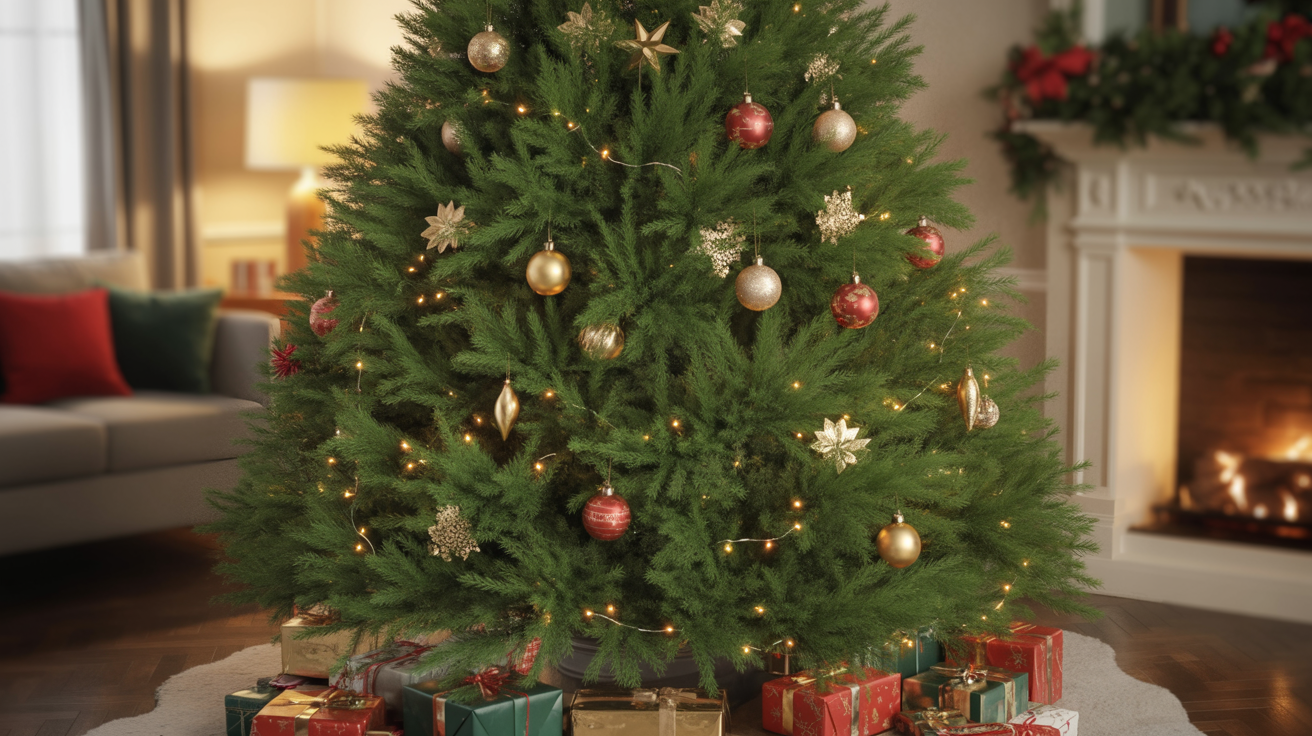
How to Decorate a Christmas Tree Like a Pro (Step-by-Step)
Learn the exact step-by-step process professional decorators use to create a balanced, magazine-worthy Christmas tree.
With proper light layering, strategic ornament placement, and finishing techniques.
Step 1: Fluff the branches

Spend 10-15 minutes shaping branches before decorating. Start at the bottom and pull each branch outward and upward.
Separate individual tips and spread them in different directions. This creates fullness and hides gaps.
Step 2: String the lights

Use 100 bulbs per foot of tree height. Start at the bottom and work up in a zigzag pattern.
Push lights 4-6 inches deep into branches for an inner glow. Wrap around the trunk occasionally. Space strands 3-4 inches apart.
Test lights as you go.
Step 3: Add ribbon or garland

Use 3-4 strands for a 6-foot tree. Start at the top and weave vertically through branches. Create loose, natural drapes; don’t pull them tight.
Tuck the ends deep inside the tree. Space evenly around all sides.
Step 4: Hang large ornaments

Use 10-15 large ornaments (3-4 inches). Place them 6-8 inches inside the tree, spaced 12-18 inches apart.
These anchor your design. Distribute colors evenly. Step back frequently to check the balance.
Step 5: Add medium ornaments

Use 20-30 medium ornaments (2-3 inches). Hang between large ornaments, slightly closer to branch tips. Vary depth for dimension.
Mix matte, shiny, and textured finishes.
Step 6: Fill with small ornaments

Use 30-40 small ornaments (1-2 inches). Fill remaining gaps and tight spaces. Place on the outer tips for detail.
These complete the layered look.
Step 7: Add the tree topper

Clear the top 6 inches. Secure the topper to the center branch. Wire heavy toppers to multiple branches. Ensure it’s straight from all angles.
Walk around and adjust crowded or bare spots. Your tree should look full and balanced from every side.
Professional-Level Christmas Tree Decorating Tips
- Layer lights at three depths: Place strands deep inside, midway, and on outer branches. This creates dimension instead of a flat look.
- Stick to three colors maximum: Use two accent colors plus one metallic. More colors look messy and uncoordinated.
- Hang ornaments in triangle patterns: Group three similar ornaments in triangles and repeat around the tree for natural visual flow.
- Add texture with fillers: Tuck pinecones, berry picks, or stems between ornaments to fill gaps without crowding.
- Hide the hooks: Turn hooks toward the trunk or use ribbon instead. Ornaments look better when the hardware doesn’t show.
- Mix 60% shiny with 40% matte: The contrast creates depth and prevents an overdone appearance.
- Put the best ornaments at eye level: Place special pieces between 4-6 feet high. Save basic fillers for the back and top.
- Wire heavy items: Use thin floral wire to secure drooping branches or large ornaments. It’s invisible but strong.
Quick Christmas Tree Decorating Methods
Fast, proven decorating techniques that create a polished Christmas tree in less time using strategic shortcuts and professional placement methods.
1. 10-Minute Method
Perfect for busy schedules when you need instant results.
Fluff only the visible front sections. Add 3-4 ribbon loops vertically. Place large ornaments first, then scatter a few medium ones. Add a simple topper.
Fast, polished, and done in minutes.
2. 3-Item Method
The simplest approach that still delivers a full, designer look.
Use only ribbon, large ornaments, and decorative stems. Weave ribbon first, place oversized ornaments evenly, then fill gaps with stems. This beginner-friendly method proves that less is more.
3. Designer Shortcut
Professional results in 15-20 minutes with smart techniques.
Quick-fluff outer edges only. Use pre-clustered ornament picks for instant fullness. Add ribbon in an S-curve pattern.
Finish with berry or pinecone picks in bare spots. Magazine-worthy in under 20 minutes.
4. Minimalist Method
Modern, clean styling that looks intentional.
Choose one color and one metallic. Use only 20-30 ornaments with plenty of spacing. Add a streamlined topper. The restrained palette creates sophistication in half the time.
5. Kid-Friendly Speed Method
Fast decorating that keeps everyone involved.
Adults place large ornaments at proper depths. Kids add the rest wherever they want. Finish together by letting the youngest place the topper.
Quick, fun, and creates lasting memories.
Common Christmas Tree Decorating Mistakes (and How to Fix Them)
1. Gaps, flat branches, uneven shape.
Fix: Spread every branch tip and angle them upward and outward for fullness.
2. The ribbon looks stiff, straight, or sits only on the surface.
Fix: Tuck the ribbon into the branches in soft curves or an S-shape for a natural flow.
3. Crowded spots, empty areas, or uneven color distribution.
Fix: Start with large ornaments, then medium, then small. Step back often to check balance.
4. The tree looks sparse or unfinished.
Fix: Add filler items like picks, florals, clusters, or textured ornaments for volume.
5. Tree looks good only from one angle.
Fix: Add ornaments around the visible sides and use inexpensive fillers for the back.
6. Tree looks chaotic or mismatched.
Fix: Stick to 1 main color, 1 supporting color, and 1 metallic accent.
7. Topper is too small or too heavy.
Fix: Choose a topper proportional to tree height and secure it with wired branches.
Conclusion
Professional tree decorating is all about technique, not budget. Layer your lights at different depths. Stick to three colors. Work from large to small with ornaments.
Follow the steps in order and check your progress from across the room. These simple methods create the polished, balanced look you see in magazines.
Pick one technique to try this year, maybe light layering or triangle ornament placement. Master it, then add more next season.
You now have the same strategies pros use. Your tree can look just as good.