DIY Shutters: Easy Steps to Upgrade Your Space
I recently tackled making my own window shutters, and I want to share everything I learned. After getting quotes for custom shutters that made my eyes water, I decided to build them myself – and you know what?
It turned out to be one of the best home projects I’ve done. Not only did I save over $2,000, but I got exactly the style and fit I wanted for my 1940s home.
In this guide, I’ll walk you through the entire process of making your own shutters, from picking the right materials to the final installation.
I’ll share all the tips I wish I’d known before starting, including how to measure correctly (yes, there’s a trick to it!), which tools actually matter, and how to avoid the mistakes I made on my first try.
Whether you’re looking to make simple panel shutters or something more detailed, I’ve got you covered with step-by-step instructions that worked for me.
Materials and Tools You’ll Need for DIY Shutters
Choosing the Right Wood for Your Shutters
When I made my shutters last month, I experimented with different woods before finding the perfect match. I started with pine because it was cheap, but it didn’t hold up well in my humid climate.
I switched to cedar, and it was worth every extra dollar. Cedar naturally fights off rot and insects, plus it takes paint beautifully.
For my six windows, I used 1×4 boards for the frames and 1×6 boards for the panels. Just make sure the wood is kiln-dried with a moisture content below 12% – I learned this the hard way when my first set warped.
Essential Tools for Cutting, Assembling, and Finishing
My most-used tools for this project were pretty basic. I got great results with my circular saw, though a table saw would have made things easier.
You’ll need a drill – I used my trusty 18V cordless with a set of brad-point bits for clean holes. A speed square became my best friend for marking perfect 90-degree cuts.
For assembly, my electric screwdriver and wood glue were essential. Don’t skip the orbital sander – I tried hand-sounding one shutter and quickly changed my mind.
Additional Supplies
Beyond the basics, here’s what actually worked for me:
- Exterior wood glue: I tried two brands and found Titebond III worked best
- 3-inch exterior screws: I used about 24 per shutter
- Exterior caulk: Clear works great for filling small gaps
- Paint primer: Oil-based gave me the best results
- Exterior paint: I went through 2 quarts for 6 shutters
- Door hinges: Get stainless steel – they cost more but won’t rust
- Shutter dogs: These hold the shutters open (I found vintage ones online!)
I also recommend picking up some spare wood for practice cuts.
I messed up a few times learning to make the angled cuts for my panels, and having extra material saved me some stress.
Step-by-Step Guide to Building Your Own Shutters
Step 1: Measure and Plan the Size of Your Shutters
I spent extra time on measurements, and it really paid off. First, I measured each window three times – top, middle, and bottom – because older homes like mine often have uneven windows.
I made my shutters about 2 inches narrower than half my window width so they’d close properly. For height, I matched my window height exactly.
Tip: draw a full-size plan on cardboard first. This helped me spot several design issues before cutting any wood.
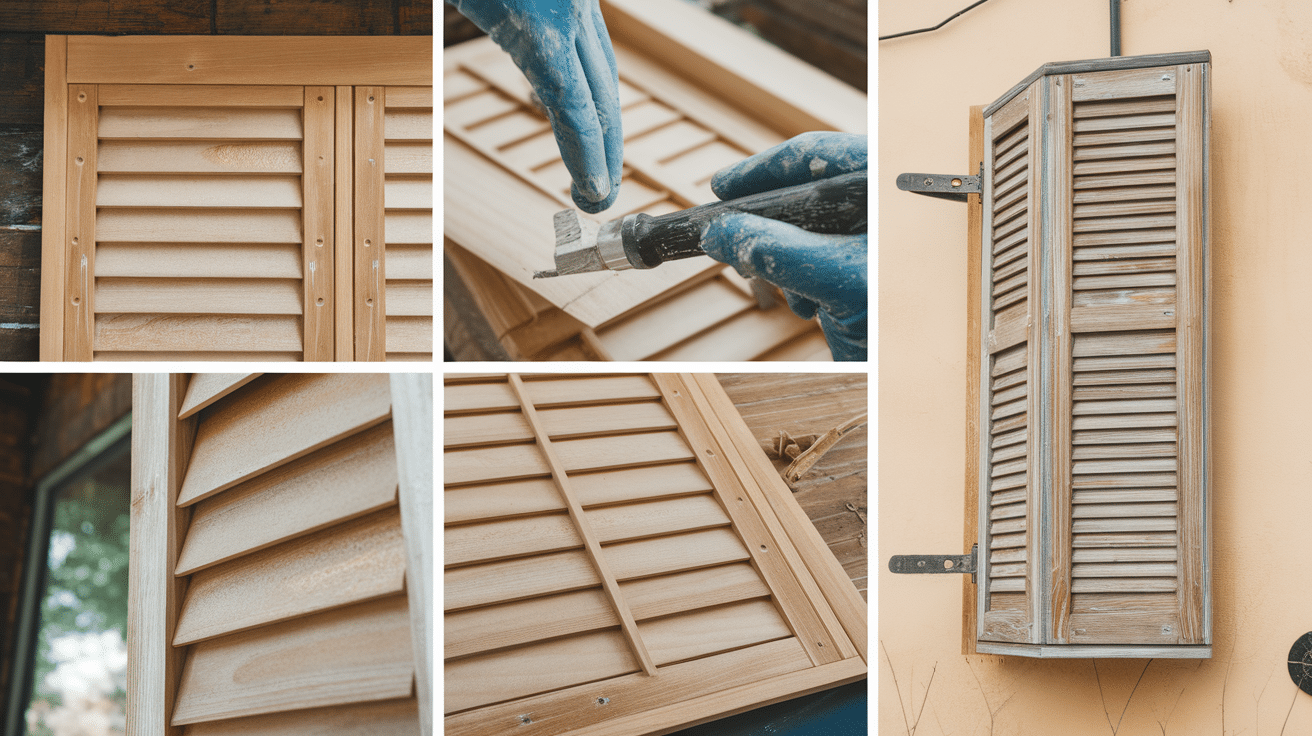
Step 2: Cut and Prepare the Wood Pieces
Starting with the frame pieces, I cut all my rails (horizontal pieces) and stiles (vertical pieces) first.
I made a simple jig for my circular saw to keep all cuts perfectly square – just a straight piece of plywood clamped to my work surface.
For the panels, I cut them slightly smaller than the frame openings to allow for wood movement. I learned to make all my cuts first, then do a test fit before any assembly. This saved me from some costly mistakes.
Step 3: Assemble the Shutter Panels
Assembly was tricky until I got a system going. I laid out all my pieces on a flat surface (my garage floor), applied wood glue to all joints, and used corner clamps to keep everything square.
I pre-drilled holes for screws to prevent splitting – my first shutter cracked because I skipped this step. I put the frame together first, then slid in the panels.
Tip: use pencil marks to keep track of which pieces go where.
Step 4: Sand, Prime, and Paint Your Shutters
This step took longer than I expected but made a huge difference. I started with 80-grit sandpaper for rough spots, then moved to 120-grit for smoothing.
After cleaning off all dust, I applied oil-based primer – two thin coats worked better than one thick coat. For paint, I used exterior-grade latex in semi-gloss, applying three light coats.
Between coats, I lightly sanded with 220-grit. I let each coat dry completely in my garage, away from dust and debris.
Step 5: Attach Hinges and Install Your Shutters
Installation day was exciting but required patience. I marked my hinge locations on both the shutters and window frames, then pre-drilled all holes.
I used a level and shims to get perfect alignment – even a small error here makes the shutters look off.
For each shutter, I installed the top hinge first, then used it to hold the shutter while fitting the bottom hinge.
Finally, I added shutter dogs (those cute little holders that keep shutters open) about two-thirds of the way down the shutters.
Cheap DIY Wood Shutters That Look Expensive
Choosing Affordable Wood Options Without Sacrificing Style
After spending way too much on my first set of shutters, I got smart about materials.
I found that 2-grade cedar works just as well as the premium stuff – once painted, you can’t tell the difference.
I saved about $200 on wood for my whole house. The key was picking through the lumber pile for straight boards with tight grain patterns.
For my kitchen shutters, I tried something different.
I used regular pine boards but added wood conditioner before priming – this prevented the blotchy look that made my first pine shutters look cheap.
I also found that some home improvement stores will cut wood for free.
By having them make the big cuts, I only needed basic tools at home, saving me from buying a table saw.
Simple Design Tips to Make Shutters Look High-End
My best learning was that simple designs often look more expensive than fancy ones.
For my living room, I made basic panel shutters but added a small decorative trim piece at the top – it costs $5 per shutter but makes them look custom-made.
I positioned my cross rails (the horizontal pieces) at the same height as my window muntins, which created a high-end, coordinated look.
The spacing made a huge difference, too. I kept a consistent 1/8-inch gap between all panels – anything wider looked sloppy.
For the board and batten style on my office windows, I used an odd number of boards (three instead of four).
This small detail made them look much more balanced and professional than my first even-numbered attempt.
How to Finish Your Shutters for an Expensive Look?
The finished work is where I really fooled everyone about the cost. First, I filled every tiny nail hole and seam with wood putty, sanding between coats.
After messing up my first pair, I learned to thin my primer slightly – it self-leveled better and didn’t show brush marks.
For paint, I switched to a paint sprayer borrowed from my neighbor. The smooth finish looks factory-made compared to my first brush-painted set.
I also added some low-cost upgrades that made a big impact. Metal corners (about $2 each) not only reinforced the joints but added a custom look.
For my bathroom shutters, I used magnetic catches instead of basic latches – they’re hidden but feel solid and expensive when closing. The final touch was adding period-appropriate hardware.
I found reproduction shutter dogs at a flea market for a fraction of the new price, and they transformed the whole look from DIY to high-end custom.
Different Styles of DIY Shutters You Can Create
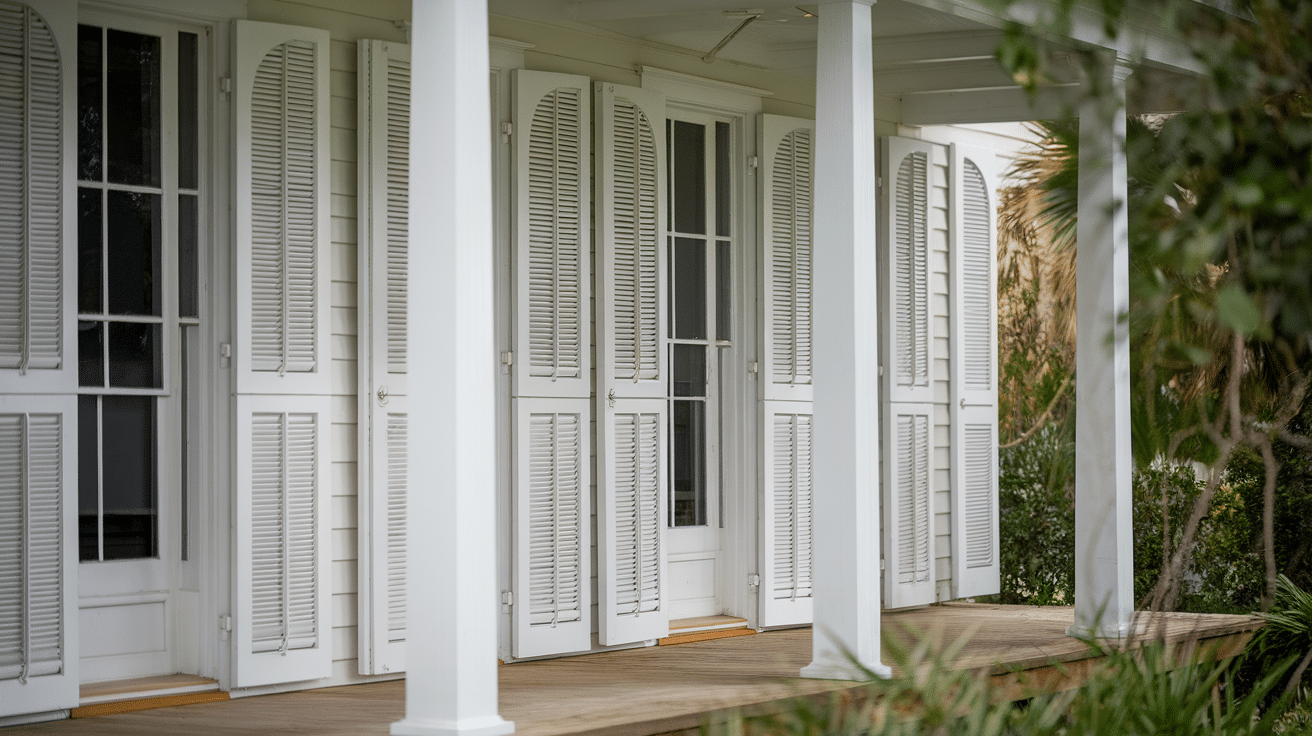
Traditional Louvered Shutters
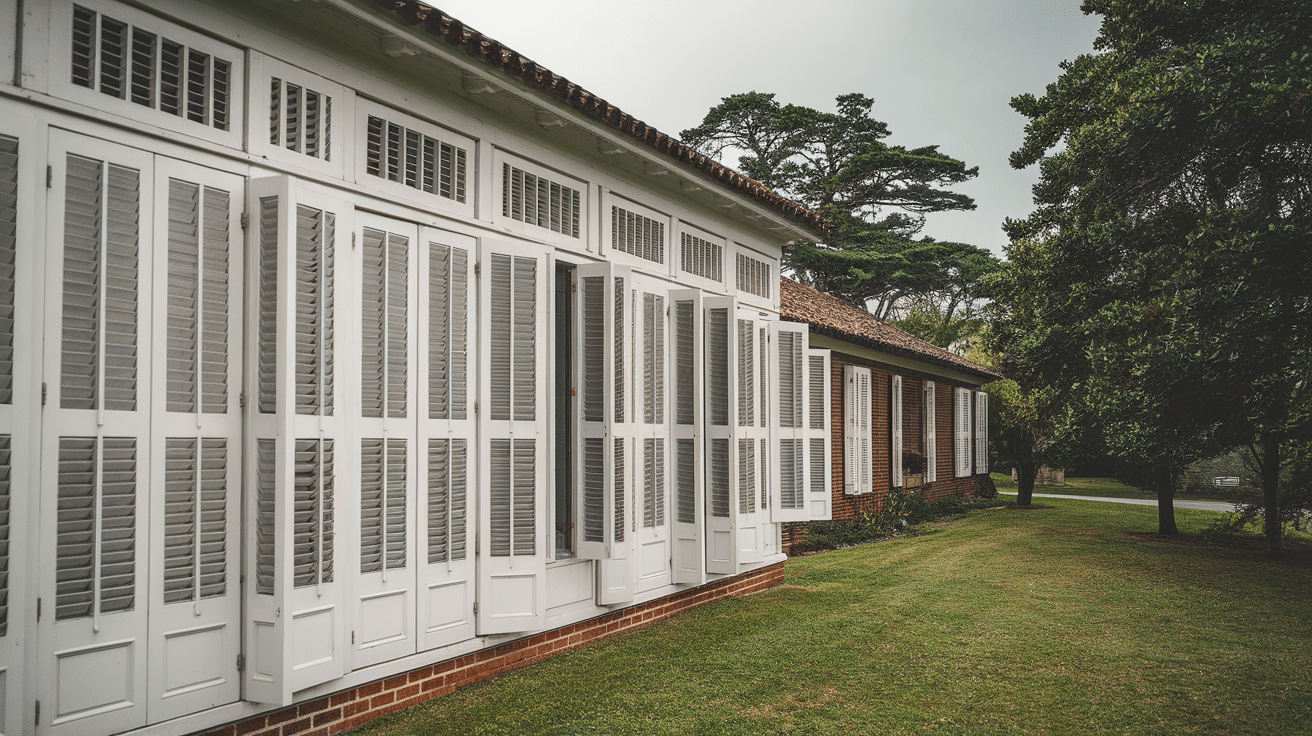
After trying louvered shutters in my living room, I can honestly say they’re more complex than they look but totally doable. I started with pine 1x4s for the frame and 1×2 angled slats for the louvers.
The trickiest part was getting the right angle for the slats – I settled on a 25-degree angle after some trial and error.
I spaced my louvers 1.5 inches apart, using a scrap piece of wood as a spacer.
My biggest lesson? Make a small test section first to practice cutting and placing the louvers.
It took me three tries to get it right, but now they look fantastic and let in just the right amount of light.
Board and Batten Shutters
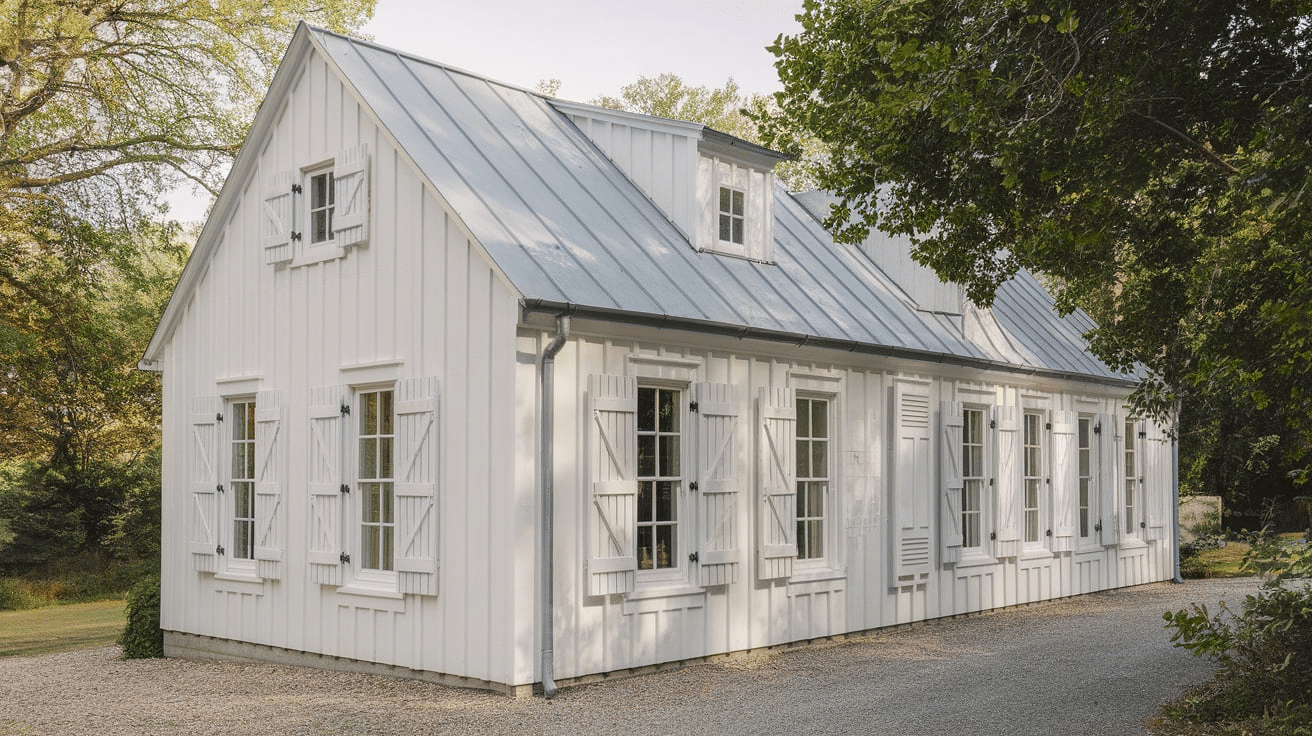
These were the first styles I made for my home office, and they’re perfect for beginners.
I used three 1×6 cedar boards placed side by side for the main panel, then added two horizontal 1×4 battens and one diagonal brace.
The diagonal brace was key – without it, my first attempt started to sag after a few weeks.
I placed the battens about 8 inches from the top and bottom and angled the brace at 45 degrees.
These shutters are strong and simple, and they’ve held up beautifully through two seasons of weather.
Plantation-Style Shutters
For my master bedroom, I chose plantation-style shutters because I wanted more light control. These have wider louvers than traditional shutters – I used 3.5-inch wide slats.
The frame needed to be sturdier to support the weight, so I went with 1×6 cedar for both the frame and the central vertical support.
I added a tilt rod down the center to control all the louvers at once.
This was my most challenging project but also the most rewarding. They took twice as long to make as the other styles, but the result is stunning and works smoothly.
Tip: I used ball bearings in the louver pins to make them turn more easily.
I also installed magnetic catches to hold these in place when closed, something I didn’t need with the other styles.
The extra effort was worth it – these shutters gave my bedroom a high-end look that matched perfectly with my older home’s character.
Tips and Tricks for a Professional Finish
How to Achieve Smooth, Even Paint Coverage?
After painting six pairs of shutters for my house, I’ve figured out what really works. I learned that prep is everything.
First, I used a tack cloth between sandings – it gets dust regular clothes miss. For my first pair, I rushed into painting and ended up with bumps that bothered me every time I looked at them.
My painting setup made a big difference, too. I built simple stands from 2x4s and dowels that let me paint all sides at once. For the smoothest finish, I used a mini foam roller and a high-quality brush for the edges.
My best tip? I thinned the paint slightly (about 10% with water) and applied three thin coats instead of two thick ones.
Also, I painted in my garage with a fan – it kept bugs from sticking to the wet paint, which happened to my first attempt outside.
Choosing the Best Finish for Long-Lasting Durability
Through trial and error with different finishes on my shutters, I found what holds up best.
I started with oil-based primer – it took longer to dry, but I sealed the wood completely.
For the top coat, I tried both satin and semi-gloss exterior paints. The semi-gloss won out – it sheds water better and doesn’t collect as much dirt.
I also tested different brands and found that spending more on paint saved me time with fewer coats needed.
For extra protection, I added a clear UV-resistant top coat to my south-facing shutters.
After six months, I can see the difference – they still look fresh, while my untreated east-facing shutters have started to fade slightly.
One surprise learning was that painting the edges and backs of the shutters was just as important as the front. Water can creep in anywhere.
Making Adjustments for Different Window Sizes and Shapes
My 1940s house came with all sorts of window challenges. My front windows weren’t exactly the same size, even though they looked it.
I learned to make a cardboard template for each window instead of assuming they were identical. For my arched kitchen window, I made a template using a large piece of paper and traced the curve carefully.
For wider windows, I had to add extra support to prevent sagging. I installed a small, hidden bracket in the middle of each shutter.
For my narrow bathroom window, I adjusted the panel design to keep everything in proportion. Instead of three panels, I used two, and it looks much better.
The most valuable lesson? I always made my shutters slightly smaller than the window opening, with about a 1/4-inch gap all around.
This gives them room to expand in humid weather and makes them much easier to open and close.
Common Mistakes to Avoid When Making DIY Shutters
Incorrect Measurements and Alignment
When I first started my shutter project, I made some big measurement mistakes that cost me time and money.
My first pair didn’t fit because I measured the window opening just once at the top. Big mistake. My 80-year-old house had settled, making the bottom opening different.
Now, I measure each window in at least three places – top, middle, and bottom.
I also messed up by not checking if my windows were level. I assumed they were and mounted my first shutters perfectly straight – which made them look crooked against the slightly tilted window.
Now, I always use a level to check both the window frame and the actual window opening.
For mounting, I made a simple template from scrap wood that helped me mark consistent hinge positions across all my windows.
This saved my second batch of shutters from looking uneven like my first try.
Overlooking Proper Ventilation and Light Flow
My first set of shutters looked great but had a major flaw – they trapped moisture behind them. I didn’t think about leaving space for airflow, and after three months, I noticed some discoloration on my siding.
For my next sets, I added small spacers (about 1/4 inch) between the shutters and the house. This tiny gap made a huge difference.
I also learned about light control the hard way. My first louvered shutters had slats that were too close together, making the room too dark when closed.
After adjusting the spacing on later sets, I got much better light control. For my bedroom shutters, I tested different slat angles by making a small mock-up first – this helped me find the perfect balance between privacy and natural light.
Choosing the Wrong Materials for the Climate
Living in a humid climate, I quickly learned that not all woods are equal. My first pair of shutters, made from pine, started warping after just one rainy season.
I had to replace them completely! For my next attempt, I chose cedar, which cost more but has lasted beautifully through all kinds of weather.
The hardware choices matter too. I initially used regular steel hinges because they were cheaper, a big mistake. They rusted within months.
I switched to stainless steel for all my hardware, and despite the higher upfront cost, they’ve stayed perfect. I also learned to seal all cut ends of the wood, even hidden ones, with primer.
Any exposed wood can soak up moisture and cause problems later. The paint type matters too – I tried to save money on my first batch with basic exterior paint, but it started peeling after six months.
The premium paint I used on later shutters still looks fresh after a year.
Maintenance Tips for DIY Shutters
Cleaning and Caring for Wooden Shutters
After having my shutters up for over a year now, I’ve developed a simple maintenance routine that works great.
Every three months, I wipe them down with a damp microfiber cloth to remove dust and pollen.
For stubborn dirt, I mix a little mild dish soap with water – anything stronger can damage the finish, which I learned after using a harsh cleaner that dulled my first pair.
During my spring cleaning, I found some mildew starting to grow on my north-facing shutters where they get less sun.
I now use a soft brush with a mix of water and white vinegar (3:1 ratio) to clean them, followed by thorough drying with an old towel.
This natural solution works better than the commercial cleaner I tried first, which left a residue that attracted more dirt.
How to Touch Up Paint and Repair Damages?
Last winter, a falling branch scratched one of my shutters. I’ve found that keeping some leftover paint stored in a small jar makes touch-ups much easier.
Before painting, I lightly sand the damaged area and clean it thoroughly. For deep scratches, I use wood filler first but I learned to test the color after it dries because it sometimes dries darker than the wood.
The most common damage I deal with is small cracks near the hinges. I fix these by cleaning out the crack, filling it with exterior wood glue, and clamping it overnight.
For larger splits, I reinforced them with small dowels after gluing. This method has held up much better than my first attempt at just filling them with caulk.
Preventing Wear and Tear on Hinges and Hardware
The biggest lesson I learned about hardware maintenance came after my first winter when my hinges started squeaking.
Now, every fall, I spray the hinges with dry lubricant – regular oil attracted too much dust and made things worse.
I also check and tighten all screws twice a year because I noticed they tend to loosen with temperature changes.
One smart move was adding small rubber bumpers where the shutters meet the house. This prevented the paint wear I noticed on my first pair.
For the shutter dogs (those little holders that keep the shutters open), I found that coating them with clear exterior polyurethane prevents rust and keeps them moving smoothly.
When one of my original shutter dogs started to stick, I took it off, cleaned it thoroughly with steel wool, and applied this coating – it’s worked perfectly since then.
Conclusion
Looking back at my shutter-making journey, I can honestly say it was worth every minute. Sure, there were some bumps along the way
Like my first wobbly attempt and that time I measured wrong – but the satisfaction of seeing my handmade shutters on my house is amazing. Plus, I saved around $2,500 compared to custom-made ones.
If you’re handy with basic tools and enjoy weekend projects, making your own shutters is totally doable. The key is taking your time with measurements and prep work.
Start with one window first to test your skills. Even if that first pair isn’t perfect (mine wasn’t!), you’ll learn exactly what works for your home.
Ready to start your own shutter project? Remember, you can always come back to this guide for step-by-step help. Trust me – if I could do it, you can too!
Want more DIY home improvement tips? Sign up for my newsletter below for monthly updates and exclusive tutorials.
Frequently Asked Questions
How Long Does It Take to Make a Pair of DIY Shutters?
From my experience, making your first pair takes about a weekend – that’s 8-10 hours of actual work spread over 2-3 days to allow for drying time.
After making a few pairs, I got it down to about 6 hours per pair. Remember to add an extra day for the paint to fully dry.
What’s the Average Cost to Make Your Own Shutters?
For my standard-sized windows (24×60 inches), I spent about $75-100 per pair, including wood, hardware, and paint.
This was a huge savings compared to custom shutters that were quoted at $400-600 per pair. The biggest costs were cedar boards ($40) and quality exterior paint ($25).
Can I Make Shutters for Odd-Sized Windows?
Absolutely! I made custom shutters for my odd-sized bathroom window (22×48 inches). The beauty of DIY is that you can adjust measurements to fit any window. Just remember to make a paper template first to test the fit.
How Do You Prevent DIY Shutters from Warping?
I’ve found three key things to prevent warping: using kiln-dried wood, sealing all sides (even hidden edges) with primer, and leaving small gaps between panels for wood movement.
Also, proper installation with spacers keeps the shutters from trapping moisture against the house.
What’s the Most Common Mistake When Making Shutters?
Based on my mistakes, it’s rushing the measuring phase. Take time to measure each window in multiple places and check if it’s square.
My first pair didn’t fit right because I assumed my windows were perfect rectangles – they weren’t.