How to Create Stunning Spackle Art at Home
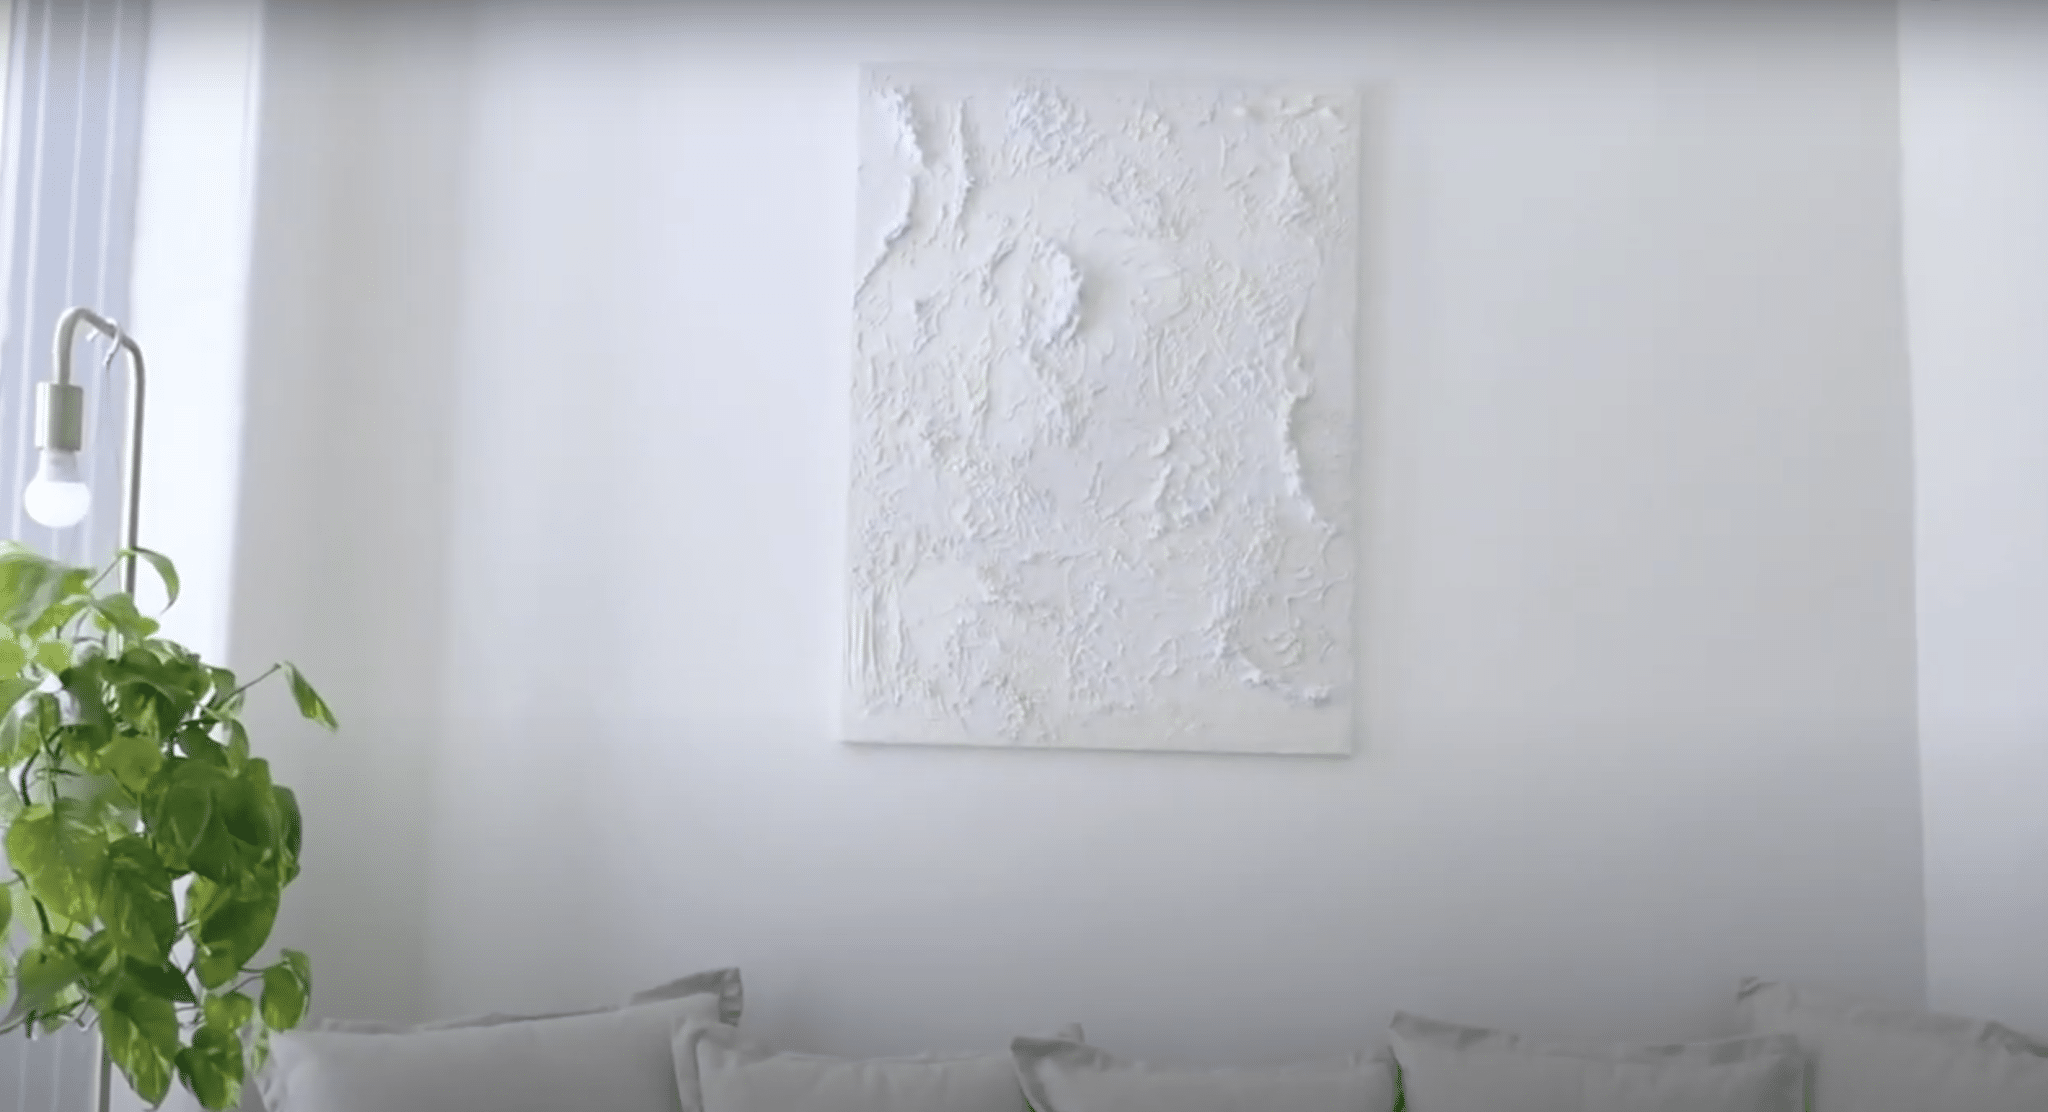
Are you looking to make beautiful art with spackle? I’ve spent years working with this simple building material, turning plain walls into eye-catching designs.
Many people think spackle is just for fixing holes, but I’m here to show you it’s so much more. Through my own practice, I’ve learned that spackle can create raised patterns, smooth finishes, and textured designs that transform any surface.
In this guide, I’ll share my tested methods for making spackle art. You’ll learn which tools work best, how to plan your design, and the steps to create long-lasting pieces.
Plus, I’ll tell you about common mistakes to avoid based on my own learning curve.
Understanding Spakle Art
I want to explain what makes spackle art special. At its heart, spackle art is about using a basic wall repair compound to make raised designs on surfaces.
I’ve found that it’s similar to working with thick paint, but it offers more depth and texture.
What makes spackle perfect for art? Let me break it down:
- It’s thick and moldable, like soft clay
- It dries hard and strong
- You can paint over it once it’s dry
- It sticks well to most surfaces
- It’s easy to shape with simple tools
In my years of making spackle art, I’ve seen people create everything from simple patterns to detailed landscapes.
The best part? You don’t need fancy art supplies. A basic container of spackle, some tools from your kitchen, and your ideas are enough to start.
Here’s what I tell my friends who want to try it: spackle art is forgiving. If you make a mistake, you can smooth it out and start over.
This makes it perfect for both new artists and skilled creators.
How to Create Spackle Art
Tools & Materials Required
| Tools & Materials Required | Description | Suggested Details |
|---|---|---|
| Canvas | Choose based on budget and size needs | Good quality (e.g., Premiere Line), medium to large size |
| Spackle | Lightweight compound | One-gallon container covers medium-sized canvas |
| Spreading Tools | A variety of tools for spreading and texturing | Large joint knife ($3-5), small plastic spatulas, metal spatulas, paint mixer tool, optional kitchen tools for unique patterns |
| Protection Materials | Materials to protect the workspace | Large cardboard pieces, drop cloth, or old newspapers |
Step-by-Step Process
1. Base Layer Application
- Spread spackle evenly across the canvas
- Use the metal spatula to put spackle on the joint knife
- Apply steady pressure for even coverage
- Switch between large and small tools as needed
2. Texture Creation
- Add extra spackle in specific areas
- Use the paint mixer tool in tapping motions
- Create peaks and valleys in the surface
- Work in different directions
- Mix smooth and textured areas
3. Drying Phase
- Let dry for 24-48 hours
- Check for air bubbles or gaps
- Make sure the texture stays stable
4. Paint Application
- Mix white and off-white paint for a subtle variety
- Thin paint with water for better coverage
- Paint smoother areas first
- Leave some textured spots in the original spackle color
- Spray lightly with water for the desired finish
5. Final Drying
- Allow 24-48 hours for complete drying
- Check for any loose pieces
- Ensure the paint is fully set
What are the Basic Techniques for Beginners
While preparing for the Canvas, I’ve learned that good prep makes all the difference. Here’s what I do:
- Wipe the canvas with a dry cloth to remove dust
- Apply a thin layer of primer if the canvas is unprimed
- Let the primer dry fully (about 2-3 hours)
- Check for any loose threads and trim them
- Make sure your canvas is flat and stable
Applying Spackle Through trial and error, I’ve found these methods work best:
- Start in the middle of the canvas
- Use small amounts of spackle at first
- Spread in thin, even layers
- Work in sections of about 12 inches
- Keep edges smooth to blend sections together
Creating Textures Here are my favorite ways to make patterns:
- Swirl patterns using a paint mixer
- Wave effects with a small spatula
- Dot patterns using the tool’s tip
- Ridge lines with the edge of a metal tool
- Random textures by tapping the surface
Drying Times Based on my experience, these factors matter most:
- Room temperature (70°F works best)
- Airflow (use a fan on low setting)
- Layer thickness (thin layers dry faster)
- Humidity (low humidity speeds drying)
- First layer: 4-6 hours
- Full piece: 24-48 hours
I’ve noticed that rushing the drying process often leads to cracks. Taking time between layers helps create better results.
Advanced Techniques for Finishing Look
1. Color Blending
- Mix white paint with off-white for depth
- Add water to thin paint slightly
- Paint smoother areas first
- Use light brush strokes
- Leave some texture in a natural spackle color
2. Surface Treatment
I’ve found these steps work best:
- Let spackle dry fully (48 hours)
- Test paint on a small area
- Use thin coats of paint
- Allow paint to settle in grooves
- Pat dry any paint pools
3. Adding Special Effects
Here’s what works for me:
- Light sanding for an aged look
- Dry brush technique for highlights
- Gentle misting for a subtle sheen
- Small color accents in deeper areas
- Build layers of thin paint washes
4. Final Protection
For Lasting results:
- Wait 72 hours after painting
- Apply clear matte sealer if needed
- Keep piece away from moisture
- Handle edges with care
- Use proper hanging hardware
My top tip: Take photos between steps. This helps track changes and plan future pieces.
How to Prevent and Fix Common Issues
| Issue | Prevention Tips | Fixing Method |
|---|---|---|
| Cracking Problems | • Mix the spackle well before using • Keep layers under 1/4 inch thick • Let each layer dry before adding more • Work in a room between 65-75°F |
• Fill small cracks with thin spackle • Sand very gently if needed • Apply a light top coat over the area |
| Bubbles and Holes | • Stir spackle slowly to avoid air pockets • Apply steady, even pressure • Use clean tools for each application |
• Pop bubbles while spackle is wet • Fill holes with a small amount of fresh spackle • Smooth the area with a clean tool |
| Uneven Texture | • Use the same pressure throughout • Clean tools between applications • Work in good lighting • Check your work from different angles |
• Add a thin layer to low spots • Gently smooth high spots • Blend edges with light strokes |
| Poor Adhesion | • Start with a clean canvas • Don’t use old or dried spackle • Keep tools clean and dry |
• Remove loose areas completely • Clean the surface thoroughly • Apply fresh spackle in thin layers |
Can I Add Acrylic Paint to The Spackle?
From my many attempts at mixing paint with spackle, I’ve found it’s not the best idea. When you add paint to spackle, it changes how the material works in ways you might not want.
The spackle takes longer to dry, doesn’t stick as well to your canvas, and often ends up with an uneven look.
I’ve tested several ways to add color to spackle art, and here’s what works best.
- First, let your spackle design dry fully. This usually takes about two days. Then, use thin layers of paint on top of the dried spackle. I like to water down my paint a bit – this helps it flow into all the textures without hiding them.
- Another method I’ve had success with is painting the canvas before adding spackle. This lets color peek through in spots where you apply thinner layers of spackle. You can also add more paint on top once everything is dry.
- Trust me on this one – keeping your spackle pure and adding color later will give you much better results. This way, you’ll get the strong texture you want plus the colors you’re looking for without risking cracks or weak spots in your art.
Approximate Cost Analysis for Creating a Spackle Art
| Category | Item | Approximate Cost |
|---|---|---|
| Basic Materials | Canvas (medium size) | $30-40 |
| Spackle (1 gallon) | $15-20 | |
| Paint (white & off-white) | $10-15 | |
| Basic tool set | $10-15 | |
| Optional Tools | Metal spatulas | $8-12 each |
| Paint mixer | $5-7 | |
| Fine brushes | $8-12 | |
| Sealer | $10-15 |
| Project Size | Total Materials Cost | Number of Pieces Made |
|---|---|---|
| Small (12×16 inches) | $45-60 | 2-3 pieces |
| Medium (24×36 inches) | $65-85 | 1-2 pieces |
| Large (36×48 inches) | $90-120 | 1 piece |
| Money-Saving Tips |
|---|
| • Buy tools in sets instead of individually |
| • Share supplies with other artists |
| • Use leftover paint from other projects |
| • Look for canvas sales at art stores |
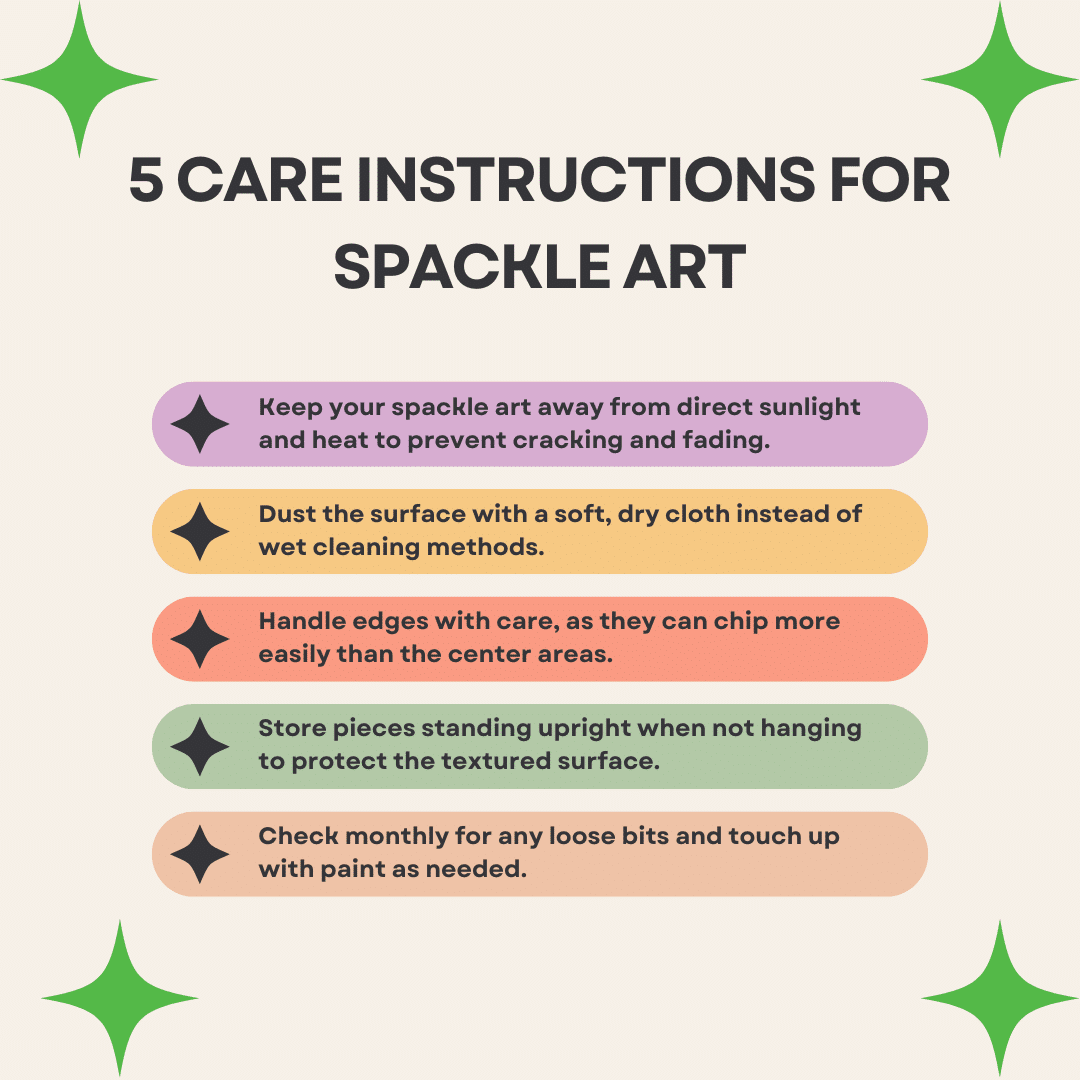
Certain Care Instructions to Follow
Conclusion
Making your own spackle art can create beautiful pieces for your home without spending a lot. I started this practice with just basic tools and learned so much along the way.
Remember, your first piece might take longer than you expect – and that’s okay! Focus on getting comfortable with the basic techniques before trying complex patterns. I still find new ways to work with Spackle every time I create.
Ready to start? Grab your basic supplies and try a small test piece first. Take photos of your progress, and don’t worry if it’s not perfect.
If you make something you love, share it in the comments below. I’d be happy to offer tips or answer questions about your spackle art project.
Frequently Asked Question
How Long Does Spackle Take to Dry on Canvas?
Spackle drying time varies by thickness and conditions. Thin layers on canvas dry in 1–2 hours; thicker applications may take several hours or overnight to dry completely.
Is Spackle Art Suitable for Outdoor Display?
Spackle isn’t intended for outdoor use and may degrade when exposed to moisture and temperature changes. To ensure durability, use materials designed for exterior applications for outdoor art.
How Do You Keep Spackle Art from Cracking?
Prevent spackle art from cracking by applying thin layers, letting each dry before the next. Mixing spackle with acrylic medium can improve flexibility and reduce cracking.

