The Ultimate DIY Guide to Painting Your Stairs
Want to give your staircase a fresh look? Painting stairs might seem simple, but it takes good planning and know-how to get it right. This guide walks you through the steps of painting stairs, from the first brush stroke to the final touch-up.
When done well, painting stairs makes a big change in how your home looks. Plus, it costs less than getting new stairs or paying someone else to do the work. But before you pick up that paintbrush, you need to know something.
We’ll show you what tools to pick, how to prep your stairs, and the best ways to paint. You’ll learn tips that make the job easier and help avoid common mistakes.
By the end of this guide, you’ll have the skills to turn your old stairs into something you’ll love looking at every day.
Getting Ready: Tips Before You Start Painting
Assessing Your Stairs
Let’s start by taking a close look at your stairs before painting. Take time to check each step for loose boards, protruding nails, or worn spots. A good inspection helps you plan your stair painting project better.
Look for:
- Splits or cracks in the wood
- Areas that feel spongy when pressed
- Spots where old paint is flaking
- Signs of water damage or rot
Fix these issues first – your painted stairs will only look as good as the surface beneath them. Small repairs now prevent bigger problems later.
Setting Up Your Workspace
A good setup makes painting stairs easier and safer. Create a clean workspace that lets you move freely while you paint.
Basic setup steps:
- Remove all items from stairs and nearby areas
- Sweep and vacuum thoroughly
- Place drop cloths on floors at the top and bottom
- Set up good lighting
- Keep windows open for fresh air
- Put tools within easy reach
Remember to plan how you’ll use the stairs while the paint dries. Consider making temporary arrangements if needed.
Each of these steps helps create better results when painting stairs. Taking time to prepare means less hassle during the actual painting process.
Staircase Basics: Understanding the Parts of Your Staircase

Anatomy of a Staircase
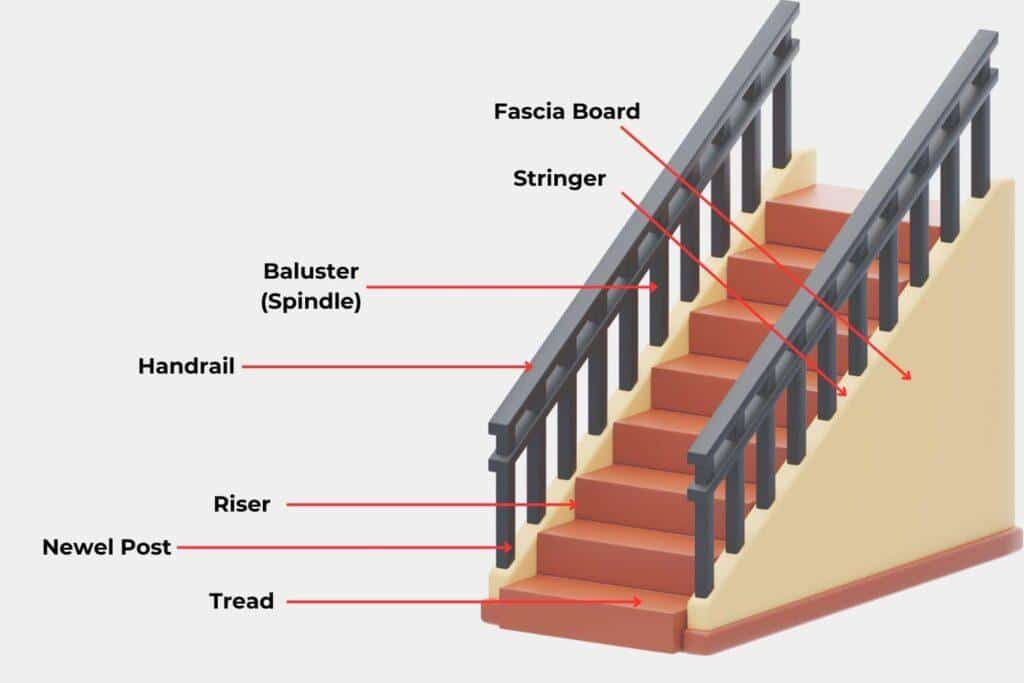
When painting stairs, knowing each part helps you do a better job. Let’s break down your staircase into its main pieces.
Main parts you’ll be painting:
- Treads: The flat parts you step on.
- Risers: The vertical boards between treads.
- Stringers: Sideboards that support the steps.
- Nosing: The front edge of each tread.
Think of your staircase like a puzzle. Each piece needs the right approach when painting stairs. The more you know these parts, the better your results will be.
Identifying Areas That Require Special Attention
Some staircase parts need extra care during painting. These spots often show wear first or prove trickier to paint well.
Key areas to watch:
- Handrails: People touch these often.
- Balusters: The posts holding your handrail.
- Corners where treads meet risers.
- Step edges where wear shows first.
- There are tight spots between balusters.
These spots matter most because they:
- Get touched frequently.
- Show signs of wear quickly.
- It can be hard to reach.
- It needs strong paint coverage.
- They might need touch-ups later.
When painting stairs, take extra time to work on these areas. A careful job here will make your whole staircase look better for a longer period of time. Remember that different parts may need different paint types. What works for treads might not suit handrails as well.
We reached out to our Australian friends, Imperial Painters Gold Coast for some tips. Since they are highly specialised in interior house painting we figured they could share a thing or two.
“When painting handrails, prep is absolutely paramount so be prepared to put some elbow grease in. Hand rails are high traffic and unlike walls, not only will you see imprecations, you will feel them. Start with some 120 grit sandpaper and then hit it with some 320 grit before applying any paint. After each coat move to 320 grit and this time lightly sand in-between painting. This will ensure you get that perfect silky touch when finished.
Your DIY of Painting Stairs: a Step-by-Step Guide
Let’s walk through the process of painting stairs with clear steps that help you work efficiently.
Tools and Materials Used
| Material/Tool | Purpose |
|---|---|
| 150-grit sandpaper | Smooth the wood surfaces |
| Vacuum | Clean up dust from sanding |
| FrogTape | Protect surfaces and create clean paint lines |
| Oil-based primer | Prevent stain bleed-through |
| Trim paint (e.g., Valspar Signature Semi-Gloss) | Apply final color and finish |
| Caulk | Fill gaps and seams for a smooth finish |
| Wood putty | Fill imperfections in the wood |
| Utility knife | Score tape for clean removal |
| Paintbrush (2.5-inch) | Apply primer and paint |
| Safety gear (mask, gloves) | Personal protection during work |
Step 1: Sanding Your Stairs
Start by sanding each part of your staircase. Work with 150-grit sandpaper to make surfaces smooth. Focus on:
- Rough spots in the wood
- Old paint edges
- Areas with shine from old finishes
- Spots between steps
- Side panels
Use steady, even strokes. Your goal is a smooth surface that paint can stick to well.
Step 2: Making Things Clean
After sanding, cleaning becomes key to painting stairs well:
- Use your vacuum with brush tools
- Wipe each step with a tack cloth
- Remove all dust from corners
- Check hidden spots near the edges
- Make sure no debris remains
A clean surface means your paint will stick better and look smoother.
Step 3: Taping for Success
Put tape on areas you want paint-free:
- Where steps meet walls
- Along step edges
- Next to carpet or trim
- Around any metal parts
- Between different colors
Press tape edges firmly. Good taping now saves fixing mistakes later.
Step 4: Adding Primer
Primer helps paint stick and last when painting stairs:
- Start at the top step
- Work down one step at a time
- Use even brush strokes
- Cover all bare wood
- Let each area dry fully
Good primer makes your paint job look better and last longer.
Step 5: Painting Your Stairs
Now comes the main part of painting stairs:
- Use quality paint for floors
- Paint in thin, even coats
- Follow wood grain patterns
- Keep wet edges as you work
- Allow proper drying time
Take your time. Good technique here shows in the final look.
Step 6: Making It Smooth
Fill any gaps or holes:
- Use wood filler for holes
- Put caulk in narrow gaps
- Let fillers dry completely
- Sand smooth when dry
- Wipe clean after sanding
These steps help create a finished look.
Step 7: Final Paint Coat
Add your last coat of paint:
- Check previous coats
- Fix any thin spots
- Keep strokes consistent
- Watch for drips
- Check coverage fully
This coat makes everything look complete.
Step 8: Taking Off Tape
Remove the tape with care:
- Score edges lightly
- Pull at an angle
- Go slowly and steady
- Watch for loose paint
- Fix any spots needed
Good tape removal keeps edges sharp.
Step 9: Clean Up Time
Finish with these steps:
- Fix any paint edges
- Clean any marks
- Remove drop cloths
- Check all surfaces
- Put tools away
A good cleanup makes your painted stairs ready to use.
For a more detailed tutorial, check out this YouTube video on how to paint stairs!
After the Paint Dries: Caring for Your Newly Painted Stairs
The First 24 Hours
Those first hours after painting stairs matter most. Your fresh paint needs time to set properly. Give the surface at least 4-6 hours before any light steps. During this time, keep pets completely away from the area.
If you must use the stairs, step gently near the edges. Going barefoot works best for these first trips. Moving items up or down should wait until the paint feels solid. Fresh air flow helps the paint cure better, so leave windows open if weather permits.
Remember to check the paint surface before regular use. A tacky feel means more drying time needed. Taking extra care now saves you from fixing problems later.
Regular Maintenance Tips
Simple care keeps your painted stairs looking fresh. A soft, damp cloth works well for basic cleaning. Strong cleaners can harm your paint job, so stick to mild options. Any spills need quick attention to prevent staining.
A weekly dusting helps prevent dirt buildup on your painted stairs. Plan for deeper cleaning each month. This regular attention helps spot any paint issues early. Small rugs on landings can catch dirt before it reaches the steps.
Keep basic cleaning supplies near your stairs for quick care. Write down the paint type and color used. This information helps when you need touch-ups later. Good care now means fewer fixes needed over time.
Dealing with Wear and Tear
Your painted stairs face daily use in some spots more than others. Step edges often show wear first. The middle of each step sees lots of foot traffic. Areas near handrails might need extra attention. The bottom steps often show signs of wear before upper ones.
Watch how your stairs wear over time. This helps you spot problem areas early. Consider removing shoes when using the stairs. Step pads might help in high-wear spots. Regular checks catch issues while they’re still small.
Your painted stairs can maintain their good looks with proper attention. Quick responses to small problems prevent more work later. Smart care habits help your paint job last longer.
Troubleshooting Common Painting Challenges

Dealing with Drips and Runs
Paint drips happen when painting stairs, but you can fix them. Small drips need attention while the paint stays wet. Simply brush them out with light strokes and work the paint evenly into the rest of the surface.
For dried drips, start with fine sandpaper. Sand the raised area until it feels level with the rest. Clean off any dust with a soft cloth. Then apply a thin coat of paint over the spot. Blend the edges into the rest of the step.
The key to preventing drips lies in your brush technique. Load less paint on your brush than you think you need. Make steady strokes when painting stairs. Check your work often in good light. Catch problems while the paint remains workable.
Correcting Uneven Layers
Uneven paint shows up as thick and thin spots across your stairs. Light catches these spots differently, making them stand out. Start fixes by letting the paint dry fully. Quick fixes on wet paint often make things worse.
Once dry, check the surface by running your hand over it. Mark spots that feel rough or bumpy. Use fine-grit sandpaper to smooth these areas. Work slowly and check often. You want the surface even, not damaged.
After sanding, wipe the area clean. Apply new paint in thin, even coats. Keep your brush strokes going in one direction. Let each coat dry between applications. Good lighting helps you spot places that need more attention.
Sometimes paint looks patchy because of poor prep work. Make sure you clean and sand well before any touch-ups. Good preparation helps paint stick better. Even coats come from good technique and patience.
Watch for these signs of trouble:
- Paint that looks thicker in some spots
- Areas that shine differently
- Rough patches you can feel
- Spots where old paint shows through
- Places where the paint looks darker
A steady hand and careful attention help prevent most paint problems. Take time to do the job right. Good technique beats rushing every time.
Conclusion
Giving old stairs new life with paint changes more than just their look. The steps we’ve shared help make this task less tricky. From picking the right tools to adding those final touches, each part plays a role in getting good results.
Making your stairs pretty much takes patience. The prep work sets the base for success. Each coat of paint brings you closer to the look you want. Plus, the care tips help keep your work looking nice longer.
Your stairs see steps every day. They connect parts of your home, and when painted well, they add style to these daily paths. The time you spend matters—good work shows in every step.
Now you know what makes stair painting work well. These skills help turn basic steps into spaces you’ll enjoy seeing each day.


