How to Read a Tape Measure Easily
Do you stare at your tape measure and wish it made more sense? I know how that feels. I used to mix up all those little lines and numbers, too.
Good news – reading a tape measure isn’t as hard as it looks. With a few simple tips, you’ll learn to make quick, right measurements every time.
In this guide, I’ll show you step by step how to read a tape measure. I’ll explain what each mark means and share some handy tricks I’ve picked up.
By the end, you’ll feel sure about measuring anything in your home or workshop.
Understanding the Parts
The tape measure might look simple, but it has several key parts that make it work well.
Let me break them down for you:
- The Case: This is the outer shell that holds everything together. I find the case really helpful – it protects the tape and fits nicely in my hand or pocket.
- The Blade: This is the long metal strip with all the markings. It’s the part that extends out when you measure something. The blade is made of metal, so it stays straight and won’t bend easily.
- The Hook: Look at the end of the blade – you’ll see a small metal piece. This hook helps you catch the edge of what you’re measuring. It also moves a tiny bit back and forth, which helps make your measurements more exact.
- The Lock: There’s a button or switch on the case that stops the blade from moving. I use this all the time when I need to keep a measurement or write it down.
- The Return Spring: Inside the case, there’s a spring that pulls the blade back in. This makes it easy to store your tape measure after you’re done using it.
Steps to Read a Tape Measure Easily
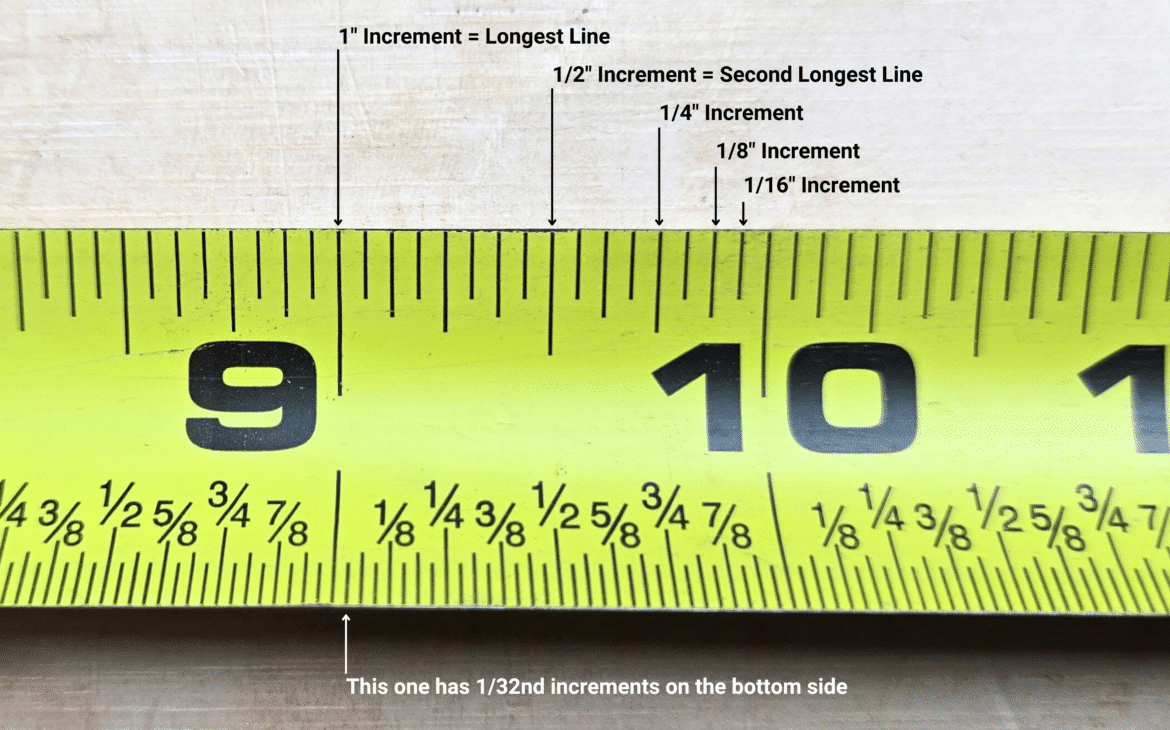
Let me walk you through a tested method I use to read measurements accurately:
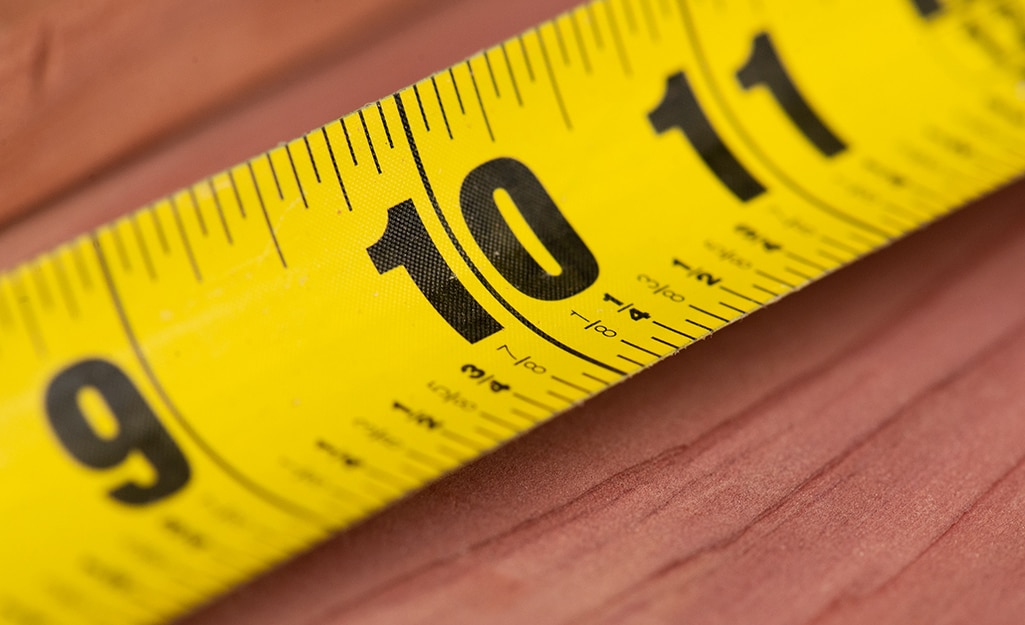
- Find the Inch Marks: Start by looking at the biggest lines on the tape. Each big line stands for one inch. You’ll see numbers next to these lines. I find it helpful to count these first before looking at smaller marks.
- Look at the Half-Inch Marks: Next, find the lines that are a bit shorter than the inch marks. These show half inches. Each half inch is marked at 1/2, 1-1/2, 2-1/2, and so on. I make sure to count these carefully.
- Check the Quarter-Inch Lines: Now look for lines that are shorter than the half-inch marks. These show quarter inches. Each quarter equals 1/4, 2/4 (or 1/2), 3/4. I always double-check these marks, to be exact.
- Study the Eighth-Inch Lines: These lines are even shorter. Each space between inch marks has eight equal parts. When I measure, I count these tiny lines from the nearest inch mark.
- Write Down Your Reading: Take your time to write the measurement. For example, if your mark falls on the third eighth-inch line after 5 inches, write it as 5-3/8 inches. I always check my numbers twice.
- Practice Regular Measurements: Start with bigger marks and work down to smaller ones. I started by measuring simple things like books or boxes. This helped me get better at reading the smaller marks.
- Use Good Light: Make sure you have plenty of light. I turn on extra lights or use a flashlight when I need to see the small lines better. This stops me from making mistakes.
Easy Steps to Read Imperial Measurements
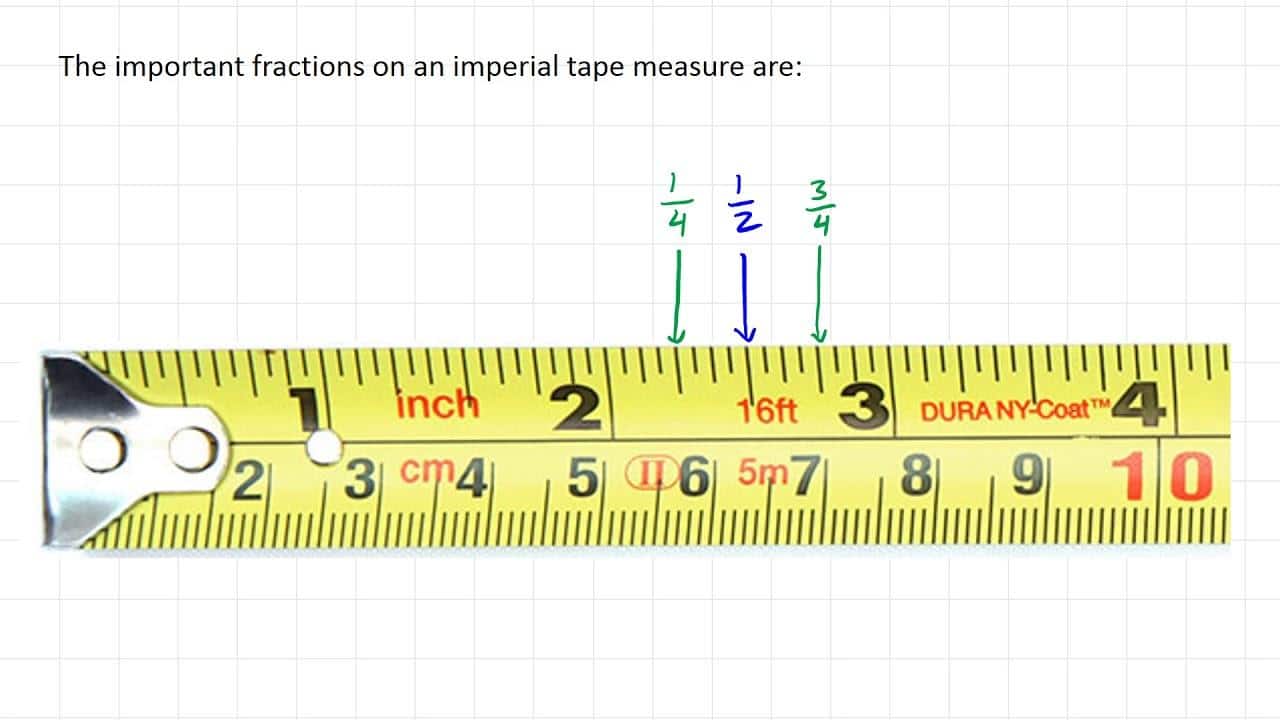
Reading imperial measurements is simpler than most people think.
Here are the steps I follow:
1. Start with the Biggest Lines
The tallest lines on the tape show whole inches. These lines reach across the full width of the tape. Each inch has a clear number next to it. I count these first.
2. Learn the Line Heights
Different line lengths mean different fractions. The size of the line tells me which fraction to read:
- Full-height lines = whole inches
- Medium-tall lines = 1/2 inches
- Medium lines = quarter inches
- Small lines = 8 inches
3. Count from Left to Right
I always start counting from zero and move right. The zero point sits at the metal hook end of the tape. Moving right helps me track the inches and fractions better.
4. Break Down the Fractions
When I see a mark between inches, I work step by step:
- First, I check if it’s past the half-inch mark
- Then I look at quarter-inches
- Last, I count the tiny eighth-inch marks
5. Read the Numbers in Order
I read the measurement like this:
- First, say the whole inches
- Then, say the fraction. For instance: “Five and three-eighths inches” for 5-3/8″
-
Make Simple Notes
When I write down measurements, I keep them clear:
- Use a dash between numbers
- Write fractions with a forward slash. Example: 5-3/8″ not 5 3/8″
How to Read Metric Measurements
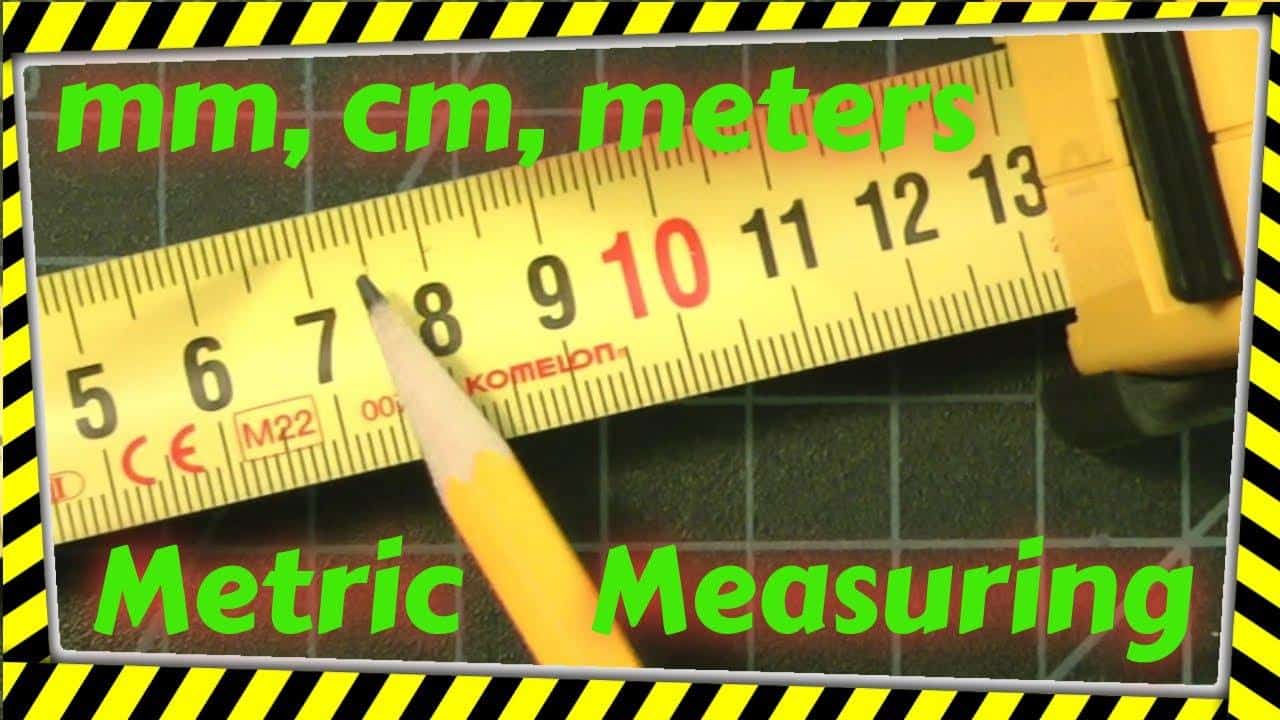
Reading metric measurements follows a simpler pattern than imperial. Here’s how I make sense of them:
- Find the Centimeter Marks: The big numbers on a metric tape show centimeters. Each centimeter equals 10 millimeters. I always start by finding these larger marks first. They make it easier to get my bearings.
- Count the Millimeter Lines: Between each centimeter, I see 10 small lines. Each tiny line stands for one millimeter. The spacing stays the same between all these lines. I count them one by one when I need an exact measure.
- Read the Numbers Left to Right: The numbers flow from left to right on the tape. Each big number shows how many centimeters I’ve measured. For example, the number 4 means 4 centimeters from the start.
- Add Up Your Measurement: I put the numbers together like this:
- First, read the last centimeter number before your mark
- Then, count the millimeter lines after it. For example, if my mark falls four lines after 3 centimeters, that’s 3.4 centimeters.
- Write Down Measurements: Clearly, I keep my notes simple and clear:
- Use a decimal point between centimeters and millimeters
- Write ‘cm’ at the end. Example: 3.4 cm, not 3,4 cm
- Remember Simple Conversions These help me check my work:
- 10 millimeters = 1 centimeter
- 100 centimeters = 1 meter
A Complete Conversion Between Imperial and Metric Systems
| Measurement | Inches | Centimeters |
|---|---|---|
| Inches to Centimeters | 1 inch | 2.54 cm |
| 2 inches | 5.08 cm | |
| 3 inches | 7.62 cm | |
| 4 inches | 10.16 cm | |
| 5 inches | 12.7 cm | |
| Centimeters to Inches | 1 cm | 0.39 inches |
| 2 cm | 0.79 inches | |
| 3 cm | 1.18 inches | |
| 4 cm | 1.57 inches | |
| 5 cm | 1.97 inches | |
| Common Fraction Conversions | 1/4 inch | 0.635 cm |
| 1/2 inch | 1.27 cm | |
| 3/4 inch | 1.905 cm |
Simple Tips for Converting
- Multiply inches by 2.54 to get centimeters.
- Multiply centimeters by 0.39 to get inches.
- Write down your math to avoid mistakes.
- Check your answer to ensure it makes sense.
- Use a calculator for exact results.
Best Advanced Reading Techniques
These methods have helped me become better at taking measurements. Let me show you how they work:
1. The Hook Technique
The metal hook at the end moves slightly back and forth. This small movement matters:
- Pull the hook when measuring the outside edges
- Push the hook when measuring inside spaces. This tiny shift makes every measurement more accurate
2. Making Marks for Long Measurements
When I measure something longer than my tape, I follow these steps:
- Make a small mark at the end of the tape
- Hold my finger on that mark
- Continue measuring from that point
- Add both measurements together
3. Reading Upside Down
Sometimes, I need to read the tape from above or below. Here’s what helps me:
- Look for numbers that read both ways
- Use my finger to mark the spot
- Turn the tape only if I need to
- Keep my eyes level with the marks
4. Using the Case Size
The case of my tape measure has its width printed. I use this when:
- Measuring tight spaces
- Adding the case width to the inside measures
- Checking short measurements
5. Working with the Lock Button
I make the most of the locking feature by:
- Locking the blade at exact measurements
- Using it to mark consistent lengths
- Keeping it locked when writing down numbers
6. Taking Care with Corner Measurements
For inside corners, I:
- Add the case width to my measurement
- Make sure the tape sits flat
- Check both sides of the corner
Top Interactive Learning Tools: One Must-Have
1. A Practice Board
- Mark exact measurements on a flat board
- Put dots at specific points
- Draw lines at set distances
- Label each mark clearly
- Keep it near your workspace
- Use it daily for quick checks
2. Learning Extras
- A small notepad for recording measures
- A pen to mark your spots
- Good lighting in your work area
- A flat, clean surface to practice on
How to Maintain Your Tap Measure
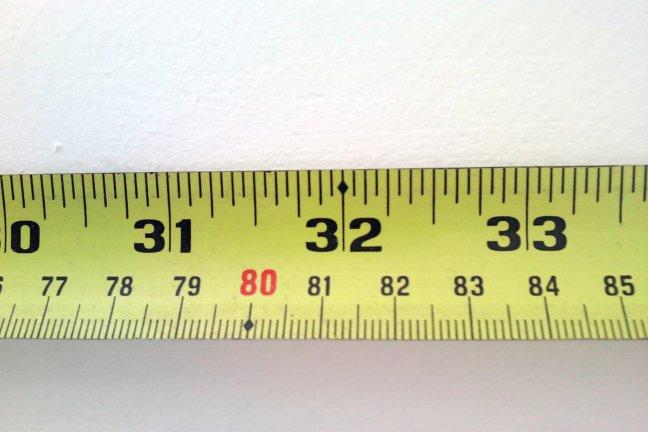
1. Clean It Often: I wipe my tape with a dry cloth after each use. If it gets dirty, I use a slightly damp cloth and dry it right away.
2. Watch the Blade Return: Let the blade slide back slowly into the case. I guide it with my hand to stop it from snapping back too fast. This keeps the blade from getting damaged.
3. Check the Hook: I look at the hook before each use:
- Make sure it moves freely
- Check if it’s still straight
- Tighten loose screws
- Clean out any dirt
4. Store It Right: Keep your tape measure in a good spot:
- Away from water
- Out of the direct sun
- In a dry place
- At room temperature
5. Handle with Care: Small habits make a big difference:
- Don’t drop it
- Keep it clean
- Store it flat
- Use the lock button
- Close it gently
Importance of Accurate Measurement
Getting measurements right matters more than you might think. Here’s why:
- For Home Projects Making exact measurements helps me:
- Cut materials the right size first time
- Save money by not wasting supplies
- Fit items perfectly in spaces
- Plan room layouts better
- For Cost Savings Good measuring saves both time and money:
- Less waste of materials
- Fewer do-overs needed
- Right amount of supplies bought
- Better project planning
- For Safety Correct measurements keep things safe:
- Proper fitting of safety equipment
- Right spacing for installations
- Secure mounting of items
- Stable construction work
Must-Known Application-Specific Guides
| Category | Tips |
|---|---|
| Woodworking | • Mark both ends before cutting |
| • Add extra length for saw cuts | |
| • Use the hook for outside edges | |
| • Check twice before any cuts | |
| Home Repairs | • Write down all numbers |
| • Include wall thickness | |
| • Measure at multiple points | |
| • Check for level surfaces | |
| Fabric Work | • Keep the tape straight |
| • Add seam allowances | |
| • Measure twice minimum | |
| • Mark points clearly | |
| Construction | • Use the same tape throughout |
| • Make clear notes | |
| • Check corner squares | |
| • Mark reference points |
Conclusion
I started out just like you – confused by all those tiny marks on a tape measure. But with these simple steps, I’ve gotten much better at taking accurate measurements.
Remember, reading a tape measure isn’t just about knowing the marks. It’s about making your projects turn out right and saving time and money along the way.
Now it’s your time to practice. Start with bigger measurements and work your way to smaller ones. Keep this guide handy, and don’t worry if you need to double-check sometimes – I still do!
Have questions about measuring something specific?
Drop a comment below. I’d love to help you get better at measuring and see your projects turn out just right.

