Wood Paneling Makeover: Ideas and How-To Guide
If you’ve got wood paneling in your home, you might be feeling like it’s a bit outdated. But don’t worry – updating those old wood panels doesn’t have to be hard or expensive.
In fact, with just a few simple tricks, you can change your space and make it feel fresh and modern.
In this blog, I’m going to show you how to give your wood paneling a makeover, ideas that’ll match your style, and breathe new life into your walls.
From painting to adding decorative touches, there are plenty of ways to update your panels without a major renovation.
So, let’s get in and see how easy it can be to turn your space into something you love again!
Top Wood Paneling Makeover Ideas
Want to give your wood paneling a new look? There are lots of simple and fun ways to make those old panels feel fresh. Let’s check out some easy ideas to update your space.
1. Paint for an Instant Refresh

Painting is the fastest way to change wood paneling. Select colors that match your room’s mood and style. Deep navy creates a bold statement, while forest green adds natural warmth.
Charcoal gray offers a sleek, modern touch for contemporary spaces. White paint can make small rooms feel larger and brighter.
2. Add Trim and Molding

Transform plain wood paneling by adding strategic trim. Crown molding can make ceilings appear higher and rooms more finished.
Baseboards create a clean line between walls and floors. Quarter-round molding adds subtle depth and visual interest to your space.
Consider mixing different trim styles for a custom look. Paint trim white or match it to your wall color for a seamless appearance.
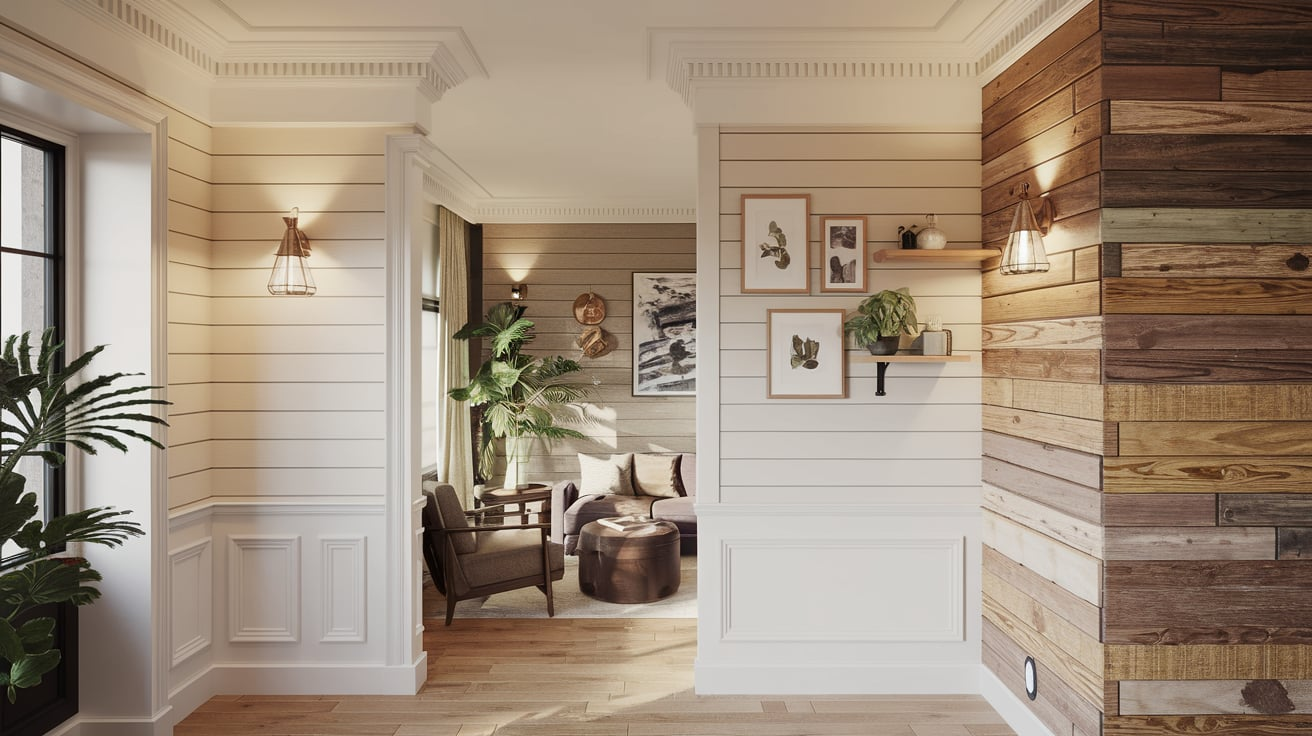
3. Create a Shiplap Effect

Turn traditional wood paneling into a trendy shiplap design. This technique works wonders in farmhouse, coastal, and modern interiors.
Space wooden planks slightly apart for an authentic look. Paint the panels white or choose a soft neutral color.
Measure carefully and use a level to ensure straight lines. Wood filler can help create smooth, professional-looking gaps between panels.
4. Install Wall Panels or Wallpaper

Peel-and-stick options make covering wood paneling simple and quick. Choose textured wallpapers that add dimension to your walls. Geometric patterns work well with wood textures.
Grasscloth wallpapers bring natural warmth and interesting depth.
Test samples first to ensure the adhesive works with your specific paneling. Some walls may need additional preparation before application.
5. Use Lighting to Highlight Texture

Lighting can completely transform wood paneling’s appearance. Wall sconces create dramatic shadows and highlight wood grain. LED strips work great for soft, indirect illumination.
Track lighting offers flexibility for highlighting specific wall areas.
Experiment with different light temperatures. Warm lights enhance wood’s natural tones, while cool lights create a modern feel.
6. Hang Art and Decorative Elements

A large artwork can completely change a room with wood paneling. Create gallery walls using frames of different sizes and styles. Mix metal and wooden frames for added visual interest.
Consider oversized mirrors to reflect light and make spaces feel larger.
Floating shelves work well to break up wood panel monotony. Display personal items or decorative objects to personalize the space.
7. Install Faux Stone or Brick Overlay

Faux stone panels offer a quick way to update wood paneling. Choose from various styles like slate, limestone, or brick.
These overlays work great in living rooms, home offices, and accent walls. Select colors that complement your existing furniture and decor.
Measure carefully and plan the layout before installation. Some panels require special adhesives or professional installation.
8. Change Panel Orientation

Switching panel direction can dramatically alter a room’s feel. Horizontal panels make rooms appear wider and more spacious.
Vertical panels create an illusion of higher ceilings. This simple change costs less than a full wall replacement.
Consider your room’s dimensions and natural light when choosing orientation. Narrow rooms benefit most from vertical panel lines.
9. Replace with Reclaimed Wood

Mix different wood tones for added depth and interest. This option works especially well in rustic, industrial, or modern farmhouse designs.
Source wood from local salvage yards or specialty wood suppliers. Ensure proper treatment and sealing to prevent moisture damage.
Steps on How to Update Wood Paneling
Now that you have some ideas, let’s walk through a simple step-by-step guide to help you update your wood paneling. This guide will make the process easy and help you get great results.
Tools and Materials Required
- Ladder
- Sandpaper
- Paint brushes
- Rollers
- Paint trays
- Primer
- Paint/stain
- Polyurethane
- Painter’s tape
- Drop cloths
- Safety glasses
- Work gloves
Step 1: Planning and Preparation

Transform your wood paneling by starting with careful planning. Measure your walls and assess the current paneling condition. Set a realistic budget for supplies like paint, primers, and tools.
Browse design websites for inspiration and create a simple mood board.
Gather essential items like drop cloths, painter’s tape, sandpaper, brushes, and safety gear. A thoughtful approach will make the entire project smoother and more enjoyable.
Step 2: Surface Preparation

Prepare your wood paneling for a stunning makeover by thoroughly cleaning and repairing it. Wash the panels with a mild detergent to remove dirt and grime.
After drying, inspect the surface carefully and fill any holes or cracks with wood filler. Sand the panels gently to create a smooth base, paying attention to uneven areas.
This crucial step ensures better paint adhesion and a professional-looking finish.
Step 3: Protective Finishing

Protect your hard work with a clear protective finish. Select from matte, satin, or glossy polyurethane based on your preferred look. Apply thin coats with a foam or synthetic brush, using long, smooth strokes.
Allow each coat to dry completely, lightly sanding between applications for a smooth finish. This final step not only enhances the appearance but also guards against everyday wear and tear.
Step 4: Painting or Staining

Choose a paint or stain that complements your room’s style and lighting. For painting, use angled brushes for edges and rollers for larger areas.
Apply paint in thin, consistent coats using W or M patterns. If staining, work with the wood grain and wipe away excess for a uniform look.
Two coats typically provide the best coverage and color depth. Take your time to ensure even application.
Step 5: Styling and Completion

Bring your wood paneling makeover to life with thoughtful styling. Reinstall trim and outlet covers carefully. Hang artwork that complements the new wall color and style.
Add decorative elements that enhance the room’s updated look. Step back and appreciate your transformation.
Maintain the new finish by cleaning gently and touching up as needed. Your refreshed wood paneling now stands as a beautiful, personalized feature in your home.
Check out the YouTube video for a more detailed overview:
Mistakes to Avoid While Updating Wood Paneling
Watch out for these pitfalls during your wood paneling makeover:
- Don’t oversand the panels: Sanding too much can damage the wood and make it harder for paint or stain to stick properly.
- Always use primer before painting: Skipping primer can lead to uneven results and peeling paint over time.
- Fill all gaps and cracks completely: Leaving gaps can result in a messy finish that won’t look smooth or polished.
- Take your time and don’t rush the process: Rushing through the steps can lead to mistakes and a less-than-perfect result.
- Avoid using the wrong paint: Not all paints work well on wood paneling, so make sure to pick one that’s meant for the job.
- Don’t skip the finishing coat: A good topcoat helps protect your work and makes the finish last longer.
Conclusion
A wood paneling makeover is a simple and budget-friendly way to refresh your home. With just a few steps, you can change your space into something you’ll love.
If you choose to paint, add trim, or use wallpaper, each method gives you the chance to make your room feel fresh and new.
Take your time, follow the steps, and soon you’ll have a space that matches your style. If you’re looking for more ideas or tips, I encourage you to check out my other blogs to help with your next project!