How to Use Hollow Wall Anchors the Right Way
Hanging stuff on drywall used to make me nervous. I’d stare at the wall, drill in hand, wondering if the shelf or mirror I was putting up would come crashing down.
Finding a stud was hit or miss, and most of the time, there wasn’t one where I needed it. That’s when I figured out how to use hollow wall anchors, a total game changer.
With the right anchor, I stopped second-guessing everything. No more leaning shelves or falling picture frames. Just solid, reliable support, even when there’s nothing behind the drywall.
If you’re unsure about drilling into drywall, this guide has you covered. I’ll show you how to use hollow wall anchors, select the right type, and install or remove them without damaging your walls.
Understanding Hollow Wall Anchors
A hollow wall anchor is a fastener used to hang items on drywall, plaster, or other hollow surfaces.
They’re designed to grip securely in hollow spaces where no stud or solid backing is available. By expanding behind the wall, they hold firm and prevent the anchor from pulling through.
These anchors come in various types, such as toggle bolts, molly bolts, and plastic sleeves. They’re often used to hang shelves, curtain rods, mirrors, or medium-weight fixtures.
They’re ideal for quick fixes around the house when stud support isn’t available. Most can be installed with basic tools and minimal wall preparation.
Types of Hollow Wall Anchors
Hollow wall anchors come in several types, each suited for different wall conditions and load needs. Choosing the right one depends on the weight of the item and the kind of wall surface you’re working with.
Plastic Expansion Anchors

Plastic expansion anchors are best for light-duty tasks in drywall or plaster. They expand as the screw enters, pressing against the inside of the hole for grip.
They’re commonly used for small items, such as picture frames, clocks, or towel hooks. When installed correctly, these anchors typically support weights ranging from 10 to 25 pounds.
Toggle Bolts

Toggle bolts feature metal wings that fold to fit through a drilled hole, then open behind the wall.
Once opened, they brace against the backside of the wall for a strong hold.
They’re ideal for medium to heavy loads, such as shelves, large mirrors, or wall-mounted TVs.
Depending on size, they can support 50–100 pounds or more.
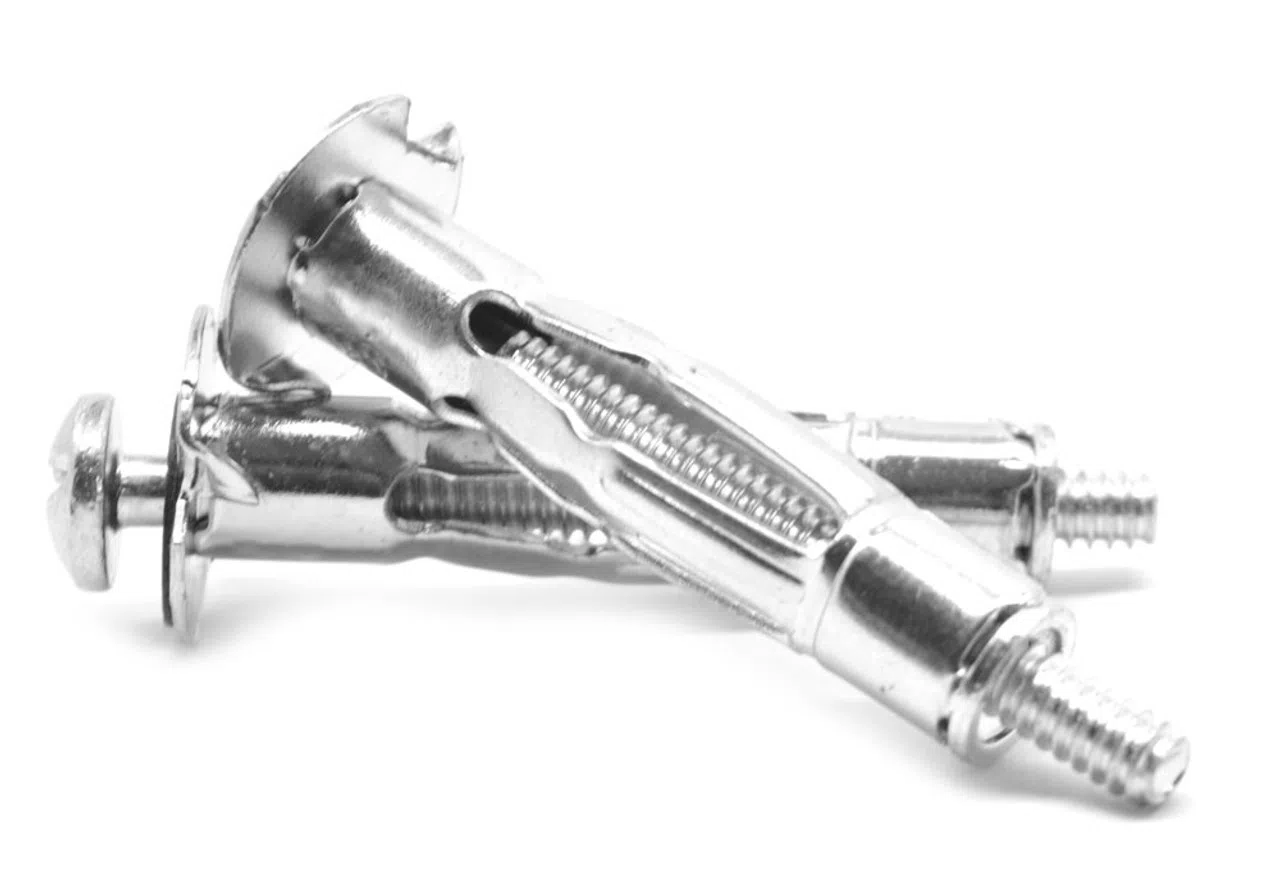
Molly Bolts

Molly bolts are metal anchors that expand behind the wall as the screw is tightened. They lock into place with a strong grip and offer more stability than plastic anchors.
Molly bolts are a good choice for medium-weight items, such as curtain rods or wall organizers. They can typically hold 25–50 pounds.
Self-Drilling Anchors

Self-drilling anchors feature a sharp tip and thread, enabling you to install them without the need for a separate drill bit.
They cut into drywall easily and work well for light to medium loads, such as key holders or racks.
Most can support 25–50 pounds, depending on the type of wall and the quality of the anchor.
How to Install Hollow Wall Anchors
Installing hollow wall anchors takes a few simple steps, but the method depends on the type of anchor you’re using.
Tools Required
Having the right tools can make installing hollow wall anchors easier and more secure. Some are basic household items, while others help speed up the process or handle tougher jobs.
- Screwdriver: For driving screws into anchors or removing them when needed
- Hammer: Helps tap anchors into place when required
- Anchor setting tool: Speeds up the process for molly bolts and some expansion anchors
- Power drill: Useful for making pilot holes or installing tougher anchors like toggle bolts
Method 1: With a Setting Tool
This method is commonly used for anchors that require expansion behind the wall. It’s fast, secure, and works well for Molly bolts or metal anchors.
Step 1: Use a drill to create a hole in the plasterboard that matches the size of the anchor.
Step 2: Push the drywall anchor through the hole until it’s flush with the wall surface.
Step 3: The setting tool has two plates that grip under the screw head. Pulling the handle draws the screw back, which expands the anchor behind the wall.
Step 4: Hook the setting tool onto the screw head already in the anchor.
Step 5: Firmly squeeze the handles to pull the screw and set the anchor securely inside the wall.
Step 6: Press the release lever to detach the tool from the screw.
Step 7: The anchor should now be tightly set in the wall, ready to hold weight.
Step 8: Remove the screw, place your fixture or bracket, and reinsert the screw to finish the job.
Using a setting tool gives you a stronger, cleaner result, especially for heavier items or thicker plasterboard. Watch the video for a full walkthrough and see each step in real time.
Method 2: Without a Setting Tool
You can still install many anchors using just basic tools and a little care. This approach is helpful for light-duty anchors or when tools are limited.
Step 1: Drill a pilot hole if the anchor requires one.
Step 2: Insert the anchor by pushing or lightly tapping with a hammer.
Step 3: Use a screwdriver to turn the screw and expand or secure the anchor.
Step 4: Stop once the anchor feels snug and doesn’t spin in the wall.
Step 5: Remove the screw if needed and attach your hardware.
Step 6: Reinsert and tighten the screw to complete the assembly.
Tips for a Secure Hold
Mounting items to hollow walls can be tricky, but the right setup keeps everything safe and steady. These simple tips will help you get it right.
- Use the right anchor for your wall and the item’s weight: Choose plastic anchors for lightweight items, and toggle or molly bolts for heavier ones. Always check the anchor’s packaging to make sure the weight rating matches your needs. For extra strength, anchor into a stud if possible.
- Match the anchor to your wall type: Not all walls are alike. Drywall, plaster, and paneling need different levels of support. Make sure your anchor is designed for the surface you’re working with.
- Avoid overtightening: Once the anchor feels snug, stop turning. Overdoing it can damage the wall or crush the anchor.
- Plan your placement carefully: Use a tape measure and level before drilling. A well-balanced layout keeps the load stable and reduces stress on any single anchor.
By choosing the right materials and taking a few extra minutes to plan, you’ll get a secure, long-lasting hold without damaging your walls
How to Remove Hollow Wall Anchors
Removing anchors requires care to avoid damaging the wall. The method you use depends on the anchor type and its installation method.
Unscrew and pull: Some plastic or threaded anchors can be backed out with a screwdriver.
Push through: For toggle bolts, remove the screw and push the wings into the wall cavity.
Cut or pry: Use a utility knife or pliers to trim or pry metal anchors from the surface.
Drill out: If stuck, carefully drill through the center to break the anchor free.
Patch the hole: Fill any leftover holes with spackle or filler, let dry, and then sand and paint.
Common Mistakes and Maintenance Tips
A secure setup starts with proper installation, but it doesn’t end there. Avoid these common issues and use a few simple maintenance habits to keep things solid over time:
- Drill a pilot hole when needed: If the anchor isn’t self-drilling, skipping the pilot hole can crack the wall or cause poor alignment.
- Fully expand the anchor: Some anchors need extra turns or a setting tool to lock in place. If not fully expanded, they can slip out.
- Avoid weak or patched drywall: Anchoring into damaged or repaired spots reduces grip. Pick a clean, solid section of wall instead.
- Check for movement or stress regularly: Look for sagging, tilting, or shifting. These signs can mean an anchor is working loose or stressed.
- Watch for cracks around the anchor: Even small cracks can grow over time, especially with heavier items. Address them early.
- Protect against moisture damage: In humid rooms, moisture can weaken drywall or cause rust. Use rust-resistant hardware and inspect it often.
- Replace worn or loose anchors: If an anchor feels weak or the wall is damaged, patch the hole and move to a sturdier spot.
Staying alert to these minor issues helps your wall anchors stay reliable and your fixtures stay safely in place.
Conclusion
Using the right hollow wall anchor makes hanging items safer and more reliable. This guide covers what they are, how they work, and provides a step-by-step installation process.
With these tips, you’re better prepared to handle light or heavy wall hangings without worry.
A little prep and the right tools go a long way toward getting a clean, secure result.
You don’t need to be an expert—follow each step and take your time. Even small improvements like this can make your space feel more put-together and functional.
Learned about how to use hollow wall anchors? Check out our other blogs for easy, hands-on tips that can help with other household projects as well.