DIY Board and Batten Shutters: Step-by-Step Guide
If you’ve ever looked at your windows and thought they needed a little more character, you’re not alone.
That’s exactly why I built my own DIY board and batten shutters to add warmth, texture, and style without spending a fortune.
This guide is based on real steps I followed and adjusted to fit my home. I’ll walk you through every part of the process, from cutting the boards to mounting them securely.
You’ll also find tips on finishes, installation, and long-term care. By the end, you’ll have shutters that look great and hold up over time.
It’s a project worth doing, and you’ll feel proud every time you pull into the driveway.
What Are Board and Batten Shutters?
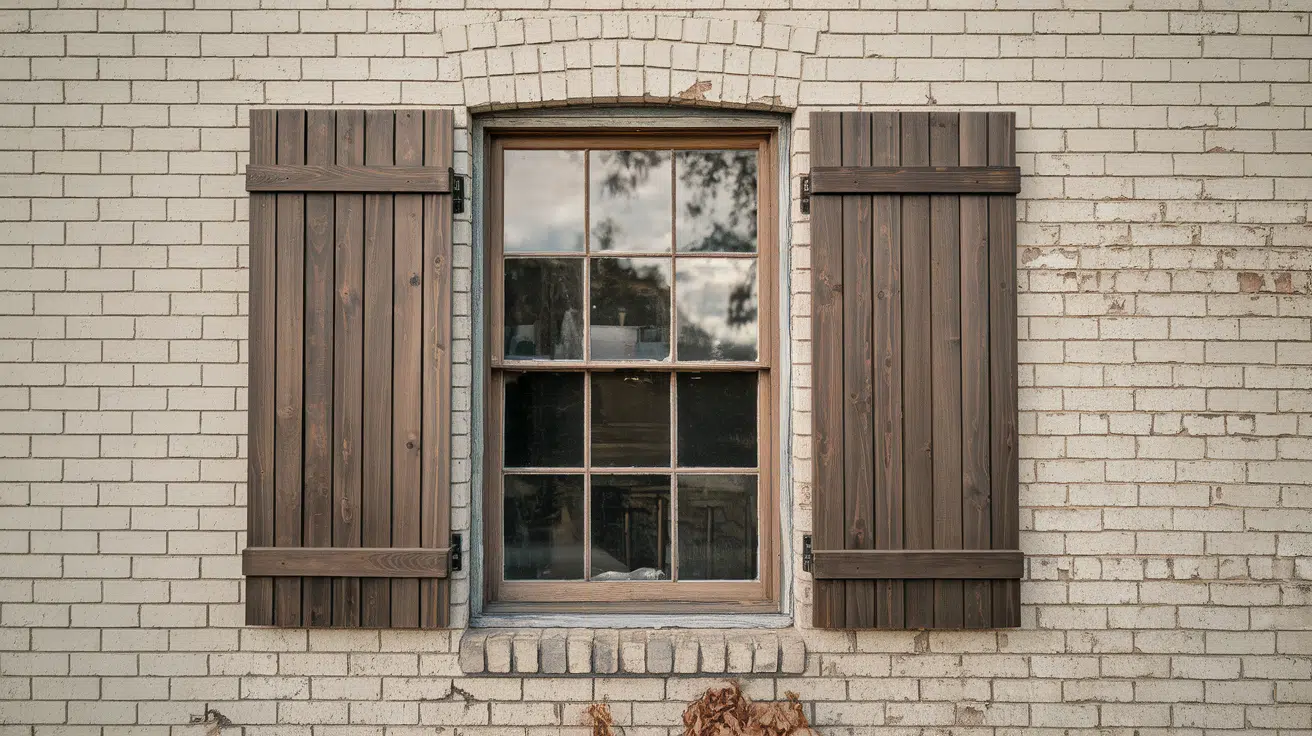
Board and batten shutters are simple, vertical wooden panels joined together by horizontal or diagonal crosspieces, known as battens.
You’ll usually see three or four vertical boards lined up side by side, held in place with two or more battens across the back.
These shutters exude a clean, traditional look that complements cottages, farmhouses, and even modern homes.
Some styles feature open gaps between boards, while others are closed and solid throughout. You can also choose between plain flat shutters or ones with a full outer frame for added structure and depth.
Materials You’ll Need
Here’s everything you’ll need to build strong, good-looking board and batten shutters that hold up outdoors.
- Table Saw or Circular Saw: For ripping and crosscutting the boards
- Drill: To install screws into the wood
- Hammer Drill: Needed if mounting shutters on brick
- Router: Optional, for chamfering the edges
- Clamps: To hold boards and battens in place while gluing
- Measuring Tape: For accurate board and batten sizing
- Sander or Sandpaper (120 and 220 grit): To smooth the boards and battens
- Paintbrush or Rag: For applying stain and finish
- Walnut or Dimensional Lumber (1×6 or 1×4): Used for the shutter body
- Wood Glue: Helps hold the battens firmly to the boards
- Wood Screws: Secure the battens to the vertical boards
- Dark Walnut Stain: Adds color and richness to match your exterior
- Outdoor Oil Finish: Protects against UV rays and moisture
- Hinges and Pintles: Provide a traditional shutter look
- Concrete Anchors: For mounting on brick walls
Step-by-Step Guide: Build Board and Batten Shutters
This five-step guide walks you through the full process from wood selection to installation. It’s beginner-friendly and easy to adjust for different sizes or styles.
Step 1: Choose and Cut Your Boards

Start by selecting your wood. Walnut is a good choice for hardwood, or consider dimensional lumber like 1×6 or 1×4 for a budget-friendly option. Cut three vertical boards to your desired shutter height.
If you’re using raw lumber, rip it to around 5¼ inches wide. Lay them out with small gaps between to get the full shutter width, then measure and cut two horizontal battens per shutter to match.
Step 2: Chamfer and Sand Each Piece

For a refined edge, use a router to chamfer all board edges before assembly. After that, thoroughly sand each piece.
Start with 120-grit sandpaper and finish with 220-grit. Focus on smoothing out any tool marks or rough edges to get a clean, even finish across all surfaces.
Step 3: Assemble the Shutters

Glue the battens across the back of the vertical boards, applying glue only where they make contact with each other. Clap the pieces tightly.
Then, drive screws up from the back of the vertical boards into the battens. Ensure your screws are short enough so they don’t protrude through the front.
Step 4: Stain and Seal for Weather Protection

Apply your choice of stain — in the video, dark walnut was used to match the brick exterior. Once dry, finish with an outdoor-rated oil sealer to protect the wood from the sun and moisture.
Reapply the finish as needed over time to prevent damage and extend the life of your shutters.
Step 5: Mount the Shutters to the Wall

Attach decorative hinges and pintles to give your shutters an authentic working look. Tape the pintle and hinge together to position them, and mark the drill holes.
Remove and drill using a hammer drill if mounting to brick. Secure with concrete anchors or standard fasteners, depending on the type of wall surface.
Check out the YouTube video for a better understanding:
Finishing Your Shutters
Once your shutters are built, adding the right finish protects them from the weather and gives them the style you want.
Paint, Stain, or Seal?
Paint gives full coverage and bright color, but may peel over time. The stain highlights the wood grain while providing solid weather protection.
Clear sealers protect without altering the look, making them great for those who prefer the natural tone. Always apply your finish after sanding but before full exposure to the elements.
You can stain or paint before or after assembly, but doing it before helps cover tight spots more easily and keeps edges sealed.
Styling Ideas
Your finish can shape the whole feel of your shutters. Go for a rustic look with dark stain and rough edges, or a coastal feel using white or pale blue paint.
A cottage style works well with pastel tones and visible wood grain, while a modern farmhouse looks great in black, deep brown, or weathered gray. Select a look that complements your home’s color and texture for the best results.
Common Mistakes to Avoid
A few small errors can lead to big problems later, especially when working with wood outdoors. Watch out for these common slip-ups.
- Skipping pre-drill holes: This can split the wood and weaken the connection between boards and battens.
- Forgetting to seal edges: Unsealed edges absorb moisture first, leading to early warping or rot.
- Using non-weather-resistant screws: Regular screws can rust fast; always choose stainless steel or coated outdoor screws.
Maintenance Tips
Taking care of your shutters doesn’t take much, but it goes a long way. A little attention each year helps prevent damage and keeps them looking fresh.
- Inspect yearly for fading or cracking: Check for signs of UV damage, peeling finish, or water stains.
- Clean off dirt and buildup: Use a soft brush or a damp cloth to remove grime, especially around joints.
- Reapply finish as needed: When the wood starts to dull or feel dry, lightly sand with 120 grit and reapply oil or sealer.
- Tighten loose hardware: Check hinges, pintles, and screws once a year to make sure nothing is pulling away from the wall.
- Look for moisture damage: Pay close attention to the bottom edges and corners where water tends to collect.
Conclusion
Making your DIY board and batten shutters is one of those projects that leaves you feeling both accomplished and excited about what’s next.
You’ve created something worthwhile, good-looking, and built to last, and you did it with your own two hands.
Everything in this guide is designed to help you skip the guesswork and avoid those minor mistakes that can slow things down.
Now, your home has a touch of custom detail that stands out in the best way. Keep your shutters clean, check them once a year, and they’ll serve you well for seasons to come.
If this project lit a spark, there’s plenty more you can build from here. Take a look at some of the other hands-on guides I’ve shared.