How to Paint a Ceramic Tile Fireplace: DIY Guide
I used to think the only way to fix old, dated fireplace tile was to remove it. But after trying a simple painting project, everything changed.
Painting the tile gave the space new life, no mess, no big budget. If you’ve been thinking about updating yours, it’s completely doable and way more manageable than it sounds.
In this post, I’ll show you exactly how the ceramic tile paint tile fireplace before-and-after process works, step by step. You’ll find supply lists, easy-to-follow instructions, and results.
This is one of those updates that may seem small but makes a significant difference. Once it’s done, you’ll be glad you gave it a shot.
Why Paint Your Fireplace Tile?
Painting your fireplace tile is a simple way to give your living space a fresh look without incurring significant expenses.
Instead of removing and replacing old tiles, you can use paint to refresh the surface for a fraction of the cost. It’s also a fast way to change the style, especially if your tile looks dated or doesn’t match your current setup.
You can go from beige and boring to bold and modern in just a few coats. Best of all, it allows you to choose a match that suits your room’s vibe.
If you prefer soft tones or dark contrasts, painting helps you achieve the look you want without a complete renovation.
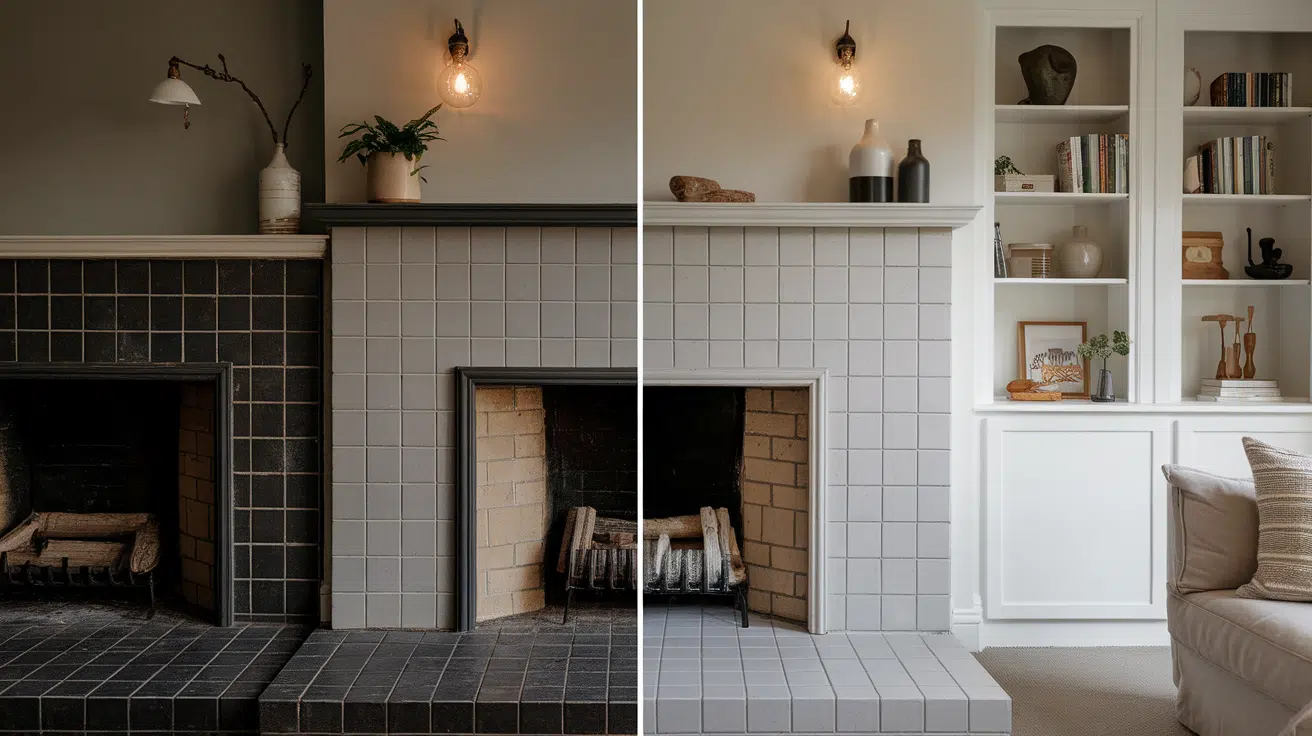
Before and After Transformations
A fresh coat of paint can make your fireplace tile look brand new. These examples demonstrate how much color alone can alter the overall ambiance of your space.
Example 1: White Over Brown Glossy Tile

Painting over dark brown glossy tile with white instantly brightens the fireplace. It creates a clean, fresh look that feels more open and matches modern or farmhouse-style spaces.
Example 2: Matte Black for a Modern Look

Matte black gives your fireplace a strong, bold appearance. It adds contrast in rooms with lighter decor and turns the fireplace into a sleek, eye-catching centerpiece without needing new tile.
Example 3: Soft Gray for a Neutral Room

Soft gray paint brings a calm, balanced look to older tile. It blends well with most color palettes, making the fireplace a seamless fit for cozy or classic interiors.
What You’ll Need
Before you start painting, gather all the right tools and materials. This makes the process smoother and helps your fireplace tile look better and last longer.
- Primer (tile bonding or stain-blocking)
- Tile-safe paint (latex, Fusion Mineral, or Rust-Oleum)
- Enamel or tile-specific paint (optional alternative)
- Heat-resistant top coat (optional but helpful for working fireplaces)
- 2″–3″ angled brush (for edges and grout lines)
- Small foam roller (for smooth, even coats)
- Painter’s tape (for clean lines)
- Drop cloths or plastic sheeting (to protect the floor and surroundings)
- Mild cleaner or degreaser (for surface prep)
- Sandpaper (220 grit for light scuffing, optional)
- Clean rags or tack cloth (for dust removal)
- Stir sticks and paint tray
Step-by-Step Painting Instructions
Follow these simple steps to get a smooth, lasting finish on your fireplace tile. Each step helps the paint adhere better and last longer over time.
Materials and Tools
Before you start painting, gather all the right tools and materials. This makes the process smoother and helps your fireplace tile look better and last longer.
- Primer (tile bonding or stain-blocking)
- Tile-safe paint (latex, Fusion Mineral, or Rust-Oleum)
- Enamel or tile-specific paint (optional alternative)
- Heat-resistant top coat (optional but helpful for working fireplaces)
- 2″–3″ angled brush (for edges and grout lines)
- Small foam roller (for smooth, even coats)
- Painter’s tape (for clean lines)
- Drop cloths or plastic sheeting (to protect the floor and surroundings)
- Mild cleaner or degreaser (for surface prep)
- Sandpaper (220 grit for light scuffing, optional)
- Clean rags or tack cloth (for dust removal)
- Stir sticks and paint tray
Step 1: Clean the Tile

Use a mild soap or degreaser to remove dust, grime, or buildup. A clean surface helps paint stick better and prevents flaking or uneven spots later.
Step 2: Sand (if needed)

Lightly scuff glossy tiles using 220-grit sandpaper. This helps the primer adhere to the surface and enhances the paint’s long-term adhesion, especially on smooth finishes.
Step 3: Apply Primer

Use a primer made for tile or glossy surfaces. It acts as a bonding layer, helping the paint adhere to the surface and reducing the likelihood of peeling or streaking.
Step 4: Paint Multiple Thin Coats

Apply 2–3 thin coats instead of one thick layer. Let each coat dry fully before adding the next to avoid bubbles, brush marks, or uneven coverage.
How Long Does Painted Tile Last?
Painted fireplace tile can last several years if it’s done right. On average, expect the finish to last 3 to 5 years with regular use.
The key to longer-lasting results lies in proper prep—cleaning, sanding, and priming the tile before painting. Using high-quality tile-safe paint and a heat-resistant clear coat also helps protect against chips, fading, or peeling.
Allowing the paint to cure fully and avoiding harsh cleaners will help it maintain its appearance. With proper care, your painted tile can remain fresh for years without requiring touch-ups.
Can You Paint Over Previously Painted Tile?
You can repaint the tile if the existing paint is still in good condition. Start by inspecting the surface—if the old paint is smooth with no flaking or bubbling, it’s safe to paint over.
Be sure to clean it thoroughly and lightly sand it to help the new layer adhere. Apply a fresh primer before painting again.
However, if the old paint is chipping or uneven, stripping it off first is a better option. Repainting over damaged tile won’t hold up and may peel or crack over time.
Use a small test spot first to check adhesion. If it peels easily, strip away the old layers before proceeding.
Tips to Avoid Peeling or Fading
Painted fireplace tiles can last a long time if you follow a few key steps. These tips help protect the finish from damage and keep the color looking fresh.
- Let Primer Fully Dry: Rushing the primer step can cause poor adhesion. Always allow it to dry completely before adding paint.
- Don’t Skip Sealing in High-Use Areas: If the fireplace is touched often or used regularly, a clear topcoat helps protect against chips and scuffs.
- Use Heat-Resistant Materials Near Direct Flames: Select paints and sealers that can withstand heat if the tile is located near an open fire or becomes warm during use.
Common Mistakes to Avoid
A few simple errors can lead to chipping, peeling, or a finish that doesn’t last. Avoid these common mistakes to get better, longer-lasting results.
- Using Wall Paint Only: Regular wall paint won’t stick well to tile and may peel quickly. Always use paint made for tile or hard surfaces.
- Skipping Primer: Primer helps paint grip the tile. Without it, the finish may look uneven or start to flake over time.
- Not Letting It Cure Fully: Even if the paint feels dry, it needs time to cure. Avoid touching or cleaning the surface too soon to prevent marks or damage.
Conclusion
Painting your fireplace tile may seem like a minor fix, but it can completely transform the mood of your room.
I’ve seen it turn dull spaces into cozy focal points without the stress of demolition. With the right prep, good paint, and a little patience, your tile can look brand new and hold up beautifully.
Now that you’ve seen how the ceramic tile paint tile fireplace before and after process works, you’ve got everything you need to get started.
Take it one step at a time, and don’t rush the drying. You’ll love walking into a space that finally feels like yours. If this project felt helpful, there’s more like it waiting in the next blog.


